
Introduction
This will be a series of 3 blogs describing a step-by-step approach to building and deploying GWT applications in the SpringSource dm Server™. The focus of the blogs will be as follows:
- Building and deploying the GWT StockWatcher sample app as a WAR file in dm Server, using the SpringSource Tool Suite to build it from scratch.
- Deploying with a "Shared Libraries" approach: How to remove the GWT dependencies from the WAR and deploy them as an OSGi bundle in dm Server.
- Deploying with a "Shared Services" approach: We convert the single WAR file into OSGi services which can be shared by other applications and hot-swapped out.
It is worth noting that I am not using the Spring Framework anywhere in these first two blogs. Integration between Spring and GWT is a subject in itself and I want to try to keep each blog as focused as possible. In the third blog, I will show how to use Spring to publish and consume OSGi services and how this can be integrated with GWT.
Background
The blog will take a practical step-by-step approach to building the GWT StockWatcher sample described here. The Google tutorial takes you through the steps required to build a GWT sample from scratch using RPC. I will be referring to pages in the tutorial as we go through and discussing the advantages/disadvantages to various approaches.
The blog assumes that you have an install of SpringSource Tool Suite 1.1.1 (I'm using the Eclipse 3.4 version), dm Server 1.0.0 and GWT 1.5. It also assumes that you have a good understanding of Java programming and a basic understanding of Javascript and Ajax.
For the purposes of the paths used in the demo, I created a new Eclipse workspace at /Users/bcorrie/gwt/workspace. I have included zipped up projects you can download below, which contain a GWT_ROOT_INSTALL variable I have defined. To use my projects, when you import them navigate to "Preferences" -> "Java" -> "Build Path" -> "Classpath Variables" and define your own GWT_ROOT_INSTALL.
Step 1: Create a new GWT project
The easiest way to create a GWT Eclipse project currently is to use the command-line tools provided with the GWT distribution: projectCreator and applicationCreator, with the -eclipse parameter as described here. These command-line tools create a simple Java project, skeleton project files, a Run Configuration to run your project in hosted mode and scripts for running or compiling the project outside of Eclipse.
One limitation of these tools is that they are prescriptive about where your source code goes. Your source code must be in a project sub-directory called /src, your client code must be in a package ending in client and your server code in a package ending in server. The projectCreator and applicationCreator cannot be configured to do otherwise because this is typically where GWTShell and GWTCompiler expect your code to be. Later on, we'll look at some ways of reorganizing the source code and tuning the Run Configurations to make them more flexible.
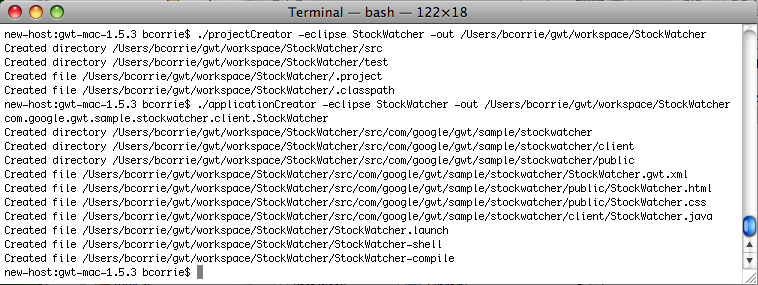
Once you've created the project on the command-line, import it into STS.
Use "Import" -> "General" -> "Existing Projects into Workspace".
Step 2: Go through the Google tutorial and develop the Java source code
Make sure you continue through "The basics" and go on to tackle the "Use remote procedure calls" section. The section on remote procedure calls will ensure that you have your stock price update code running on the web server which will be dynamically updating the web page every 5 seconds. This gives a simple but powerful demonstration of the capabilities of Ajax and the way in which GWT abstracts that behavior in Java code. You should end up with a project which looks something like this:
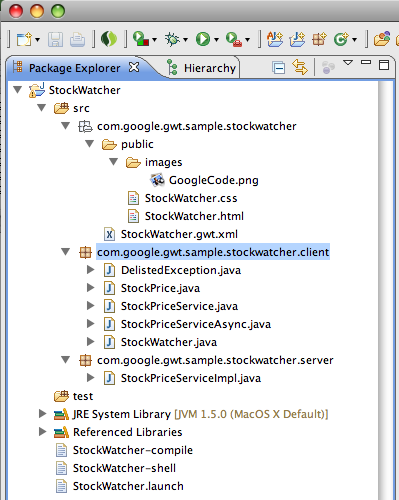
If you don't want to go through the process of developing the Sample code, you can download a zipped copy of my initial project here. To run with my project, you'll need to go through the following steps:
- Unzip and import the project ("Import" -> "Existing Projects Into Workspace")
- Define a GWT_ROOT_INSTALL variable as described in Background above
- Either modify the StockWatcher GWTShell.launch Run Configuration included, or create a new one with the following values:
- Right-click on the StockWatcher Project -> "Run As" -> "Run Configurations"
- For the "Main class", enter com.google.gwt.dev.GWTShell
- In "Program arguments", enter -out www com.google.gwt.sample.stockwatcher.StockWatcher/StockWatcher.html
- On Mac OS X only, in "VM arguments", enter -XstartOnFirstThread
- In "Classpath" -> "User Entries":
- add gwt-dev-<os>.jar (Eg. gwt-dev-mac.jar)
- add the StockWatcher Project /src folder, using "Advanced" -> "Add Folders"
Note that adding the /src folder to the classpath is a requirement of the GWTShell because it needs to have the metadata, such as its .xml file, on the Java classpath.
Step 3: Run it in hosted mode - check that it works!
Hosted mode allows you to run and debug your GWT application in its "pre-compiled" Java state before it's deployed. Read about hosted mode here. It's important to remember that the client classes of the StockWatcher application will eventually be compiled to javascript and html to be deployed on the client and the server classes will run as normal Java code on the server. Confusingly, some of the client code is used both on the server as support classes and on the client as compiled javascript. This will become clearer when we start splitting up the project later.
Either click the "Run" button with the StockWatcher project selected, or choose the Run Configuration you created in Step 2.
Note also that when you run in hosted mode, GWTShell creates a /www output folder into your project as well as a /tomcat folder to configure the embedded Tomcat. You'll see these if you refresh your StockWatcher project after testing it.
Step 4: Create a new Dynamic Web project
To create a WAR file, we need a Dynamic Web project… but we already have a Java project! So what's the most sensible way to manage this requirement? Google recommend generating the compiled code into the Eclipse Java project and then cut-and-pasting the output from the GWT compiler and the generated .class files into a separate WAR project. My preference is to set up the GWT compiler to build the deployed code straight into the WAR project and to also split up the source code into the two projects so that the client code is in the Java project and the server code is in the WAR Project.
So why not just copy everything over to the WAR project and run it all from there? Well, there are a number of reasons why I think it makes sense to maintain two separate projects:
Firstly, you don't want your hosted mode to generate its /www and /tomcat folders into your WAR project.
Secondly, generating javascript and html from the hosted mode project into the WAR project has the advantage of keeping both projects cleaner and separating concerns. It eliminates the duplication of generated code which can lead to versioning confusion, particularly given that the generated code is obfuscated.
Thirdly, as discussed in Step 1, GWTShell and GWTCompiler mandate that your source code is in a sub-directory called /src. This limits your WAR project's ease of integration with tools such as Maven and Ant.
Finally, it allows the Java code to also be separated so that you're not copying the redundant client code into the WAR file.
While it may seem like unnecessary extra effort, you'll see as we go forwards with the different approaches why breaking up the code early on makes it easier to deploy it as shared services later.
So let's create a new Dynamic Web project and at the same time, create a Server instance of the dm Server.

If you don't already have a dm Server instance in the workspace, you'll need to hit the "New" button next to the "Target Runtime" textfield and select "Create a new local server". Note that I've also chosen src/main/java and src/main/webapp for the "Java Source Directory" and "Content Directory" respectively. You can use the defaults, but these paths are recommended as they integrate well with build tools like Maven.
Next, we're going to split the Java code up between the two projects:
Note that this division of code is not essential if you are just going to export your GWT code as a vanilla WAR file. The simplest way to achieve that is to create your Java project as a Java EE Dependency of the WAR Project and Eclipse will turn your Java project into a JAR file which it adds to WEB-INF/lib in the WAR. However, the problems with that approach are that you package your redundant client code into the WAR and it makes it harder to split your application up into services later on.
So, we have 3 types of Java code in our project: code which is only ever compiled to javascript and html, code which is exclusively server-side and code which supports both purposes. It makes sense to move these last two types of code into our WAR project. It also makes sense to put our "common" classes (those used by the client and server) into a separate package (again, the need for this will become clearer in blog 3) which we'll call com…client.api. Finally, GWT requires that our Async interface is in the same package as the RemoteService interface, so refactor this into the com…client.api package. Once you're done, this is how it should look:
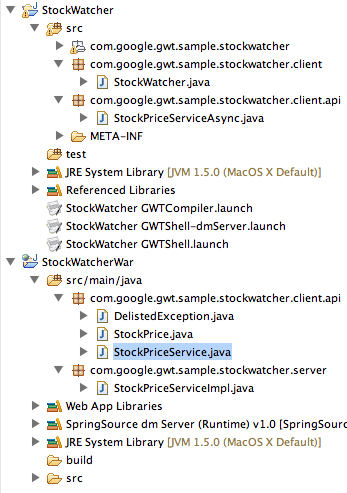
The last thing required in breaking up the code is to add the StockWatcherWar project to the build path of the StockWatcher project, so that it can access the classes in thecom…client.api package (Properties -> Java Build Path -> Projects -> Add…).
If you prefer, you can skip all of this arduous work by download a zip of my two finished projects, plus the various Run Configurations here (see Step 2 and Background for instructions on importing and setting up). If you have a clean workspace, you'll need to create an instance of a dm Server runtime (New -> Server -> SpringSource …) and you may need to select the server runtime for the WAR project in "Properties" -> "Targeted Runtimes" as it may not match mine.
Step 5: Configuring GWTCompiler to generate client code into the WAR project
We need to set up the GWT compiler to generate our code from the StockWatcher project into the StockWatcherWar project. This is virtually the same process as setting up GWTShell in Step 2. Either modify the StockWatcher GWTCompiler.launch script included with the project zip in Step 4, or create a new one with the following values:
- Right-click on the StockWatcher Project -> "Run As" -> "Run Configurations" and create a new configuration
- For the "Main class", enter com.google.gwt.dev.GWTCompiler
- In "Program arguments", enter -out <path to your workspace>/StockWatcherWar/src/main/webapp com.google.gwt.sample.stockwatcher.StockWatcher
- On Mac OS X only, in "VM arguments", enter -XstartOnFirstThread
- In "Classpath" -> "User Entries":
- add gwt-dev-<os>.jar (Eg. gwt-dev-mac.jar)
- add the StockWatcher Project /src folder and the StockWatcherWar /src/main/java folder, using "Advanced" -> "Add Folders"
Note that adding the source folders to the classpath is a requirement of the Google compiler.
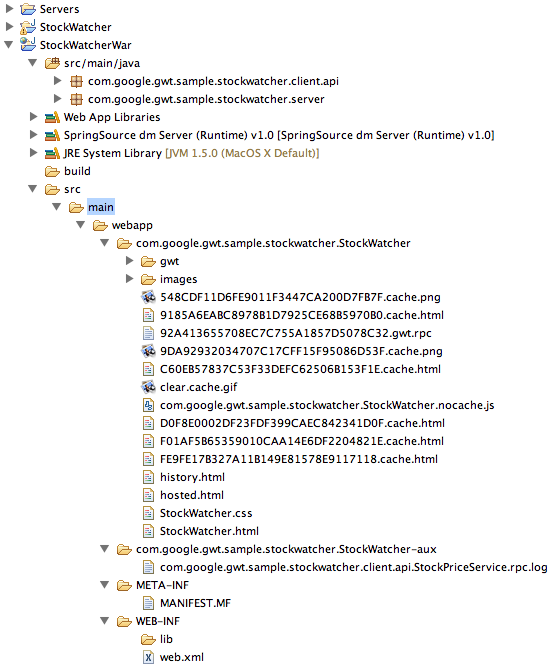
Now, run the compiler configuration you just created and refresh the StockWatcherWar project to see the generated files. You should see something like this:
Step 6: Configure the WAR project
You'll notice that the Google compiler generates the output into 2 folders reflecting the name of the GWT project. The compiler assumes that the target folder will be the same as the source folder and there is no way to disconfigure this, so you'll have to drag the generated files into the src/main/webapp folder and then delete the 2 Google directories. This is in fact what Google themselves recommend you do here.
Next, we need to add the required dependencies into our project.
- Add web module dependency gwt-servlet.jar ("Properties" -> "Java EE Module Dependencies" -> "Add External Jar"). Note that this module depends on the javax.servletAPIs.
- Modify the web.xml file as per Google's instructions. It's worth also adding StockWatcher.html to a <welcome-file-list> so that it comes up automatically on deployment (although this doesn't always work when deploying in Eclipse as the browser window usually opens before the server is fully initialized).
If you're having problems, have a look at my zipped projects from Step 4.
Step 7: Deploy onto dm Server in STS
Now that we've created our shiny new WAR project, let's deploy it to dm Server within STS. Simply right-click on the StockWatcherWar project and select "Run As" -> "Run On Server". If the welcome page doesn't come up automatically, either refresh the page or add /StockWatcher.html to the URL manually.
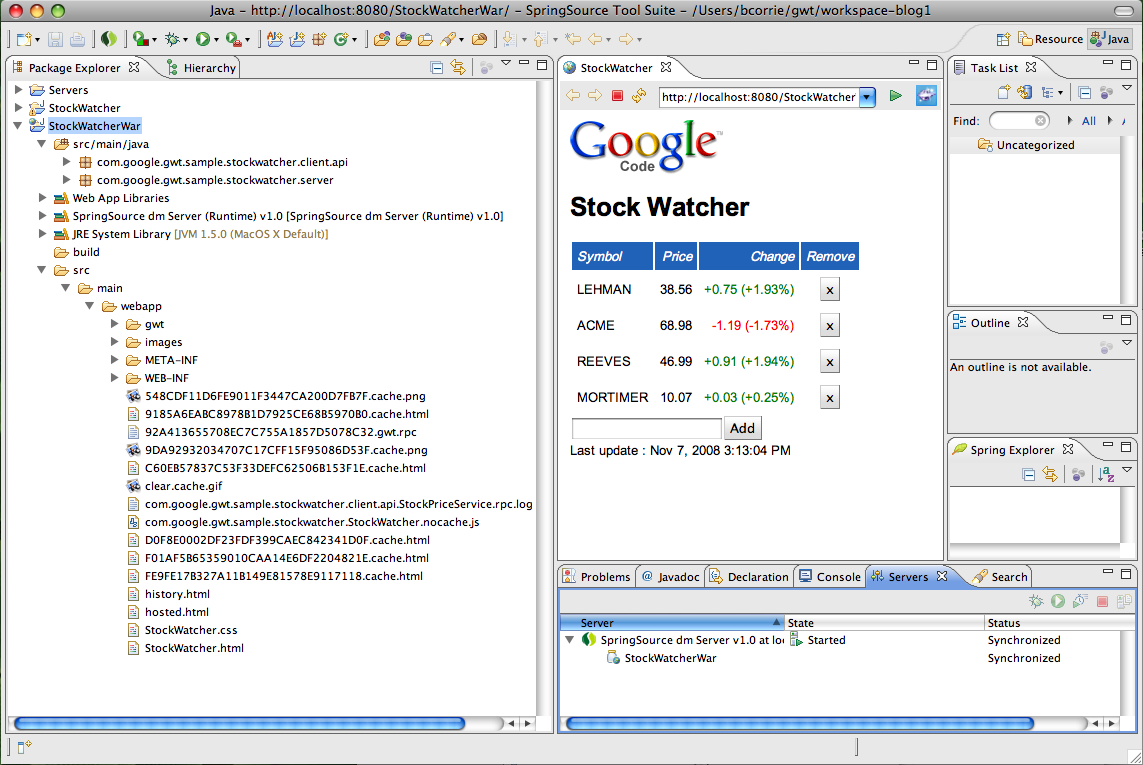
Once you've got the WAR project running successfully, you can configure hosted mode to use dm Server as its server, rather than its embedded Tomcat. To do this, all you need to do is to modify the Run Configuration for GWTShell and change the Program Arguments to -noserver -out www http://localhost:8080/StockWatcherWar/. This allows you to quickly test client-side changes. Server-side changes are automatically re-deployed to the running server. Nice!
It's important to mention that if you want to run in the embedded Tomcat hosted mode with the setup I'm advocating, you need to temporarily unselect dm Server as the Targeted Runtime in the WAR project's properties. This is because adding StockWatcherWar to StockWatcher's build path also pulls in dm Server runtime packages (such as javax.servlet) which messes up the build path of GWTShell.
Assuming that this worked, let's now package up our WAR and deploy it outside of the tooling.
Step 8: Export and deploy outside of STS
Firstly, we need to export our project as a WAR file. This is achieved with right-click on StockWatcherWar -> "Export" -> "Web" -> "WAR file". If you're wondering where the "Overwrite existing file" checkbox is, it's because there appears to be an Eclipse bug which hides it until you resize the WAR Export dialog. You can download my exported WAR here (note that it is zipped up).
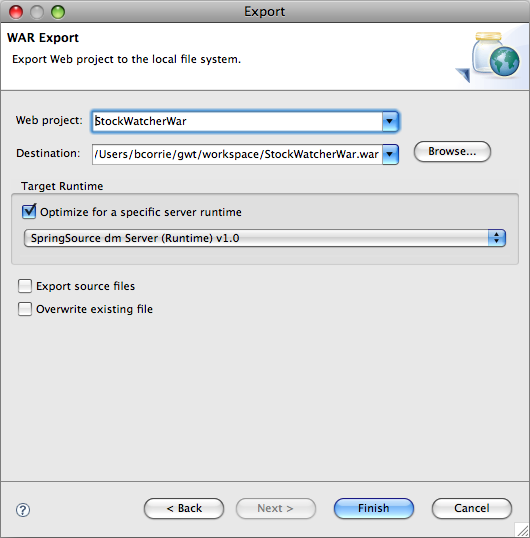
Once we've exported the WAR, we need to start up the dm Server outside of STS.
Firstly, make sure that the STS dm Server is stopped, otherwise they will clash over ports. Then, on the command-line, run the dm Server startup script. In my case, this isbin/startup.sh. You can add the -clean option to ensure that you're starting with a clean setup. You should see the message:
[2008-10-27 14:14:44.468] server-dm-10 <SPPM0002I> Server open for business with profile 'web'.
Once this has started successfully, open up the Admin console in a web browser, using the following URL:
http://localhost:8080/admin/web/applications/list.htm
The default username is admin and the password is springsource. For more detailed information on running and configuring dm Server, see the user guide.
You should now see the following:
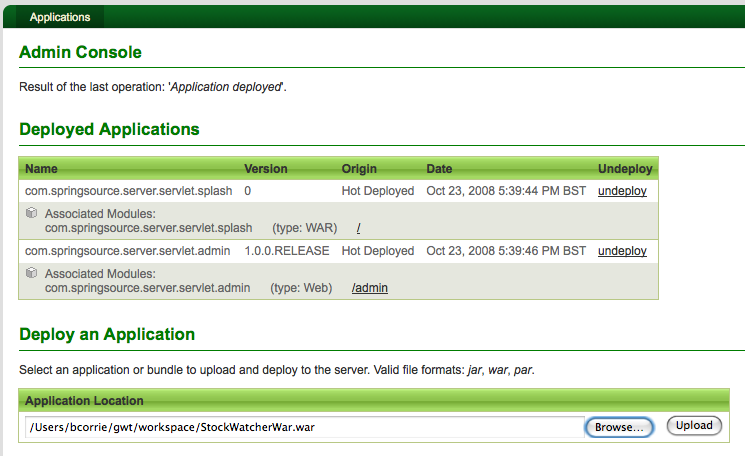
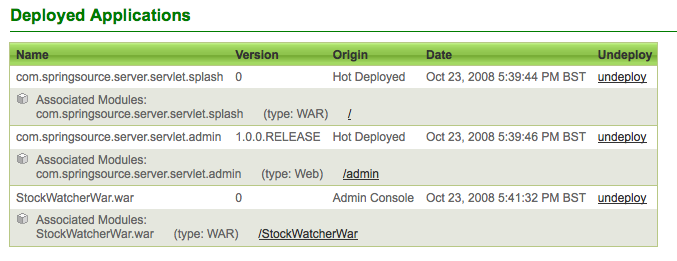
Browse for your exported WAR file in the "Application Location" textfield and then click on upload. This will upload and deploy the WAR file which should then appear in "Deployed Applications":
In the terminal output, you should see the following messages:
[2008-10-27 14:07:44.380] server-tomcat-thread-5 <SPSC1000I> Creating web application '/StockWatcherWar'.
[2008-10-27 14:07:44.396] async-delivery-thread-1 <SPSC1001I> Starting web application '/StockWatcherWar'.
[2008-10-27 14:07:44.684] server-tomcat-thread-5 <SPDE0010I> Deployment of 'StockWatcherWar.war' version '0' completed.
Finally, all that remains to do is to click on the /StockWatcherWar link shown above and you are now using your GWT application!
Looking forward to Part 2
In the next blog, we will look at how we can make use of the OSGi capabilities of dm Server to extract our GWT dependencies out of the WAR and turn them into a bundle which can be shared by all GWT applications running in the server. We'll also take a little peak under the covers to see our OSGi bundles interacting.