
Introduction
This is the final blog in a series of three describing a step-by-step approach to building and deploying GWT applications in the SpringSource dm Server™. The first blog looked at the process of creating a simple WAR file from a sample GWT application and the second blog turned the GWT dependencies into an OSGi bundle which can be shared across multiple applications. This final blog will further modularize our GWT sample into OSGi services using Spring Dynamic Modules. This should clearly demonstrate the benefits of OSGi modularity: The ability to remove and replace services at runtime, seamlessly managing multiple versions of bundles and how straightforward it is to deploy and manage using dm Server.
This is the only blog in the series to actually use the Spring Framework. Spring is used to configure the Spring Dynamic Modules and publish and consume the OSGi services. It also demonstrates one mechanism of bridging the world of Spring-managed beans with GWT remoting. However, I'm well aware that Spring/GWT integration is a significant topic in itself, so I'm purposefully keeping to the one simple solution here.
Please see Part 1 for the background to the GWT StockWatcher sample and the software I'm using.
Also note that you can skip all these tedious instructions and zoom on down to the downloads summary at the bottom.
Quick Catch Up
In Part 1, we built the GWT StockWatcher sample application from scratch as an Eclipse project and then generated the code into a Dynamic Web project which was then deployed into dm Server. Finally, we exported the Dynamic Web project into a WAR file and deployed it outside of STS.
In Part 2, we removed the GWT dependencies from the WAR file and turned them into an OSGi bundle which was installed into dm Server's repository. Having done that, we were then able to deploy any number of applications which use GWT remoting without having to include any GWT dependencies in the WARs.
In this final part, we're going to further modularize the application using Spring Dynamic Modules. A question you might well be asking is… why? It's not a bad question - no-one wants to unnecessarily complicate their code for the sake of it. In deciding whether a shared services approach is going to be helpful, you could boil it down some simple questions:
- Is there any part of my application which may need to be used by another application?
- Will different components in my application evolve at different rates?
- Is it possible that I may need to maintain multiple concurrent versions of the same component?
- Do I want to be able to deploy changes to components in my application while it's running?
Looking at our Stockwatcher application, it's currently limited to just one stock market. We know that there are many different markets around the world, so to make it more flexible, it would certainly make sense to give it the capability to access different markets, so that's what we're going to do - turn our stock markets into shared services. One bundle will contain a shared API which defines what a market can do. Other bundles can then be implementations of that API - maybe one for London and one for New York. We'll then have the capability to deploy the market we want, start it, stop it, undeploy it and replace it with another - all at runtime.
I'm conscious that the process of transforming a single WAR file into shared services will likely be a far more common experience than designing it in a modular way from the ground up, so this blog will further build on what we did in Part 2, rather than start over. You can download the Eclipse projects from Part 2 here and the finished projects from all the work in Part 3 here (you'll need to define GWT_ROOT_INSTALL classpath variable if you do). Hopefully, some of the suggestions I made in earlier blogs about dividing up the source code will start to finally make sense!
Step 1: Create a StockService API bundle
In order to create the London and New York StockWatcherService implementation bundles, we'll need a common API for them both. Obviously modularizing common code is good practice, but there is a more important reason why we need a separate bundle for the APIs. If you want to undeploy bundles in a running application in dm Server, you can safely remove code which implements a service, but you can't remove any interfaces which the remaining code has a dependency on. Therefore, it makes sense to put our service interface and common code into an API bundle which will be a dependency of the other bundles.
To create a simple bundle project in Eclipse, right-click and select New->Other->SpringSource dm Server->Bundle Project. This will create a skeleton MANIFEST.MF for you to get started with. There's no need for us to make this a Spring Dynamic Module as its sole purpose is to provide APIs and it won't have any bean instances of its own, so a vanilla bundle is fine.
- Specify StockWatcherServiceAPI as the project name
- If you prefer, you can configure the source directory by clicking the Configure Default… link in Project Layout. For consistency, I'd set it to src/main/java
- Set the bundle name and symbolic name to com.google.gwt.sample.stockwatcher.client.api and leave the version as 1.0.0
- The Module Type should be None and the Target Runtime should be your dm Server instance. If you don't have the option to select this, you'll need to click New and create one.
- You can now click Finish and you should see your new bundle project with a generated MANIFEST.MF.
Next thing to do is to move the API code into the new project. Drag and drop the entire com.google.gwt.sample.stockwatcher.client.api package from the StockWatcherWar project into the new bundle project. This is all the code which is shared by both the client and the server. It should contain the StockPriceService interface and the StockPrice andDelistedException classes. If this was successful, just about everything should be broken!
Next, let's think about what we need to export from the new bundle. Well, in this case it's simple - the APIs from one package. In the Runtime tab of the MANIFEST.MF editor, add the package to the Exported Packages list and save.
Now we need to think about which dependencies our API code requires, in other words, why it isn't building anymore. Clearly, the GWT bundle we created in Part 2 would be a good start. In the Dependencies tab, add the com.google.gwt bundle to the Import Bundle list (if it's not listed, it's likely not in the dm Server repository, which is explained in Part 2) and save. This should fix all of the build problems in the new project, but the other projects should still be broken. For now, let's ignore this as there's still more refactoring to do.
At this point, the the StockWatcherServiceAPI project should look like this:
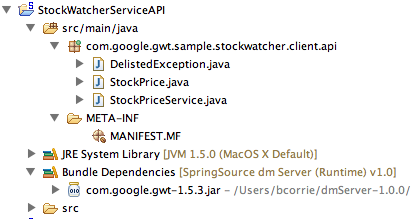
And its MANIFEST.MF should look like this:

Step 2: Create a StockPriceService service bundle
Having created an API bundle containing common code from which we can create multiple service implementations, let's create one of those implementations. We'll start with London.
Create a new Bundle Project called "StockWatcherServiceLondon" using the instructions in Step 1 and give it a bundle name of com.google.gwt.sample.stockwatcher.service.london
So let's think about what this bundle is going to need. It needs code to implement a London stock price service and a way of exporting that service to the OSGi registry as a shared service. The first part is a simple refactoring job as we already have some service code we can reuse. For the second part, making the bundle into a Spring Dynamic Module is going to be the easiest approach as it makes publishing and consuming OSGi services using Spring beans very simple.
First things first. Go back and look at the service implementation in StockPriceServiceImpl.java. You'll see that the StockPriceService code is tied into the RemoteServiceServlet. The servlet needs to remain for the remoting to work, but we need to extract the implementation code and use it to create the shared service. Later on in Part 4, the servlet will need to be adapted to consume the service we've created.
So, copy the com.google.gwt.sample.stockwatcher.server package from the StockWatcherWar project and paste it into the src/main/java of StockWatcherServiceLondon. You should now have a copy of StockPriceServiceImpl.java that can be refactored.
Delete extends RemoteServiceServlet, the RemoteServiceServlet import and the SerialVersionUID field as none of these are now required. When you save the changes, you'll see that we need to import some dependencies for the bundle - specifically, the API bundle created in Step 1.
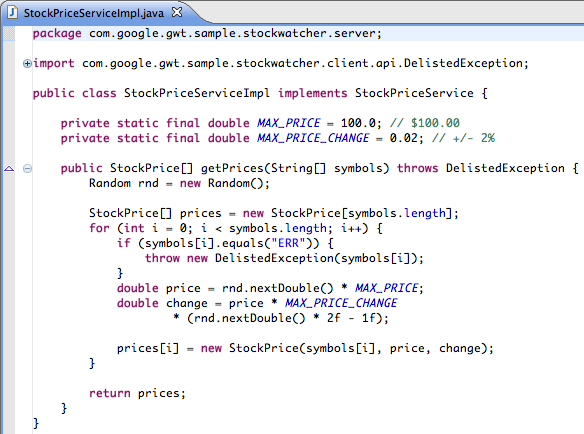
Edit MANIFEST.MF to add an Import Package for com.google.gwt.sample.stockwatcher.client.api. When you save, you should see an error in the manifest saying that the package can't be resolved. What have we done wrong?! The problem is that when you have imports and exports between bundle projects in Eclipse, you need to tell the tooling to allow the projects to share references. Right-click on StockWatcherServiceLondon and select Properties->Project References. Tick the box for StockWatcherServiceAPI and then OK. You'll then need to fake edit the MANIFEST.MF to pick up the change. You should now see StockWatcherServiceAPI listed as a Bundle Dependency. Let me make it clear that once a bundle has been exported from Eclipse, you don't need to peform this extra step - it's only when you want to create dependencies between bundles when they are just Projects.
You should still have one more problem to solve. Although the com..client.api bundle imports the com.google.gwt bundle, the import is private to that bundle. Any bundle which imports the com..client.api bundle doesn't inherit this dependency - it must be made explicitly. So in the MANIFEST.MF, add an Import-Bundle for the com.google.gwt bundle and save. If you still see a problem in StockPriceServiceImpl.java, you may need to try a fake edit on it, otherwise you've done something wrong.
![StockWatcherServiceLondon <tt alt=]() MANIFEST.MF</tt>" src="http://blog.springsource.com/wp-content/uploads/2008/12/picture-7d.png" alt="" style="margin-top: 0px; margin-right: 0px; margin-bottom: 0px; margin-left: 0px; padding-top: 0px; padding-right: 0px; padding-bottom: 0px; padding-left: 0px; border-top-style: none; border-right-style: none; border-bottom-style: none; border-left-style: none; border-width: initial; border-color: initial; ">
MANIFEST.MF</tt>" src="http://blog.springsource.com/wp-content/uploads/2008/12/picture-7d.png" alt="" style="margin-top: 0px; margin-right: 0px; margin-bottom: 0px; margin-left: 0px; padding-top: 0px; padding-right: 0px; padding-bottom: 0px; padding-left: 0px; border-top-style: none; border-right-style: none; border-bottom-style: none; border-left-style: none; border-width: initial; border-color: initial; ">
Brilliant! We're now half way to creating a shared service. This is how it should currently look:

The next step is to turn StockPriceServiceLondon into an OSGi service. We're going to do this using Spring Dynamic Modules. The principle of a Spring Dynamic Module is simple - you provide Spring configuration files in a /META-INF/spring folder and an ApplicationContext is created for you when the bundle is deployed. It's an excellent and very simple way of exporting Spring-managed beans as OSGi services.
So, create a /spring folder in /META-INF (right-click on /META-INF and select New->Folder). Then right-click on the new /spring folder and select New->Spring Bean Definition. You can call this whatever you like, but in my example it's called serviceLondon-config.xml. Enter the name and click Finish. We now need to define the StockPriceServiceImpl as a Spring bean, so that an instance of it is created when the bundle is deployed. If you're familiar with Spring, this should be easy. If you're not, you need to insert the following XML:
    <bean id="stockPrices"
class="com.google.gwt.sample.stockwatcher.server.StockPriceServiceImpl"/>
Finally, we need to export this bean as an OSGi service. We could do this in the same configuration file, but it's good practice to keep OSGi dependencies separate. So create another Spring Bean Definition called osgi-config.xml and this time, click Next and select the osgi namespace checkbox before clicking Finish. To export the bean as an OSGi service, insert the following XML:
    <osgi:service
interface="com.google.gwt.sample.stockwatcher.client.api.StockPriceService"
ref="stockPrices"/>
That's it! We now have a bundle which creates a shared service. Before we move on, it would be a wise idea to test it, to make sure it's behaving as we expect.
Step 3: Testing a shared service bundle
I'm going to describe two approaches to testing here: The quick and dirty method and a properly documented automated JUnit approach. Arguably this should be a blog posting all by itself, but I decided that it was an important enough subject to include here in detail.
Quick and dirty test:
The quick and dirty method is to hack up another Spring Dynamic Module which will consume the service, inject it into a test class and then just log the output. It's a good way of making sure the service works, but obviously it's not asserting anything and can't run within a test framework.
So we've already built one Spring Dynamic Module, so for this new TestConsumer module, I'm only going to highlight the differences. The module will need to import the com.google.gwt.sample.stockwatcher.client.api bundle (or package) and it will need some Java code to call the service client. You'll need 2 spring config files in the /META-INF/spring folder:
one for the test bean (eg. testConsumer-config.xml)
    <bean id="consumer" class="com.ben.consumer.Consumer">
<constructor-arg ref="priceService"/>
</bean>
and one for the <osgi:reference to consume the service (eg. osgi-config.xml)
    <osgi:reference id="priceService"
interface="com.google.gwt.sample.stockwatcher.client.api.StockPriceService"/>
In the Java code, simply call service.getPrices(new String{"foo", "bar"}) with some arbitrary strings and you should get back an array of StockPrice objects. If you want to log the output to System.err, this appears in dm Server's trace directory: <dm server install directory>/servicability/trace/<name of your test bundle>/trace.log.
To run your quick and dirty test in STS, you need to start dm Server. Then, drag and drop the entire StockWatcherServiceAPI project onto the server. When the project is deployed successfully, you should get a console message like this: Deployment of 'com.google.gwt.sample.stockwatcher.client.api' version '1' completed. Next, drag and drop the entire StockPriceServiceLondon project onto the server and wait for the deployment message. If that all initializes succesfully, drop your test project onto the server.

If you want to get the server to start clean each time (wipe the old trace output etc) then add a -Dcom.springsource.server.clean=true VM argument to the launch configuration, which you can find by double-clicking on the server instance, selecting Open Launch Configuration and clicking on the Arguments tab.
If this isn't working and you're not sure why, you can download my entire Eclipse workspace here.
Automated JUnit OSGi bundle test:
You can read about the support for automated integration testing of Spring Dynamic modules in the Reference Guide here. The AbstractConfigurableBundleCreator test class will start an OSGi framework, load all the required test bundles and then build your test code as an on-the-fly bundle and test it. If you think that this maybe sounds complicated, you'd be right. Not wanting you to feel short-changed, dear reader, I tried this for myself and I have to be honest, setting it up to get all of the required dependencies working was a bit of a pain. So here is my step-by-step pain-free guide to getting this up and running.
So out of the box, the test expects to get all of its dependencies from a local Maven repository. You can configure the test to use other types of dependency management, but for the sake of simplicity (heh!) I'm using Maven. Firstly, I installed m2eclipse which I got by adding http://m2eclipse.sonatype.org/update/ as an update site (Help->Software Updates->Available Sites->Add Site). It's advisable to unselect the optional Maven POM Editor, otherwise you'll get a bunch of unsatisfied dependency warnings and it won't install.
Create a new Java Project called StockWatcherServiceTest (with src/main/java as the source folder). Right-click on the project and select Maven->Enable Dependency Management to Mavenize the project. Next, create a new package (com.ben in my case) and copy the SimpleOSGiTest code from the Spring DM Reference Guide into a test class in that package (note that the test framework will not allow you to use the default package). This test class will help us to sanity-check that the dependencies are all set up correctly.
You'll notice that the test won't yet compile because we don't yet have the dependencies it needs. You need to specify the correct dependencies in the pom.xml file. To save you hours of fist-shaking and blaspheme, you can view my pom.xml file here (included in the full workspace download here). Once you have the dependencies working, see if you can spot the typo in the sample code, add the java imports and you should now have a test class which compiles.
Try running the test with right-click->Run As->JUnit Test. If you get a ClassNotFoundException, it's because the test is looking in the wrong place for the .class files. The easiest way to fix this is to override getRootPath() and return "file:./target/classes" or whatever path your .class files are being generated into.
Hopefully you should now have a green bar, which has at least proved that the test case started up the Equinox framework and was able to create an on-the-fly bundle successfully. Now we can create our proper unit test for the StockWatcherServiceLondon bundle.
Next step is to get the test dependency bundles loading and resolving correctly. To do this, the required bundles need to be installed in the local maven repository and specified in getTestBundlesNames() in the testcase.
Let's deal with Maven first: The pom.xml file created earlier should have downloaded the external dependencies, but we will need to add the com..client.api, com..service.london and com.google.gwt bundles to the maven repository manually. I did this for the bundles in the workspace by mavenizing the projects and creating a pom.xml file for each. There are a couple of gotchas here. Firstly, to get Maven to pick up the MANIFEST.MF files, you have to configure maven-jar-plugin in the pom.xml and point it at the location of the file. See mypom.xml here. Secondly, I discovered that the Spring dm Server proprietary Import-Bundle manifest entry doesn't work, so I had to change both projects to use a number of Import-Package entries instead. Once you have made these changes, open a command-prompt, change to the project directory and type mvn install. This will build the plugin and install it into the local maven repository. To install the gwt plugin we build in Part 2 I used the following command-line: mvn install:install-file -DgroupId=com.google.gwt -DartifactId=com.google.gwt -Dversion=1.5.3 -Dpackaging=maven-plugin -Dfile=<location of jar file>. It's worth checking at this point that the plugins built correctly by unzipping the jars in the repository and checking that the manifests look sane.
Once all of the test bundles are built and installed into the repository, they need to be specified in the testcase in a getTestBundlesNames() method. The syntax is described in thereference documentation and I specified 4 bundles: the com..client.api, com..service.london, com.google.gwt and javax.servlet.
Hopefully at this point, you'll be able to run the test without any actual assertions, but you should be successfully getting it to install and start all of the test bundles without any problems. If it's not working, a useful debug tool is to enable the Equinox telnet console and use that to check that the expected imports and exports all appear to be correct. If you're getting ClassNotFoundException, they're probably not. The way to enable the console is overriding createPlatform() and calling System.setProperty("osgi.console", "9000").
Once all of the bundles are resolving and starting correctly, you're finally ready to write some assertions! We need to consume the service that's exported by the com..service.london bundle. Copy the <osgi:reference line from the quick and dirty example above into an osgi-config.xml file and then add this to a getConfigLocations() method in the testcase, which returns a String array of config files. In this particular case, we're just going to make it a vanilla OSGi bundle rather than a Spring Dynamic Module, so no need to put the file in a /spring folder.
In an integration test, Spring will autowire all spring-managed beans into a testcase where there's an appropriate setter, so adding a setStockPriceService(StockPriceService s)method will inject the OSGi service into the test class. Once you have a reference to the service, you can start to assert things on it… finally!
Now, I realise that this is a very verbose description of what is ultimately a simple concept. Frankly, the best way to understand the configuration is to look at my Eclipse workspace here. I've described it in detail because it's one thing to see an example of something that works and it's quite another to understand the processes and pitfalls of how to get there. However, once set up, this is an extremely powerful way of integration testing bundle services in an automated manner.
Step 4: Consuming the shared service
In Step 2, we created an API bundle and a shared service bundle. We now need to refactor our other projects to work with these bundles, both at compile-time and runtime. At the end of Step 2, you'll have broken some dependencies in the StockWatcherWar and StockWatcher projects. Let's fix these first.
Starting with StockWatcher, it's broken because we removed the APIs from the WAR project it depended on. Change its build-time dependency so that it references the StockWatcherServiceAPI project (right-click->Build Path->Configure Build Path->Projects). There are no runtime dependencies for this project, so this is all that needs to be done.
StockWatcherWar is now going to need some modification to consume the OSGi service we created in Step 2. Currently, it still contains the service code that we copied over to the service bundle in Step 2, so one job to do is to remove this code and replace it with a call which delegates to the OSGi service instead. However, this means that we'll need to somehow pass a reference to the service bundle into the class… which also means that we actually need to get an instance of it from somewhere. Let's deconstruct this further.
Ok, so we already know how to get a reference to the service because we did it in the test methods above: Create a spring configuration file and add an <osgi:reference tag. So let's start by doing this. Create a new Spring Bean definition in /META-INF (right-click->New->Spring Bean Definition) call it whatever you like (eg osgi-config.xml) and make sure to select the osgi namespace checkbox to get the schema included. Add the <osgi:reference example code from Step 3 and you now have a Spring configuration file to consume the OSGi service. Should this configuration file go into a /spring subdirectory to make it a Spring Dynamic Module? The correct answer is no. We need to use this to bootstrap a specific flavour of ApplicationContext defined in web.xml, so we don't need another one being created automatically for us.
While we're on the subject, edit web.xml and add the following lines:
    <context-param>
<param-name>contextClass</param-name>
<param-value>com.springsource.server.web.dm.ServerOsgiBundleXmlWebApplicationContext</param-value>
</context-param>
<context-param>
<param-name>contextConfigLocation</param-name>
<param-value>/META-INF/*.xml</param-value>
</context-param>
This will bootstrap a dm Server ApplicationContext and use all of the xml files in /META-INF to configure it.
Next, we need to work out how to pass this Spring-managed service instance to the StockPriceServiceImpl class, in other words, a way of bridging the Spring and servlet worlds. One way to do this is to look up the ApplicationContext in the ServletContext and call getBean() on it. This isn't great because it requires us to hard-code a bean name into the service code and rely on dependency lookup. A cleaner mechanism is to use a Spring-managed ServletFilter, inject the service instance into it and then pass that through to the servlet using a static constant for the lookup. This is what I have implemented here:
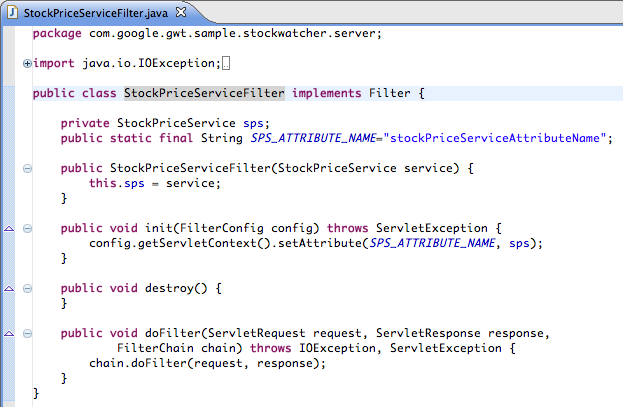
This class should be created in the StockWatcherWar project along with the StockPriceServiceImpl class. Also, don't forget to delegate to the FilterChain in doFilter().
If you've been following the instructions carefully, neither this class or StockPriceServiceImpl will compile at this point, due to the refactoring in Step 1. To fix this, you need to add the StockWatcherServiceAPI as a project reference to StockWatcherWar (right-click->Properties->Project References) and then add com.google.gwt.sample.stockwatcher.client.api to the Import-Bundle list. With this change, the code should now compile.
Now that we have a bridge between the servlet and the ApplicationContext, all we need to do is to create an instance of the ServletFilter and inject the service into it. Create another spring bean definition in /META-INF, call it whatever you like (eg. stockwatcher-config.xml). Copy the following configuration into it (assuming that the bean name for the OSGi service you used was priceService):
    <bean id="myFilter" class="com.google.gwt.sample.stockwatcher.server.StockPriceServiceFilter">
<constructor-arg ref="priceService"/>
</bean>
Finally, we need a little magic trick called a DelegatingFilterProxy. This class delegates all incoming and out-going servlet requests to a Spring-managed ServletFilter and is defined in web.xml. Copy this code into your web.xml (it assumes that the bean name for your ServletFilter is myFilter)
    <filter>
<filter-name>myFilter</filter-name>
<filter-class>org.springframework.web.filter.DelegatingFilterProxy</filter-class>
<init-param>
<param-name>targetFilterLifecycle</param-name>
<param-value>true</param-value>
</init-param>
</filter>
<filter-mapping>
<filter-name>myFilter</filter-name>
<servlet-name>StockService</servlet-name>
</filter-mapping>
The pieces of the jigsaw are finally coming together. You'll see that in the code above we also mapped the DelegatingFilterProxy to the StockService servlet. The web.xmlconfiguration is now complete.
All that remains now is to get hold of the service instance in the StockPriceServiceImpl code and use it!
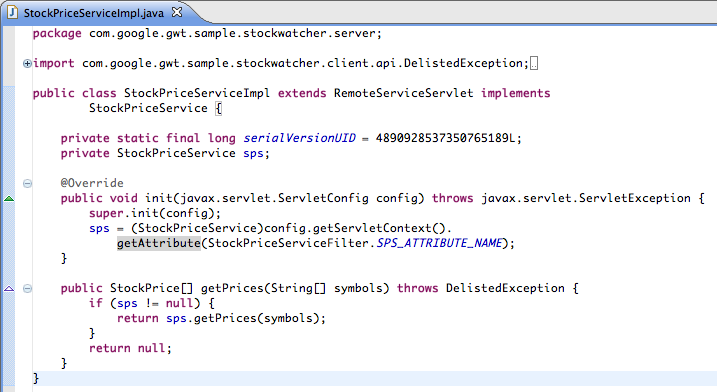
Given that we seem to have thought of everything, try deploying the WAR project to dm Server, following the same instructions used for the quick and dirty test in Step 3: Drop the API project onto the Server, then the London Service project and finally the StockWatcherWar project.
You should see the following:
[2008-12-19 17:46:23.504] onnection(4)-192.168.1.5 <SPDE0010I> Deployment of 'com.google.gwt.sample.stockwatcher.client.api' version '1' completed.
[2008-12-19 17:46:44.125] onnection(4)-192.168.1.5 <SPDE0010I> Deployment of 'StockWatcherServiceLondon' version '1' completed.
[2008-12-19 17:47:03.528] onnection(4)-192.168.1.5 <SPSC1000I> Creating web application '/StockWatcherWar'.
[2008-12-19 17:47:03.544] async-delivery-thread-1 <SPSC1001I> Starting web application '/StockWatcherWar'.
[2008-12-19 17:47:03.676] async-delivery-thread-1 <SPSC1005E> Failed to start web application '/StockWatcherWar': consult the Server trace.log for further details.
[2008-12-19 17:47:03.680] async-delivery-thread-1 <SPSC1002I> Removing web application '/StockWatcherWar'.
[2008-12-19 17:47:03.752] onnection(4)-192.168.1.5 <SPDE0011E> Deployment of 'com.google.sample.stockwatcher' version '1' failed.
Deployment failed? After all that? Gadzooks! What's wrong here?
Have a look at the trace file in <dm Server installation>/serviceability/trace/com.google.sample.stockwatcher-1/trace.log. You should see a ClassNotFoundException: org.springframework.web.context.ContextLoaderListener. The problem is that, now that we're in the world of explicit imports and exports, we need to explicitly import the bundles that give us the Spring support in the WAR file, so add the following bundles to the Import-Bundle entry: org.springframework.context, org.springframework.core, org.springframework.beans and org.springframework.web. It should now look like this:
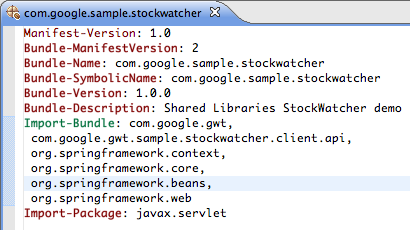
Now try to deploy it again. This time, I promise, it should work. Don't move onto Step 5 until it does.
Step 5: Celebrate
Raid the mini-bar, make a cup of tea, do a little dance or punch the air, whatever is appropriate for your culture and budget.
Step 6: Hot-swap different services
Now it's time to show off one of dm Server's party pieces.
First, let's create another stock market service we can swap in. This is not much more than a copy/paste job. Right-click on the StockWatcherServiceLondon project, select Copy and then Paste. Name the copied project StockWatcherServiceNewYork. The things to edit are as follows:
- MANIFEST.MF - update the bundle name and symbolic name from London to NewYork.
- serviceLondon-config.xml - rename, but no need to change any of the contents
- StockPriceServiceImpl.java - change the prices considerably so that it's obvious we're using a different stock market. I just added 500 to each price. Go Dow Jones!
Now for the fun part. Start up the StockWatcherWar with the London stock service as before and add a few stocks so that you can see it working:
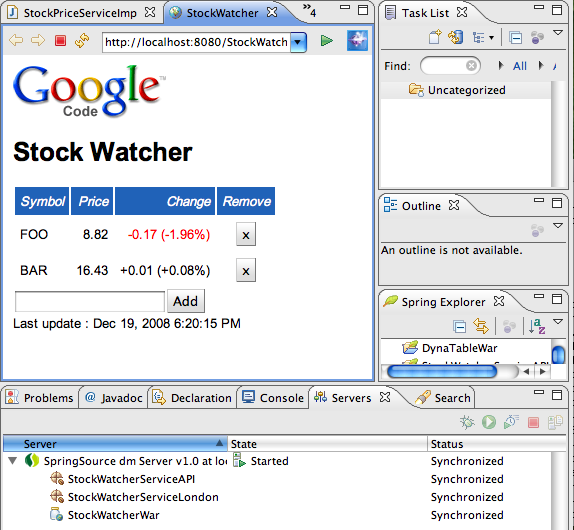
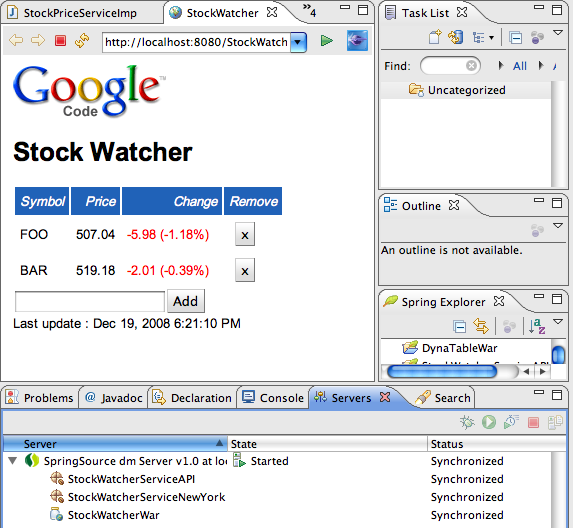
Then right-click on the StockWatcherServiceLondon entry in the Servers view and select Remove. This will undeploy the StockWatcherServiceLondon bundle from the server. You'll now see the application pause. The call to the remote service will block until dm Server has polled for a replacement service. So let's give it one. Take the StockPriceServiceNewYork project and drop it onto the server. Wait a couple of seconds and… hey presto… the application is now using the New York service (note the significant increase in prices).
Step 7: Deploy outside of STS
Deploying the application outside of STS is a simple matter of exporting the bundles. The technique differs depending on whether or not you are using Maven and whether Maven is automatically doing the job for you. Using Export->Jar File on a Maven project will fail unless you only export the /src directory. You'll also need to select "Use existing manifest from workspace" regardless of whether you are using Maven or not.
Once the bundles are exported, there are a couple of ways of packaging them and then a couple of ways to deploy them.
In terms of packaging, you can leave them as individual bundles, or you can combine them all into a single PAR file. A PAR file looks like a bundle which contains bundles and is described here. The significant benefit of using a PAR file is that runs its bundles in a "scope", so it is completely isolated from other bundles running in other applications. However, if you deploy the application as a PAR, you can't then hot-swap individual bundles within it.
Once you've decided on the deployment mode, you can either upload the file(s) using the admin console or you can copy them into the <dm Server installation>/pickup directory. The first time you do this, the server needs to be already running and you should copy the bundles into the directory in the correct order. dm Server remembers the order for the next time you start the server. The advantage of using this mechanism is that you can hot-deploy or undeploy individual bundles simply by moving them in and out of this directory.
Download Summary
I realise I've been scattering the downloads throughout the blog, so I thought I'd summarise them here. Also, apologies for zipping up small files, but the blogging tool won't allow me to upload raw XML or Java files for security reasons. Have fun!
- Entire Part 3 workspace projects, including both types of test mechanism are here.
- The exported bundles can be downloaded here.
- A PAR file of the project (with London market) can be downloaded here.