Chapter 11. Eclipse Designer(Eclipse 设计器)
Table of Contents
- Installation
- Activiti Designer editor features(特性)
- Activiti Designer BPMN features(Activiti设计器BPMN特性)
- Extending Activiti Designer(扩展Activiti设计器)
-
- Customizing the palette(定制面板)
- Exporting to custom output formats(输出定制的格式)
Activiti comes with an Eclipse plugin, the Activiti Eclipse Designer, that can be used to graphically model, test and deploy BPMN 2.0 processes Eclipse. The Activiti Eclipse Designer is started and maintained by Tijs Rademakers, Tiese Barrell, Ron van Liempd and Yvo Swillens.
Activiti携带了能够在Eclipse里面用来对BPMN 2.0流程进行图形化建模的Eclipse插件。Activiti Eclipse Designer由Tijs Rademakers, Tiese Barrell, Ron van Liempd 和 Yvo Swillens发起并维护。
Installation
The following installation instructions are verified on Eclipse Classic Helios.
下列安装指令在 classic Eclipse Helios 环境里面得到验证。
Go to Help -> Install New Software. In the following panel, click on Add button and fill in the following fields:
到 Help -> Install New Software.在下面面板里面,点击 Add 按钮并填充下面的字段:
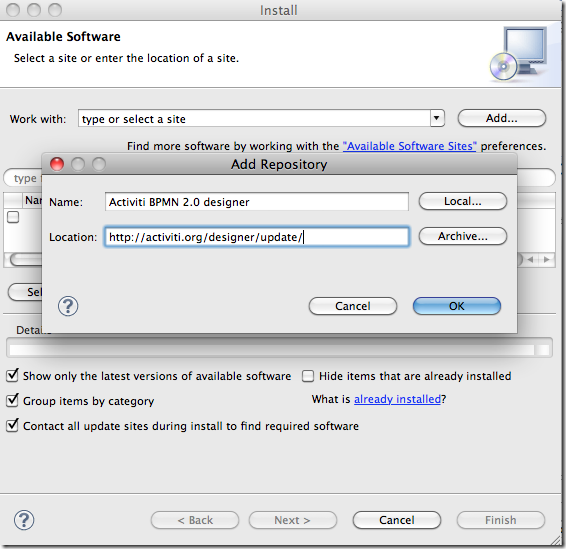
Make sure the "Contact all updates sites.." checkbox is not checked, because all the necessary plugins can be downloaded from the Activiti update site.
确保选择 "Contact all updates sites.."复选框,这是因为所有必要的插件从Activiti的更新站点下载。
Activiti Designer editor features(特性)
-
Create Activiti projects and diagrams.
建立Activiti项目和流程图。
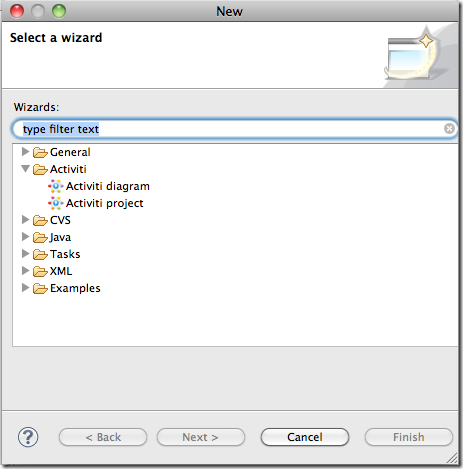
-
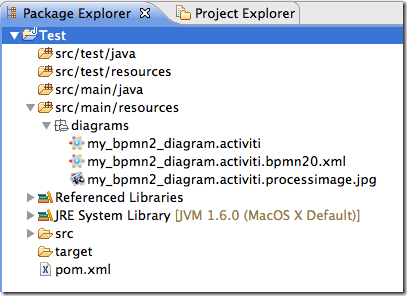
The Activiti project is generated as a Maven project. To configure the dependencies you need to run mvn eclipse:eclipse and the project dependencies will be configured as expected.
Activiti项目作为一个Maven项目而产生。为了配置所需的依赖,请运行 mvn eclipse:eclipse,那么项目依赖的配置将如你所愿。
-
A BPMN 2.0 XML file and an image of the process are automatically generated after each save of the Activiti diagram (the automatic generation can be switched of in the Eclipse preferences in the Activiti tab).
在Activiti流程图每次保存时将自动产生BPMN 2.0 XML文件和流程的图像(在Eclipse的preferences的Activiti标签页里可以关闭自动产生的选项)。
-
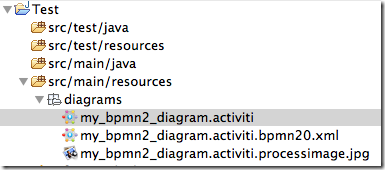
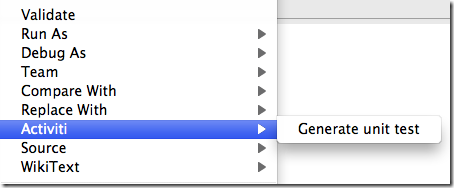
Generate a unit test (right click on a BPMN 2.0 XML file in the package explorer and select generate unit test) A unit test is generated with an Activiti configuration that runs on an embedded H2 database. You can now run the unit test to test your process definition.
产生单元测试(右击包导航器的BPMN 2.0 XML文件并选择产生单元测试(generate unit test))。Activiti配置产生的单元测试运行在嵌入式H2的数据库之上。现在能够运行单元测试来测试流程定义。
-
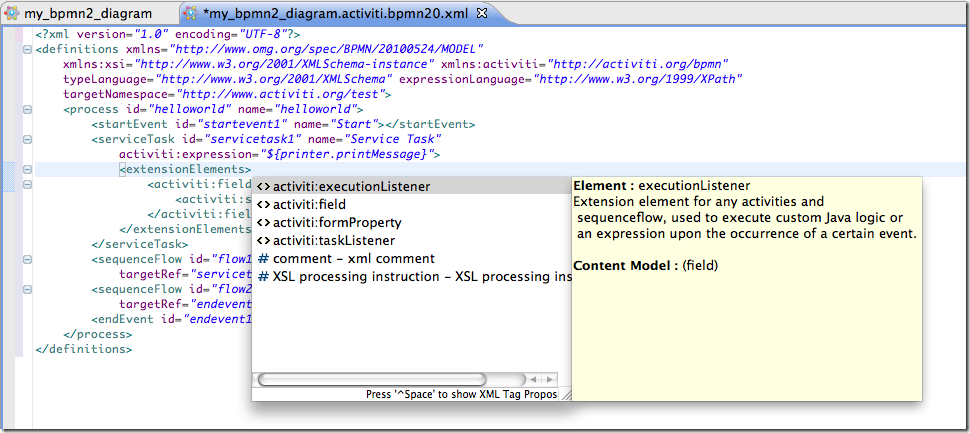
The BPMN 2.0 XML is opened in a Activiti XML editor which provides content assist. Note that there are 2 main XSDs configured, the BPMN 2.0 spec XSD and the Activiti extensions XSD. These two XSDs are not yet alligned in a good manneer.
Activiti XML编辑器提供内容辅助功能。可以在Activiti XML编辑器里面打开BPMN 2.0 XML文件。注意存在两种可配置的XSD:符合BPMN 2.0规范的XSD和Activiti扩展的XSD。这两个还没有以良好的方式齐头并进。
-
A basic validation is performed after each save of the Activiti diagram and the errors are mentioned in the Eclipse problem view.
当Activiti流程图每次保存时,完成基本的校验。校验错误显示在Eclipse 问题视图里。

-
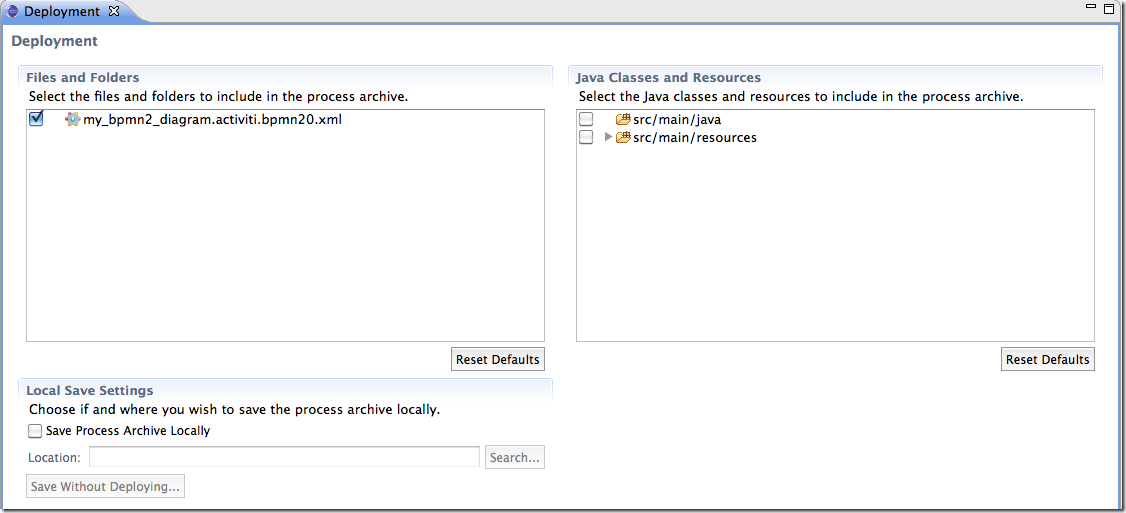
A basic deployment editor is available when right-clicking on an Activiti diagram in the package explorer. You see a Deployment property at the end of the pop-up items. The deployment editor currently supports saving a BAR file, and will be extended in the next release to also deploy the BAR file to the Activiti engine.
当右击包导航器的Activiti的流程图时,将显示一个基本的部署编辑器。在弹出项的的最下端将显示一个"Deployment"属性。部署编辑器当前支持保存为一个BAR文件。在下一个版本将扩展为将BAR文件部署到Activiti引擎。
Activiti Designer BPMN features(Activiti设计器BPMN特性)
-
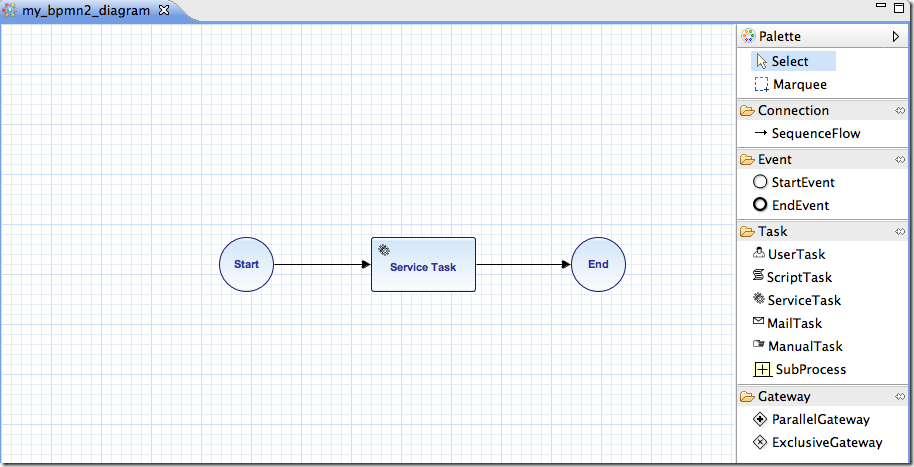
Support for start event, end event, sequence flow, parallel gateway, exclusive gateway, embedded subprocess, script task, user task, service task, mail task and manual tasks.
支持启动事件,结束事件,顺序流,并行网关,唯一网关,嵌入式子流程,脚本任务,用户任务,服务任务,邮件任务和手动任务。
-
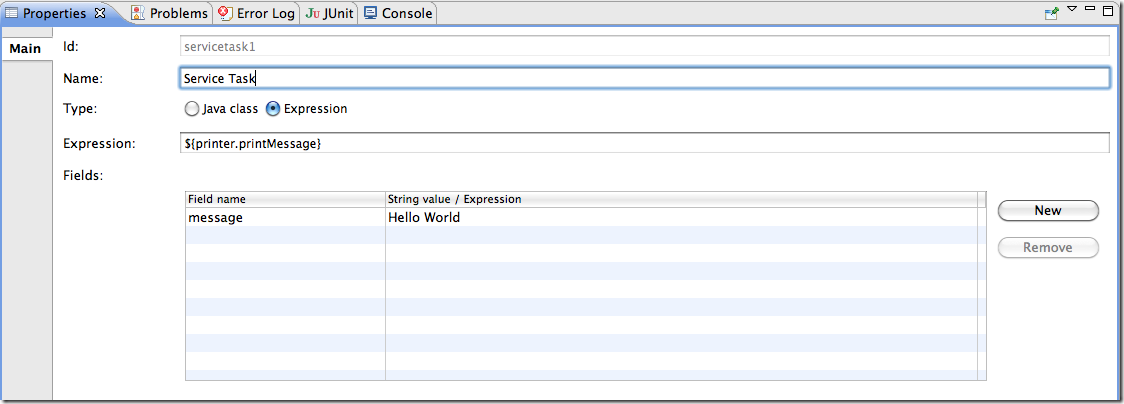
Java class or expression configuration is supported for the Java service task. In addition field extensions can be configured.
支持对Java服务任务进行Java类或者表达式配置。能够配置另外的字段扩展。
-
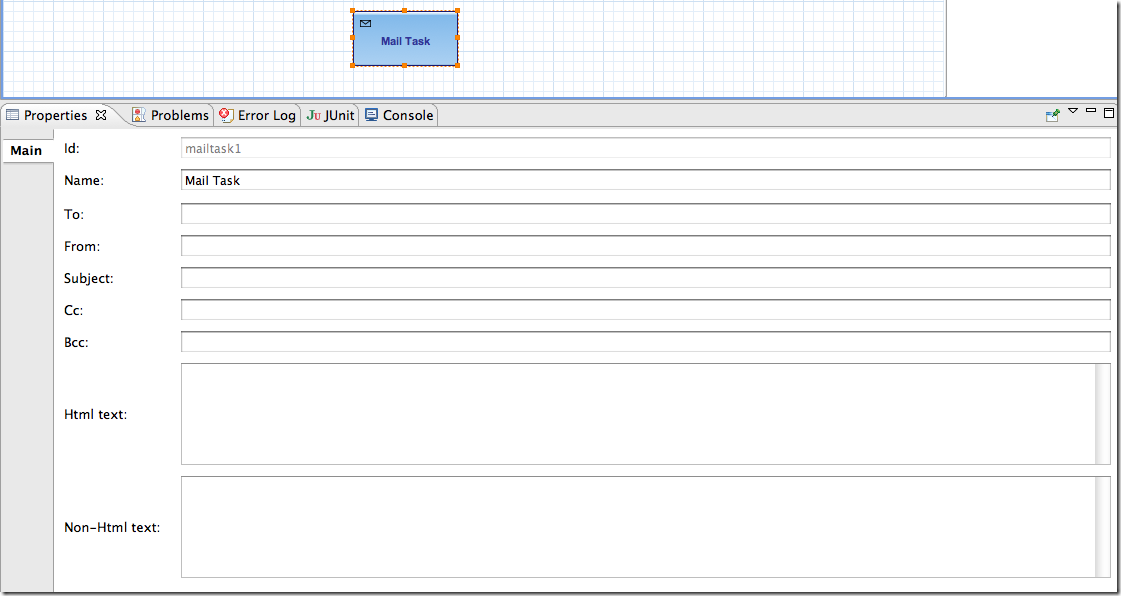
Support for additional Activiti extensions like the Mail task, the candidate configuration of User tasks and Script task configuration.
支持像Mail任务的Activiti扩展任务,用户任务的候选人配置和脚本任务配置。
-
-
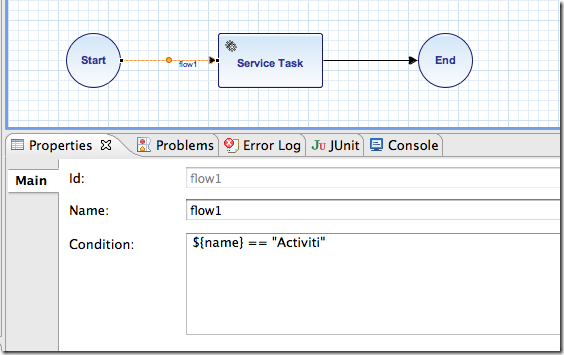
Support for conditions on sequence flows.
支持顺序流之上的条件表达式。
Extending Activiti Designer(扩展Activiti设计器)
You can extend the default functionality offered by Activiti Designer. This section documents which extensions are available, how they can be used and provides some usage examples. Extending Activiti Designer is useful in cases where the default functionality doesn't suit your needs, you require additional capabilities or have domain specific requirements when modelling business processes. Extension of Activiti Designer falls into two distinct categories, extending the palette and extending output formats. Each of these extension ways requires a specific approach and different technical expertise.
你能够扩展由Activiti Designer提供的缺省功能。本章为哪些扩展可用,如何使用这些扩展问题提供一些有用的示例。在缺省功能不适合你的需求,你需要额外的能力,或者当对业务流程建模时具有领域特定的需求的地方,正是扩展Activiti Designer扩展有用武之地。Activiti Designer扩展有两个明显的分类:扩展面板和扩展输入格式。每个扩展方式需要特定的方法和不同的技术技巧。
Note
Extending Activiti Designer requires technical knowledge and more specifically, knowledge of programming in Java. Depending on the type of extension you want to create, you might also need to be familiar with Maven, Eclipse, OSGi, Eclipse extensions and SWT.
注意
扩展需要技术基础和更特别的Java编程基础。依赖ni ddddd所想建立的扩展类型,你也许需要熟悉Maven,Eclipse,OSGi,Eclipse扩展和SWT。
Customizing the palette(定制面板)
You can customize the palette that is offered to users when modelling processes. The palette is the collection of shapes that can be dragged onto the canvas in a process diagram and is displayed to the right hand side of the canvas. As you can see in the default palette, the default shapes are grouped into compartments (these are called "drawers") for Events, Gateways and so on. There are two options built-in to Activiti Designer to customize the drawers and shapes in the palette:
当建模时,你可以给用户提供一个定制的面板。面板是能够拉至
-
Adding your own shapes / nodes to existing or new drawers
增加你自己的图形或者节点到已存在或新的抽屉上。
-
Disabling any or all of the default BPMN 2.0 shapes offered by Activiti Designer, with the exception of the connection and selection tools
j禁止任何Activiti Designer提供的缺省BPMN 2.0图形,连接和选择
In order to customize the palette, you create a JAR file that is added to a specific installation of Activiti Designer (more on how to do that later). Such a JAR file is called anextension. By writing classes that are included in your extension, Activiti Designer understands which customizations you wish to make. In order for this to work, your classes should implement certain interfaces. There is an integration library available with those interfaces and base classes to extend which you should add to your project's classpath.
未来定制调色板,你建立一个可以添加到Activiti Designer(后面将更多介绍how to do that )里的JAR的文件。这样的JAR文件叫一个扩展(extension) 。
Note
You can setup your project in whichever tool you prefer and build the JAR with your build tool of choice. For the instructions below, a setup is assumed with Eclipse Helios, using Maven (3.x) as build tool, but any setup should enable you to create the same results.
注意
ni你能够设置你喜欢的工具来设置你的项目。用这个工具来构建这个JAR包。对于下列指令,假定用Eclipse Helios设置,采用Maven(3.x)作为构建工具,但是任何设置建立相同的结果。
Extension setup (Eclipse/Maven)(扩展设置(Eclipse/Maven))
Download and extract Eclipse (Galileo or Helios should both work) and a recent version (3.x) of Apache Maven. If you use a 2.x vesion of Maven, you will run into problems when building your project, so make sure your version is up to date. We assume you are familiar with using basic features and the Java editor in Eclipse. It's up to you whether your prefer to use Eclipse's features for Maven or run Maven commands from a command prompt.
下载并抽取 和最新版本。如果你使用Maven 2.x版本,在构建项目时将带来问题,所以确保它的版本及时更新。我们假定你熟悉Eclipse里面的基本特性和Java编辑器。是否你钟情在Eclipse里面使用Maven或者在命令行提示下使用Maven,完全取决于你。
Create a new project in Eclipse. This can be a general project type. Create a pom.xml file at the root of the project to contain the Maven project setup. Also create folders for the src/main/java and src/main/resources folders, which are Maven conventions for your Java source files and resources respectively. Open the pom.xml file and add the following lines:
在Eclipse里面建立一个新项目。这个项目可以是一个一般类型的项目。为了包含Maven项目设置,在项目的根目录下建立一个pom.xml文件夹。也要建立 src/main/java 和 src/main/resources文件夹,这是Maven对Java源代码文件和相关资源文件的约定。打开pom.xml文件并增加下列行:
<project
  xmlns="http://maven.apache.org/POM/4.0.0"
  xmlns:xsi="http://www.w3.org/2001/XMLSchema-instance"
  xsi:schemaLocation="http://maven.apache.org/POM/4.0.0 http://maven.apache.org/maven-v4_0_0.xsd">

 <modelVersion>4.0.0</modelVersion>

 <groupId>org.acme</groupId>
 <artifactId>money-tasks</artifactId>
 <version>1.0.0</version>
 <packaging>jar</packaging>
 <name>Acme Corporation Money Tasks</name>
...
</pom>
As you can see, this is just a basic pom.xml file that defines a groupId, artifactId and version for the project. We will create a customization that includes a single custom node for our money business.
正如你所见,这只是定义了项目的 一个基本的pom.xml文件。我们
Add the integration library to your project's dependencies by including this dependency in your pom.xml file:
通过在pom.xml文件里包含项目的依赖库,将集成的库加到项目里面。
<dependencies>
 <dependency>
  <groupId>org.activiti.designer</groupId>
  <artifactId>org.activiti.designer.integration</artifactId>
  <version><!-- Current Activiti Designer Version --></version>
  <scope>compile</scope>
 </dependency>
</dependencies>
Warning
At the moment, the dependency is not available from the Activiti Maven repository. To use it, you should download it from here and place it in your local Maven repository.
此时,还未从Activiti的Maven仓库获得依赖。为了使用它,从这里下载 from here,并把它放到你本地的Maven仓库里。
Finally, in the pom.xml file, add the configuration for the maven-compiler-plugin so the Java source level is at least 1.5 (see snippet below). You will need this in order to use annotations. You can also include instructions for Maven to generate the JAR's MANIFEST.MF file. This is not required, but you can use a specific property in the manifest to provide a name for your extension (this name may be shown at certain places in the designer and is primarily intended for future use if you have several extensions in the designer). If you wish to do so, include the following snippet in pom.xml:
最后,因为
<build>
 <plugins>
        <plugin>
   <artifactId>maven-compiler-plugin</artifactId>
   <configuration>
    <source>1.5</source>
    <target>1.5</target>
    <showDeprecation>true</showDeprecation>
    <showWarnings>true</showWarnings>
    <optimize>true</optimize>
   </configuration>
  </plugin>
  <plugin>
   <groupId>org.apache.maven.plugins</groupId>
   <artifactId>maven-jar-plugin</artifactId>
   <version>2.3.1</version>
   <configuration>
    <archive>
     <index>true</index>
     <manifest>
      <addClasspath>false</addClasspath>
      <addDefaultImplementationEntries>true</addDefaultImplementationEntries>
     </manifest>
     <manifestEntries>
      <ActivitiDesigner-Extension-Name>Acme Money</ActivitiDesigner-Extension-Name>
     </manifestEntries>
    </archive>
   </configuration>
  </plugin>
 </plugins>
</build>
The name for the extension is described by the ActivitiDesigner-Extension-Name property. The only thing left to do now is tell Eclipse to setup the project according to the instructions in pom.xml. So open up a command shell and go to the root folder of your project in the Eclipse workspace. Then execute the following Maven command:
扩展名由ActivitiDesigner-Extension-Name 属性描述。唯一剩下的d事实告诉Eclipse根据文件里指令建立这个项目。所以打开一个命令shell并到Eclipse工作区的项目根文件夹。执行下面的Maven命令:
mvn eclipse:eclipse
Wait until the build is successful. Refresh the project (use the project's context menu (right-click) and select Refresh). You should now have the src/main/java and src/main/resourcesfolders as source folders in the Eclipse project.
等到构建成功完成。刷新项目(使用项目的上下文菜单(右击)并选择“刷新”(Refresh))。现在你应当在Eclipse项目里看见文件夹src/main/java 和 src/main/resources作为源代码文件夹。
Note
You can of course also use the m2eclipse plugin and simply enable Maven dependency management from the context menu (right-click) of the project. Then choose Maven > Update project configuration from the project's context menu. That should setup the source folders as well.
你当然也可使用 m2eclipse 插件。简单地从上项目下文菜单(右击)启动Maven依赖管理。然后从项目的上下文菜单选择“ Maven > Update project configuration ”。也要设置设置源代码。
That's it for the setup. Now you're ready to start creating customizations to Activiti Designer!
设置就这样弄好了。建立Activiti Designer的定制的准备工作就绪。
Applying your extension to Activiti Designer(应用对Activiti Designer的扩展)
You might be wondering how you can add your extension to Activiti Designer so your customizations are applied. These are the steps to do just that:
你可能疑惑如何才能把自己的定制加入到Activiti Designer以便让自己的定制起作用呢。那么采取这些步骤可以解决:
-
Once you've created your extension JAR (for instance, by performing a mvn install in your project to build it with Maven), you need to transfer the extension to the computer where Activiti Designer is installed;
一旦你建立自己的扩展JAR(例如,通过Maven在你的项目里执行一个mvn install 来构建)。你需要将这个扩展放到Activiti Designer安装的地方。
-
Store the extension somewhere on the hard drive where it will be able to remain and remember the location;
ddd将扩展存储在硬盘的某个地方,在那可以保存扩展。
-
Start Activiti Designer and from the menu, select Window > Preferences
首先启动Activiti Designer,然后在菜单里选择 Window > Preferences.
-
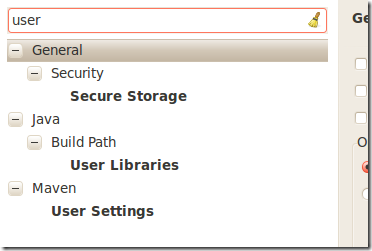
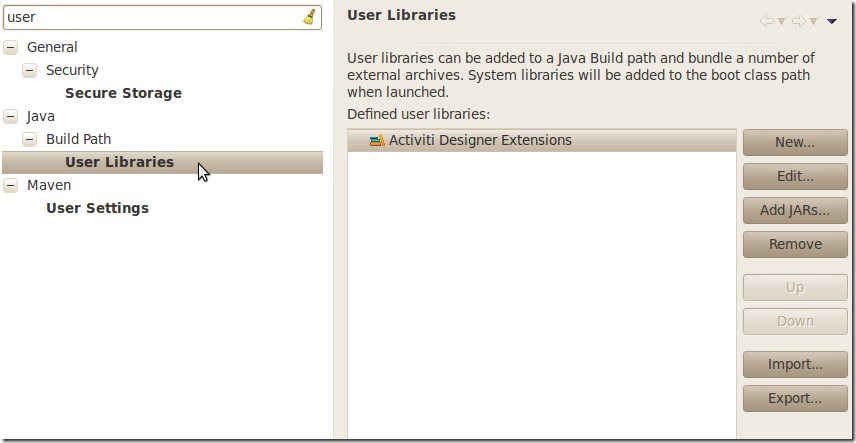
In the preferences screen, type user as keyword. You should see an option to access the User Libraries in Eclipse in the Java section.
在preferences 屏幕,键入 user 作为关键字。你应当在Eclipse的Java部分看见访问 User Libraries 的选项。
-
Select the User Libraries item and a tree view shows up to the right where you can add libraries. You should see the default group where you can add extensions to Activiti Designer (depending on your Eclipse installation, you might see several others as well).
选择 User Libraries 项,在右端将显示一个树形视图,在此可以添加你自己的Java库。你应当能看见扩展加入到Activiti Designer 的缺省组(依赖于你的Eclipse的安装,你可能看到其它的情况)。
-
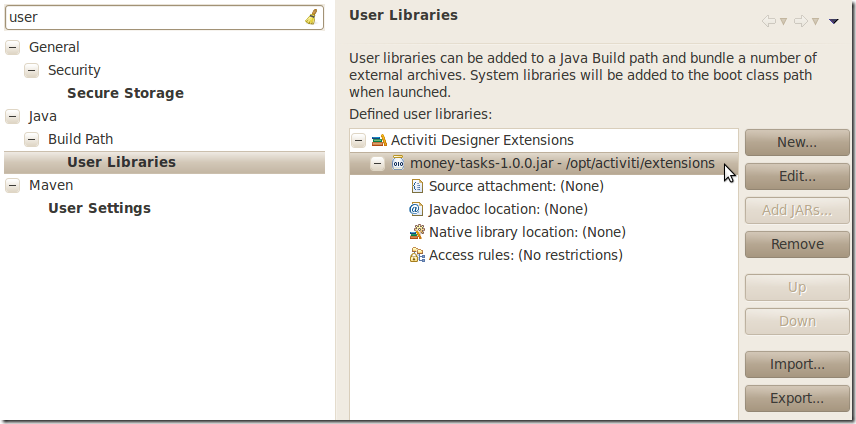
Select the Activiti Designer Extensions group and click the Add JARs... button. Navigate to to folder where your extension is stored and select the extension file you want to add. After completing this, your preferences screen should show the extension as part of the Activiti Designer Extensions group, as shown below.
选择组Activiti Designer Extensions组并点击 Add JARs...按钮。导航至你自己扩展所保存的文件夹并选择所要添加的扩展。完成之后,你的 preference屏幕应当显示作为 Activiti Designer Extensions 组的一部分的扩展,如下所示。
-
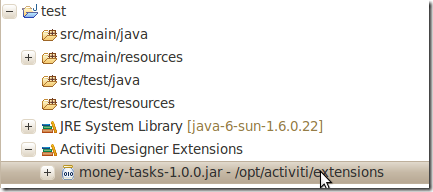
Click the OK button to save and close the preferences dialog. The Activiti Designer Extensions group is automatically added to new Activiti projects you create. You can see the user library as entry in the project's tree in the Navigator or Package Explorer. If you already had Activiti projects in the workspace, you should also see the new extensions show up in the group. An example is shown below.
点击OK按钮,保存并关闭preference对话框。组自动添加到你所建的Activiti项目里面。在Navigator或者Package Explorer视图上的项目树书上,用户库作为一个条目显示。如果你在工作区上存在一个Activiti项目,那么你应当看见在组里显示的新的扩展。示例如下所示。
Diagrams you open will now have the shapes from the new extension in their palette (or shapes disabled, depending on the customizations in your extension). If you already had a diagram opened, close and reopen it to see the changes in the palette.
打开的流程图的有一个新的扩展,并能看见图形(依赖于你的定制,这些图形可能被禁止)。如果流程图已经打开,关闭并重新打开,观察面板发生的变化。
Adding shapes to the palette(把图形加到面板)
With your project set up, you can now easily add shapes to the palette. Each shape you wish to add is represented by a class in your JAR. Take note that these classes are not the classes that will be used by the Activiti engine during runtime. In your extension you describe the properties that can be set in Activiti Designer for each shape. From these shapes, your refer to the runtime class that should be used by the engine. This class should implement JavaDelegate as for any ServiceTask in Activiti.
一旦项目设置好,你能轻易把图形添加到面板。你想加入的图形在Jar包里用一个类来表示。注意这些类不是Activiti引擎在运行期间所使用的类。在扩展里,描述了在Activiti Designer里可以设置的属性。通过这些图形,引用应当有引擎所使用的运行期类。这些类应当为Activiti里的ServiceTask实现JavaDelegte接口。
A shape's class is a simple Java class, to which a number of annotations are added. The class should implement the CustomServiceTask interface, but you shouldn't implement this interface yourself. Extend the AbstractCustomServiceTask base class instead (at the moment you MUST extend this class directly, so no abstract classes in between). In the Javadoc for that class you can find instructions on the defaults it provides and when you should override any of the methods it already implements.
图形类是一个简单的Java类,加入了注释。尽管这个类应当实现接口,但是不应当你自己实现这个接口。而应当扩展这个基类作为代替(目前你必须直接扩展这个类,所以没有抽象类)。在那个类的Javadoc里面,可以找它提供的缺省功能的指令。你应当复写它已经实现的任何方法。
/**
 * @author John Doe
 * @version 1
 * @since 1.0.0
 */
public class AcmeMoneyTask extends AbstractCustomServiceTask {
...
}
You will need to implement the getName() method to determine the name the node will have in the palette. You can also put the nodes in their own drawer and provide an icon. Override the appropriate methods from AbstractCustomServiceTask. If you want to provide an icon, make sure it's in the src/main/resources package in your JAR. The path you supply is relative to that folder.
需要实现 getName()方法来决定将在面板中节点的名称。你也能将节点放置到它们的抽屉里并提供一个图标。复写AbstractCustomServiceTask类里合适的方法。如果你想提供一个图标,确定它在JAR包里的src/main/resources包。提供的路径是相对路径。
You can add properties to the shape by adding members to the class and annotating them with the @Property annotation like this:
通过向类加入成员并以如下方式用 @Property 标注标注它们可以给图形增加属性。
@Property(type = PropertyType.TEXT, displayName = "Account Number")
@Help(displayHelpShort = "Provide an account number", displayHelpLong = HELP_ACCOUNT_NUMBER_LONG)
private String accountNumber;
At the moment, there are just two PropertyType values you can use, TEXT and MULTILINE_TEXT. Future releases will allow you to use other types. You can make a field required by setting the required attribute to true. A message and red background will appear if the user doesn't fill out the field.
当前,只存在两种可以使用的PropertyType 值: TEXT和MULTILINE_TEXT。未来版本将允许你使用其它的类型。通过设置必选的属性为true让字段必选。如果用户没有填充字段,将出现一个消息,背景为红色。
As you can see, there's also an @Help annotation that's used to provide the user some guidance when filling out the field. You can also use the @Help annotation on the class itself - this information is shown at the top of the property sheet presented to the user.
如你所见,当填充字段时,也有一个标注用来提供给用户一些指南的的 @Help标注。也可在类自身使用 @Help 标注--这个信息在属性表上提供给用户信息。
Below is the listing for a further elaboration of the MoneyTask. A comment field has been added and you can see an icon is included for the node.
为了获得MoneyTask的详情,以下是列表。已经加入注释字段,并且在节点能看见图标。
/**
 * @author John Doe
 * @version 1
 * @since 1.0.0
 */
@Runtime(delegationClass = "org.acme.runtime.AcmeMoneyJavaDelegation")
@Help(displayHelpShort = "Creates a new account", displayHelpLong = "Creates a new account using the account number specified")
public class AcmeMoneyTask extends AbstractCustomServiceTask {

 private static final String HELP_ACCOUNT_NUMBER_LONG = "Provide a number that is suitable as an account number.";

 @Property(type = PropertyType.TEXT, displayName = "Account Number", required = true)
 @Help(displayHelpShort = "Provide an account number", displayHelpLong = HELP_ACCOUNT_NUMBER_LONG)
 private String accountNumber;

 @Property(type = PropertyType.MULTILINE_TEXT, displayName = "Comments")
 @Help(displayHelpShort = "Provide comments", displayHelpLong = "You can add comments to the node to provide a brief description.")
 private String comments;

 /*
  * (non-Javadoc)
  *
  * @see org.activiti.designer.integration.servicetask.AbstractCustomServiceTask #contributeToPaletteDrawer()
  */
 @Override
 public String contributeToPaletteDrawer() {
  return "Acme Corporation";
 }

 @Override
 public String getName() {
  return "Money node";
 }

 /*
  * (non-Javadoc)
  *
  * @see org.activiti.designer.integration.servicetask.AbstractCustomServiceTask #getSmallIconPath()
  */
 @Override
 public String getSmallIconPath() {
  return "icons/coins.png";
 }
}
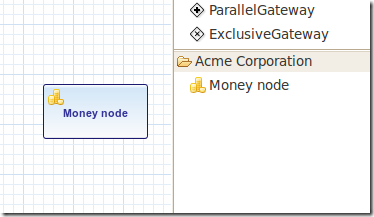
If you extend Activiti Designer with this shape, The palette and corresponding node will look like this:
如果用这个图形扩展Activiti Designer,面板及其相关节点如下所示:
The properties screen for the money task is shown below. Note the required message for the accountNumber field.
money任务的属性屏幕如下所示。注意 accountNumber字段的必填的消息。
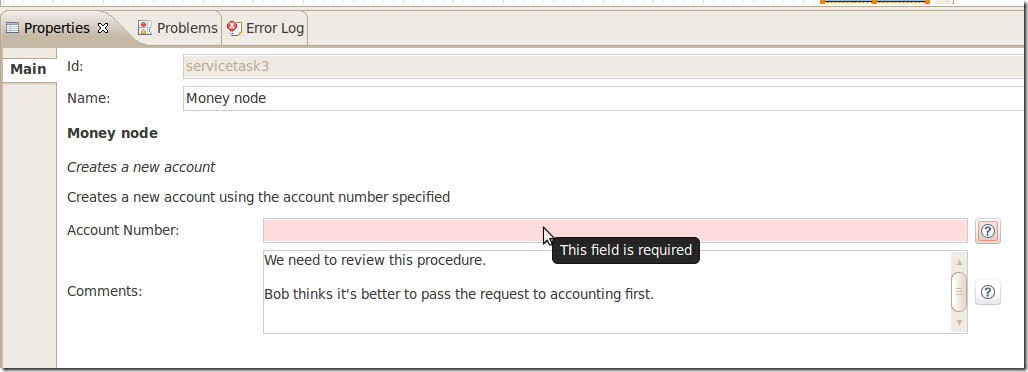
The help for fields is offered by the buttons to the right of each property. Clicking on the button shows a popup as displayed below.
在每个属性的右侧的按钮提供字段的帮助信息。点击按钮将显示如下弹出的信息。

The final step for your shape is to indicate the class that is instantiated by the Activiti engine when it reaches your node when executing a process instance. To do this, you use the @Runtime annotation. The delegationClass attribute you return should contain the canonical name of the runtime class. Note that the runtime class shouldn't be in your extension JAR, as it's dependent on the Activiti libraries.
当执行一个流程实例时,Activiti引擎到达你的节点。图形的最终步骤指明被Activiti引擎实例化的那个类。可以 @Runtime 标注来完成这个功能。返回属性应当包含运行时期的正规名称。注意运行时期类不应当在扩展JAR包里,因为它依赖于Activiti类库。
@Runtime(delegationClass = "org.acme.runtime.AcmeMoneyJavaDelegation")
Disabling default shapes in the palette(禁止面板里的缺省图形)
This customization requires you to include a class in your extension that implements the DefaultPaletteCustomizer interface. You should not implement this interface directly, but subclass the AbstractDefaultPaletteCustomizer base class. Currently, this class provides no functionality, but future versions of the DefaultPaletteCustomizer interface will offer more capabilities for which this base class will provide some sensible defaults so it's best to subclass so your extension will be compatible with future releases.
这个定制需要你在扩展里包含实现接口的类。你不应当直接实现这个接口,而是子类化AbstractDefaultPaletteCustomizer 基类。当前,接口的未来版本将提供为那些基类通过更多功能,所以最好子类化,这样,你的扩展将会和未来的版本。
Extending the AbstractDefaultPaletteCustomizer class requires you to implement one method, disablePaletteEntries(), from which you must return a list of PaletteEntry values. For each of the default shapes, you can disable it by adding its corresponding PaletteEntry value to your list. Note that if you remove shapes from the default set and there are no remaining shapes in a particular drawer, that drawer will be removed from the palette in its entirety. If you wish to disable all of the default shapes, you only need to addPaletteEntry.ALL to your result. As an example, the code below disables the Manual task and Script task shapes in the palette.
扩展 AbstractDefaultPaletteCustomizer类需要你实现一个disablePaletteEntries()方法,你必须返回一个 PaletteEntry值列表。对于每个缺省图形,通过增加相关的 PaletteEntry值到你的列表,你能禁止它。注意如果从缺省集合里删除图形,特别的抽屉里没有任何图形,那么这个抽屉也将从面板中删除。如果你想禁止所有缺省的图形,你只需要把加入PaletteEntry.ALL 到结果。作为一个示例,下列代码禁止了面板中的手动任务和脚本任务。
public class MyPaletteCustomizer extends AbstractDefaultPaletteCustomizer {

 /*
  * (non-Javadoc)
  *
  * @see org.activiti.designer.integration.palette.DefaultPaletteCustomizer#disablePaletteEntries()
  */
 @Override
 public List<PaletteEntry> disablePaletteEntries() {
  List<PaletteEntry> result = new ArrayList<PaletteEntry>();
  result.add(PaletteEntry.MANUAL_TASK);
  result.add(PaletteEntry.SCRIPT_TASK);
  return result;
 }

}
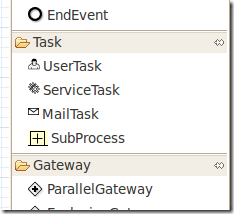
The result of applying this extension is shown in the picture below. As you can see, the manual task and script task shapes are no longer available in the Tasks drawer.
这个扩展的应用效果如下图所示。如你所见,手动任务和脚本任务的图形不在Task抽屉上获取。
To disable all of the default shapes, you could use something similar to the code below.
为了禁止所有的缺省图形,你可以应当使用和下列相似的代码。
public class MyPaletteCustomizer extends AbstractDefaultPaletteCustomizer {

 /*
  * (non-Javadoc)
  *
  * @see org.activiti.designer.integration.palette.DefaultPaletteCustomizer#disablePaletteEntries()
  */
 @Override
 public List<PaletteEntry> disablePaletteEntries() {
  List<PaletteEntry> result = new ArrayList<PaletteEntry>();
  result.add(PaletteEntry.ALL);
  return result;
 }

}
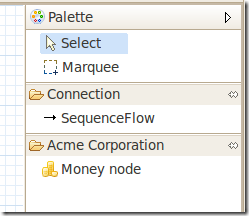
The result will look like this (notice that the drawers the default shapes were in are no longer in the palette):
结果将如下相似(注意缺省图形原来所在的抽屉也不在面板里面了)。
Exporting to custom output formats(输出定制的格式)
You can extend Activiti Designer to publish to additional formats when saving diagrams. These extensions are called Export Marshallers and are invoked automatically by Activiti Designer on each save action by the user. This behavior can be enabled or disabled by setting a preference in Eclipse's preferences dialog for each format to be saved.
当你保存流程图时,你能够扩展Activiti Designer 发表另外的格式。这些扩展被称为。当用户每次采取保存的行为时,由Activiti Designer自动调用。
You can compare these extensions to the BPMN 2.0 export and process image saving that's performed during save actions by default in Activiti Designer. In fact, these functions use exactly the same extension features you can use to save to your own formats.
你能将这些功能和BPMN 2.0输出和流程图像进行比较。缺省地,后者在Activiti Designer里在保存动作期间完成。
事实上,这些功能完全使用你能使用的相同的扩展特性。它通常保存为你自己的格式。
To create an Export Marshaller, you need to create a different kind of extension than for extending the palette. The reason for this is simple: from your code you will need access to more APIs than are offered by the integration library. In particular, you will need classes that are available in Eclipse itself. The way to implement an Export Marshalleris therefore to create an Eclipse plugin (which you can do by using Eclipse's PDE support) and package it in a custom Eclipse product. It's beyond the scope of this user guide to explain all the details involved in developing Eclipse plugins, so the instructions below are limited to the functionality for extending Activiti Designer.
为了建立一个输出解组( Export Marshaller),你需要建立不同种类的扩展,而不是扩展面板。这个原因是简单的:从代码观点来看,你将需要比访问比集成库需要更多的API。特别地,你将需要Eclipse里能够获取的类。实现一个Export Marshaller 方法是建立一个Eclipse的插件(通过Eclipse的PDE支持),并且在一个定制的Eclipse产品里将它打包。解释所有关于开发Eclipse 插件的细节超过了本用户指南的范围,所以下列指令被限制为扩展Activiti Designer的功能。
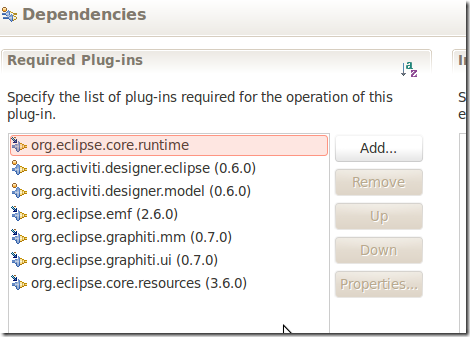
Your bundle should be dependent on the following libraries:
你的bundle应当依赖下列库:
Create an extension to the org.activiti.designer.eclipse.extension.export.ExportMarshaller extension point. For this extension point, you are required to subclass the AbstractExportMarshallerclass. This abstract base class provides you with a number of useful methods when marshalling to your own format, such as adding markers to Eclipse's problems view and saving resources to the workspace.
建立一个org.activiti.designer.eclipse.extension.export.ExportMarshaller 扩展点的扩展。对于这个扩展点,需要子类化 AbstractExportMarshaller这个类。当自己的格式时这个抽象基类提供了大量的有用的方法,诸如在Eclipse Problem视图添加标记,并把资源保存到工作区里面。
You are required to implement some methods, such as getMarshallerName() and getFormatName(). These methods are used to display options to the user and to show information in progress dialogs, so make sure the descriptions you return reflect the functionality you are implementing.
需要实现诸如这样getMarshallerName() 和 getFormatName()的方法。这些方法用来显示用户的选项和显示进度对话框的信息,这样确保返回的描述反应了所实现的功能。
The bulk of your work is performed in the marshallDiagram(Diagram diagram, IProgressMonitor monitor) method. You are provided with the diagram object, which contains all of the information about the objects in the diagram (BPMN constructs) and the graphical representation. If you want to access the diagram through its resource in Eclipse or you want to transform the diagram using XSLT, there are methods to get to Resources and InputStreams for the diagram in the AbstractExportMarshaller class.
工作的大部分在 marshallDiagram(Diagram diagram, IProgressMonitor monitor)方法里面执行。提供了流程图对象,它包含关于流程图(BPMN构件)对象和图形表示的所有信息。如果你想通过Eclipse里的一样访问流程图,或者你想采用XSLT来转换流程图,在AbstractExportMarshaller 类里有为流程图获取Resources 和的 InputStreams方法。
It's probably a good idea to invoke clearProblems() as one of the first things you do; this will clear any previous markers for your marshaller. You should also use the progress monitor provided to report your progress back to the user. If you need examples on how to do this, take a look at the code of Activiti Designer itself.
首先调用 clearProblems() 方法可能是个好主意;这将清除 marshaller先前的标记。你也应当所提供的进度监视器,向用户报告进展情况。如果需要如何完成这样功能的示例,请参考Activiti Designer 自身的代码。