#
Java9之HttpClientAPI实战详解
https://blog.csdn.net/u014042066/article/details/78153653
Java 9 揭秘(14. HTTP/2 Client API)
https://www.cnblogs.com/IcanFixIt/p/7229611.html
Java JDK11(Java11)中设置HttpClient允许不安全的HTTPS连接
https://www.cjavapy.com/article/84/
通常如果rest服务支持https,需申请收费的ssl证书,但也可自制这种证书。
httpClient进行链接时要进行相应的设置, 主要是设置SSLContext中的
TrustSelfSignedStrategy:
import java.security.KeyManagementException;
import java.security.KeyStoreException;
import java.security.NoSuchAlgorithmException;
import java.util.concurrent.TimeUnit;
import javax.net.ssl.SSLContext;
import org.apache.http.client.config.RequestConfig;
import org.apache.http.conn.ssl.TrustSelfSignedStrategy;
import org.apache.http.impl.client.CloseableHttpClient;
import org.apache.http.impl.client.HttpClients;
import org.apache.http.impl.conn.PoolingHttpClientConnectionManager;
import org.apache.http.ssl.SSLContexts;
import org.springframework.context.annotation.Bean;
import org.springframework.context.annotation.Configuration;
@Configuration
public class HttpClientConfiguration {
@Bean
public PoolingHttpClientConnectionManager poolingHttpClientConnectionManager(AbstractProperties kycProperties) {
PoolingHttpClientConnectionManager result =
new PoolingHttpClientConnectionManager(
kycProperties.getHttpConnectionTimeToLiveMinu(),
TimeUnit.MINUTES
);
result.setMaxTotal(200);
result.setDefaultMaxPerRoute(20);
return result;
}
@Bean
public RequestConfig requestConfig(AbstractProperties kycProperties) {
return RequestConfig
.custom()
.setConnectionRequestTimeout(kycProperties.getHttpConnectionTimeout())
.setConnectTimeout(kycProperties.getHttpConnectionTimeout())
.setSocketTimeout(kycProperties.getHttpConnectionTimeout())
.build();
}
@Bean
public SSLContext sslContext() throws KeyManagementException, NoSuchAlgorithmException, KeyStoreException {
return SSLContexts
.custom()
.loadTrustMaterial(null, new TrustSelfSignedStrategy())
.build()
;
}
@Bean
public CloseableHttpClient httpClient(AbstractProperties kycProperties) throws KeyManagementException, NoSuchAlgorithmException, KeyStoreException {
return HttpClients
.custom()
// .setConnectionManager(poolingHttpClientConnectionManager(null))
.setDefaultRequestConfig(requestConfig(null))
.setKeepAliveStrategy(
new MyConnectionKeepAliveStrategy(
kycProperties.getHttpConnectionTimeToLiveMinu(),
TimeUnit.MINUTES
)
)
.setMaxConnTotal(200)
.setMaxConnPerRoute(20)
// .setConnectionTimeToLive(
// kycProperties.getHttpConnectionTimeToLiveMinu(),
// TimeUnit.MINUTES
// )
.setSSLContext(sslContext())
.build();
}
}
相应设置
http-connection-timeout: 30000
http-connection-time-to-live-minu: 5
一系列参数存于文本文件,需在LINUX下循环读取,之后以此参数进行CURL远程API调用,同时需记录每次CURL的总时间
参数文件,test1.json
{"ADDRESS_FREE":"XXX","NAME":{"SURNAME":"XXX","FIRST_NAME":"XXX"}}
{"ADDRESS_FREE":"XXX","NAME":{"SURNAME":"XXX","FIRST_NAME":"XXX"}}
{"ADDRESS_FREE":"XXX","NAME":{"SURNAME":"XXX","FIRST_NAME":"XXX"}}
test1.sh
#! /bin/bash
RESULT_FILE="result.csv"
echo "" > $RESULT_FILE
i=1
while read line || [[ "$line" ]] #In case the file has an incomplete (missing newline) last line, you could use this alternative:
do
echo "$i"
printf "$i;$line;" >> $RESULT_FILE
curl -w %{time_total} -o /dev/null -X POST -H "Content-Type:application/json" -d "$line" http://ip:port >> $RESULT_FILE
#printf "\n\r" >> $RESULT_FILE
echo "" >> $RESULT_FILE
#i=$(( $i + 1 ))
(( i++ ))
done < test1.json
Reference:
https://stackoverflow.com/questions/30988586/creating-an-array-from-a-text-file-in-bash
当使用httpOutBoundGateway时,有时会碰到网络抖动问题而出现连接异常,这时应该有个重试机制,如隔多少秒重试,重试多少次后放弃等。
默认是重试3次,每次重试间隔是20秒。
@SpringBootApplication
public class SpringIntegrationDslHttpRetryApplication {
@SuppressWarnings("unchecked")
public static void main(String[] args) {
ConfigurableApplicationContext applicationContext =
SpringApplication.run(SpringIntegrationDslHttpRetryApplication.class, args);
Function<Object, Object> function = applicationContext.getBean(Function.class);
function.apply("foo");
}
@Bean
public IntegrationFlow httpRetryFlow() {
return IntegrationFlows.from(Function.class)
.handle(Http.outboundGateway("http://localhost:11111")
.httpMethod(HttpMethod.GET)
.expectedResponseType(String.class),
e -> e.advice(retryAdvice()))
.get();
}
@Bean
public RequestHandlerRetryAdvice retryAdvice() {
return new RequestHandlerRetryAdvice();
}
}
#打印日志
logging.level.org.springframework.retry=debug
Reference:
https://docs.spring.io/spring-integration/reference/html/handler-advice.html#retry-advice
https://stackoverflow.com/questions/49784360/configure-error-handling-and-retry-for-http-outboundgateway-spring-dsl
https://stackoverflow.com/questions/50262862/requesthandlerretryadvice-with-httprequestexecutingmessagehandler-not-working
https://stackoverflow.com/questions/63689856/spring-integration-http-outbound-gateway-retry-based-on-reply-content
https://blog.csdn.net/cunfen8879/article/details/112552420
git的世界里有后悔药吗?
有的。不仅有,还不止一种:Reset 和 Revert。它们有什么区别呢?先说结论吧。
|
Reset | Revert |
| 作用 |
将某个commit之后的push全部回滚 |
将某个指定的commit回滚 |
| 历史记录(轨迹) |
无 |
有 |
| 是否可作用于单个文件 |
否(都是作用于commit,与文件无关) |
否 |
下面来说说具体例子。
Revert
试验步骤如下:
- 新建两个空白文件 Revert.txt 和 Common.txt,然后commit&push。
- 修改 Revert.txt 文件,内容为“commit 1”,然后commit&push,提交的备注为“commit 1 of Revert”
- 修改 Common.txt 文件,内容为“update for Revert(by commit 2)”
- 修改 Revert.txt 文件,新增一行,内容为“commit 2”
- 3 和 4的修改一起commit&push,提交备注为“commit 2 of Revert(Revert.txt + Common.txt)”
效果如下:
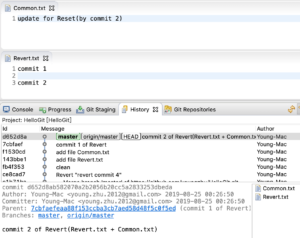
图1-revert之前
目的
保留3的修改,回滚4的修改。
操作
选中“ Revert.txt ”文件,然后在 History 里选中 “commit 2 of Revert…”,右键,找到“Revert Commit”菜单,如图:

图2-revert操作
点击后,效果如图:
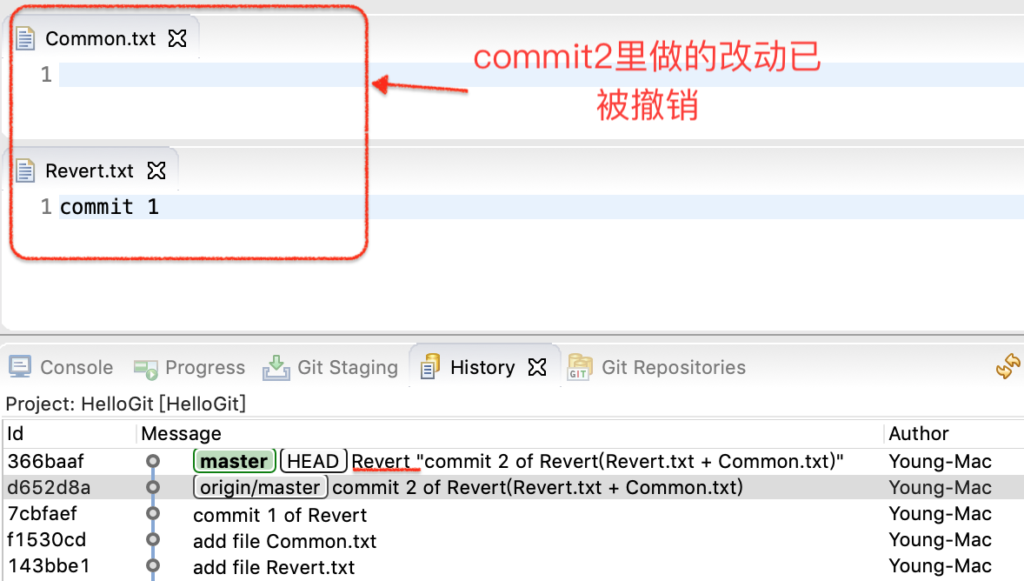
图3-revert之后
最后,push即可。
结果
未能达到预期效果,Revert.txt 和 Common.txt的修改都被撤销了。Revert的作用范围是一个commit(原子),跟文件的个数无关。
注:对最后一个commit做revert比较简单,两步:一,revert;二,push就可以了。对于较早的commit,因为中间间隔了其他的commit,文件会有冲突,需要处理完冲突才可以commit&push。
Reset
试验步骤如下:
- 新建空白文件 Reset.txt,然后commit&push。
- 修改 Reset.txt 文件,内容为“commit 1”
- 修改 Common.txt 文件,内容为“update for Reset(commit 1)”
- 2和3的修改一起commit&push,提交的备注为“commit 1 of Reset”
- 修改 Reset.txt 文件,新增一行,内容为“commit 2”,然后commit&push,提交的备注为“commit 2 of Reset”
- 修改 Reset.txt 文件,内容为“commit 3”
- 修改 Common.txt 文件,内容为“update for Reset(commit 3)”
- 6和7的修改一起commit&push,提交的备注为“commit 3 of Reset”
效果如下:
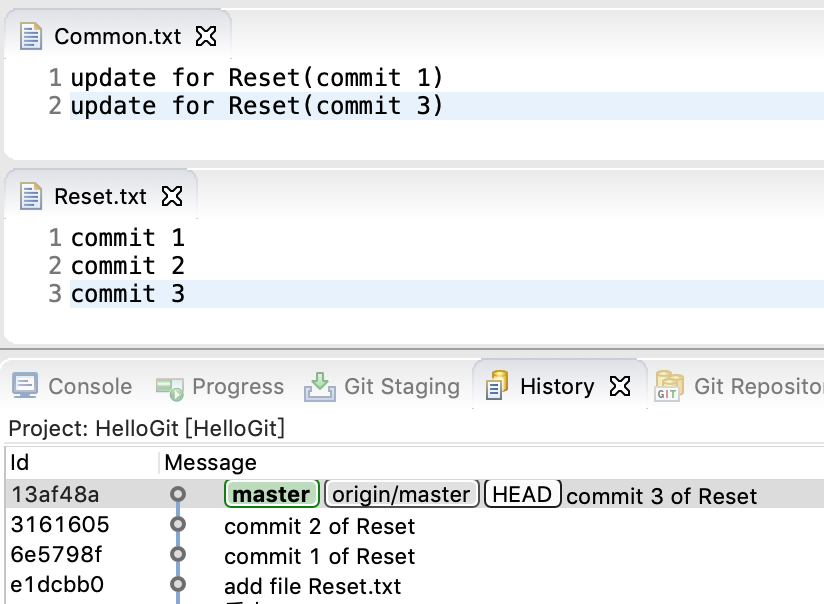
图4-reset之前
目的
将commit 1 之后的(即commit 2 和 3)改动全部回滚。
操作
在 History 里找到“commit 1”,选中后,右键,找到 Reset 菜单,选择 Hard 模式。

图5-reset
执行后,如下图所示,HEAD 已经指向里 commit 1,Common.txt 和 Reset.txt 的内容也已改变。注意左侧的项目栏,它已落后了服务器(GitHub)2个commit。怎么提交到服务器上呢?直接push,它会提示不是最新的,操作失败。这里要用到 push 的 force 属性。
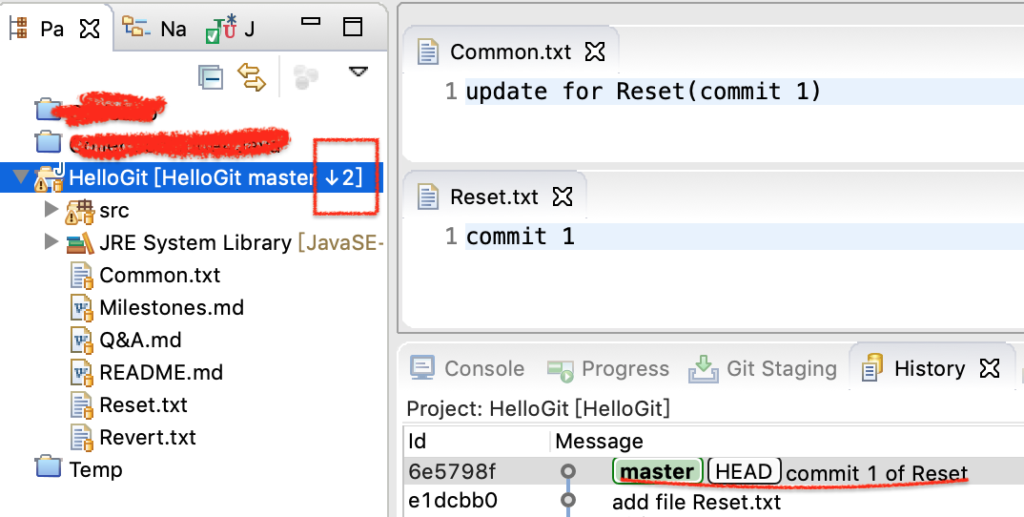
图6-reset之后
选中 项目,右键 – Team – Remote – Configure Push to Upstream,在打开的小窗口中找到 Advanced,如下图所示,这里的 Force Update 要勾上,表示强制覆盖。
重新push,就可以跟服务器保持同步了。
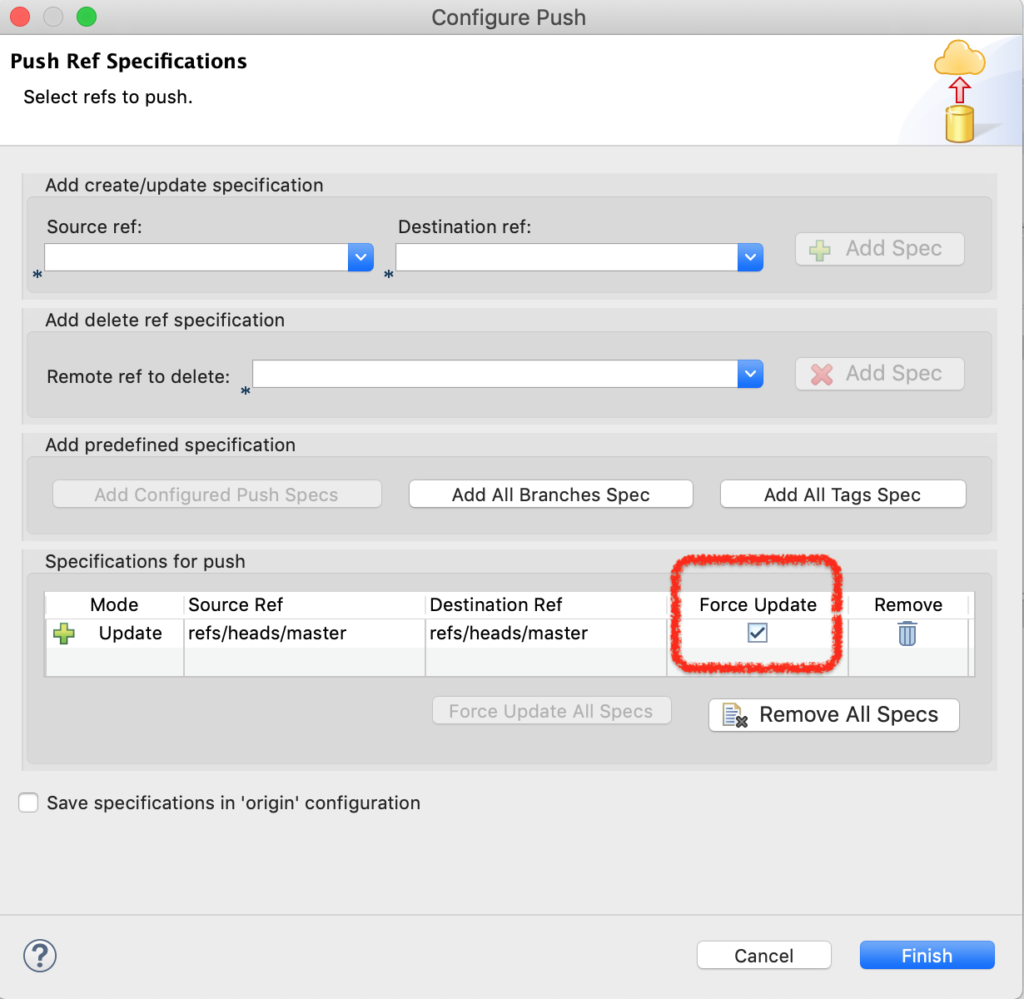
图7-push-force
要特别注意的是,Reset慎用,跟Linux的“rm -rf /”有异曲同工之妙。
http://www.youngzy.com/blog/2019/08/git-difference-between-reset-and-revert-using-eclipse/