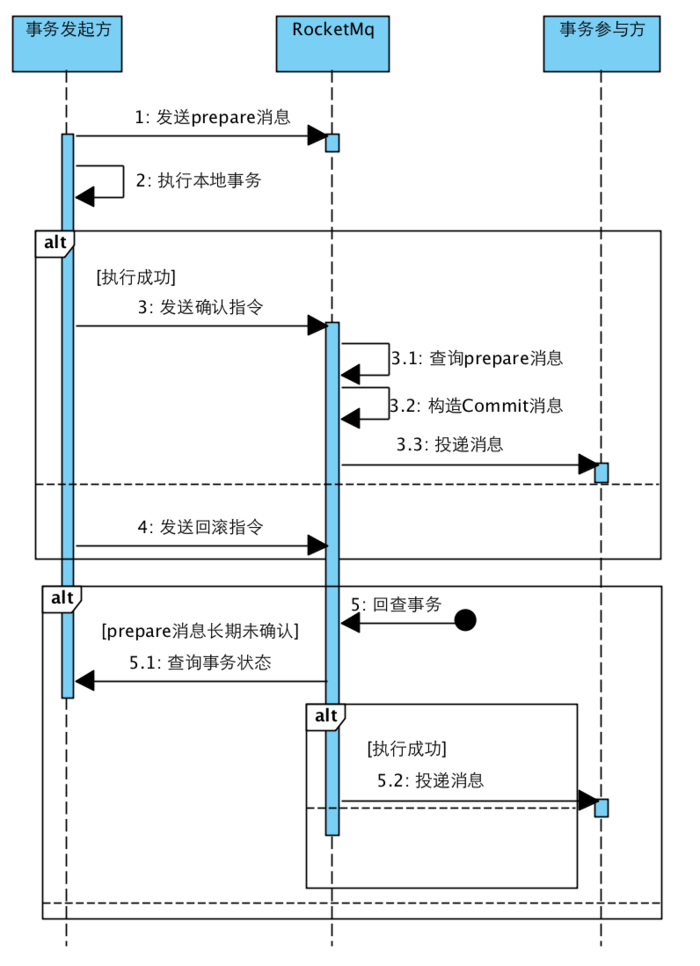
例如有如下场景,新增一订单,同时为此订单的用户增加积分。场景对应场景表,积分对应积分表,如果要防止订单增加成功而积分增加不成功,则要将此两种操作放在一个事务下。
分布式的场景下,订单服务在一个JVM下,积分服务在另一个JVM下,两者要如何才能达到数据一致(原子)性?

https://zlt2000.gitee.io/2019-09-23-rocketmq-transaction/
SPRING BATCH中的REMOTE CHUNKING JOB,由于是基于MASTER/SLAVE的架构,其中某个STEP是会在远程机器中执行,如果要停止这个JOB,需要考虑两个问题:
1、什么时候发出停止指令
2、如何等待远程STEP的完成
一般停止JOB,可用JobOperator.stop(long executionId)来停止,但这个无法确定什么时候发出停止指令,如果是在CHUNK的处理中途发出,则会出现回滚的现象。
BATCH_STEP_EXECUTION
thead tr {background-color: ActiveCaption; color: CaptionText;}
th, td {vertical-align: top; font-family: "Tahoma", Arial, Helvetica, sans-serif; font-size: 8pt; padding: 4px; }
table, td {border: 1px solid silver;}
table {border-collapse: collapse;}
thead .col0 {width: 173px;}
.col0 {text-align: right;}
thead .col1 {width: 82px;}
.col1 {text-align: right;}
thead .col2 {width: 282px;}
thead .col3 {width: 164px;}
.col3 {text-align: right;}
thead .col4 {width: 161px;}
thead .col5 {width: 161px;}
thead .col6 {width: 109px;}
thead .col7 {width: 127px;}
.col7 {text-align: right;}
thead .col8 {width: 109px;}
.col8 {text-align: right;}
thead .col9 {width: 118px;}
.col9 {text-align: right;}
thead .col10 {width: 117px;}
.col10 {text-align: right;}
thead .col11 {width: 142px;}
.col11 {text-align: right;}
thead .col12 {width: 150px;}
.col12 {text-align: right;}
thead .col13 {width: 166px;}
.col13 {text-align: right;}
thead .col14 {width: 137px;}
.col14 {text-align: right;}
thead .col15 {width: 109px;}
thead .col16 {width: 156px;}
thead .col17 {width: 161px;}
| STEP_EXECUTION_ID |
VERSION |
STEP_NAME |
JOB_EXECUTION_ID |
START_TIME |
END_TIME |
STATUS |
COMMIT_COUNT |
READ_COUNT |
FILTER_COUNT |
WRITE_COUNT |
READ_SKIP_COUNT |
WRITE_SKIP_COUNT |
PROCESS_SKIP_COUNT |
ROLLBACK_COUNT |
EXIT_CODE |
EXIT_MESSAGE |
LAST_UPDATED |
| 2304 |
169 |
step2HandleXXX |
434 |
2020-06-22 16:27:54 |
2020-06-22 16:32:46 |
STOPPED |
167 |
5010 |
0 |
4831 |
0 |
155 |
0 |
161 |
STOPPED |
org.springframework.batch.core.JobInterruptedException |
2020-06-22 16:32:46 |
另外SPRING BATCH也不会等远程STEP执行完成,就将JOB的状态设为Complete。
发出停止的指令应通过ChunkListener达成:
public class ItemMasterChunkListener extends ChunkListenerSupport{
private static final Logger log = LoggerFactory.getLogger(ItemMasterChunkListener.class);
@Override
public void beforeChunk(ChunkContext context) {
log.info("ItemMasterProcessor.beforeChunk");
}
@Override
public void afterChunk(ChunkContext context) {
log.info("ItemMasterProcessor.afterChunk");
if(XXXX.isStoppingOrPausing()) {
log.info("context.getStepContext().getStepExecution().setTerminateOnly()");
context.getStepContext().getStepExecution().setTerminateOnly();
}
}
@Override
public void afterChunkError(ChunkContext context) {
log.info("ItemMasterProcessor.afterChunkError");
}
}
配置BEAN:
@Bean
@StepScope
public ItemMasterChunkListener novaXItemMasterChunkListener() {
return new ItemMasterChunkListener();
}
this.masterStepBuilderFactory
.<X, X>get("step2Handle")
.listener(itemMasterChunkListener())
.build();
由于是在CHUNK完成的时候发出停止指令,就不会出现ROLLBACK的情况。
等待远程STEP完成,通过读取MQ上的MESSAGE是否被消费完成,PENDDING的MESSAGE为0的条件即可。
public class JobExecutionListenerSupport implements JobExecutionListener {
/* (non-Javadoc)
* @see org.springframework.batch.core.domain.JobListener#afterJob()
*/
@Override
public void afterJob(JobExecution jobExecution) {
Integer totalPendingMessages = 0;
String queueName = "";
String messageSelector = "JOB_EXECUTION_ID=" + jobExecution.getJobInstance().getInstanceId();
do{
totalPendingMessages =
this.jmsTemplate.browseSelected(queueName, messageSelector,
(session, browser) ->
Collections.list(browser.getEnumeration()).size()
);
String brokerURL = null;
if(jmsTemplate.getConnectionFactory() instanceof JmsPoolConnectionFactory) {
JmsPoolConnectionFactory connectionFactory =
(JmsPoolConnectionFactory)jmsTemplate.getConnectionFactory();
ActiveMQConnectionFactory activeMQConnectionFactory =
(ActiveMQConnectionFactory)connectionFactory.getConnectionFactory();
brokerURL = activeMQConnectionFactory.getBrokerURL();
} else if(jmsTemplate.getConnectionFactory() instanceof CachingConnectionFactory) {
CachingConnectionFactory connectionFactory =
(CachingConnectionFactory)jmsTemplate.getConnectionFactory();
ActiveMQConnectionFactory activeMQConnectionFactory =
(ActiveMQConnectionFactory)connectionFactory.getTargetConnectionFactory();
brokerURL = activeMQConnectionFactory.getBrokerURL();
}
LOGGER.info("queueName = {}, {}, totalPendingMessages = {}, url={}",
queueName, messageSelector, totalPendingMessages, brokerURL);
Assert.notNull(totalPendingMessages, "totalPendingMessages must not be null.");
try {
Thread.sleep(5_000);
} catch (InterruptedException e) {
LOGGER.error(e.getMessage(), e);
}
} while(totalPendingMessages.intValue() > 0);
}
/* (non-Javadoc)
* @see org.springframework.batch.core.domain.JobListener#beforeJob(org.springframework.batch.core.domain.JobExecution)
*/
@Override
public void beforeJob(JobExecution jobExecution) {
}
}
这样整个JOB就能无异常地停止,且会等待远程STEP完成。
Reference:
https://docs.spring.io/spring-batch/docs/4.1.3.RELEASE/reference/html/common-patterns.html#stoppingAJobManuallyForBusinessReasons
https://stackoverflow.com/questions/13603949/count-number-of-messages-in-a-jms-queue
https://stackoverflow.com/questions/55499965/spring-batch-stop-job-execution-from-external-class
https://stackoverflow.com/questions/34621885/spring-batch-pollable-channel-with-replies-contains-chunkresponses-even-if-job
根据分支1新建了功能分支1,并在此上开发一段时间,后来分支1被别人提交了代码,因此分支1比功能分支1要新,这时,可以将功能分支1与分支1进行合并,但会多出很多COMMIT,这时就出现了rebase,
GIT会将功能分支1上的所有COMMIT另存一个文件,回退到分支1原始状态,再更新至当前分支1的状态,再把另存文件的COMMIT执行一遍,就成了已经合并的新的功能分支1。
http://jartto.wang/2018/12/11/git-rebase/GIT使用rebase和merge的正确姿势
https://zhuanlan.zhihu.com/p/34197548git merge和git rebase的区别, 切记:永远用rebase
https://zhuanlan.zhihu.com/p/75499871
https://computingforgeeks.com/how-to-run-java-jar-application-with-systemd-on-linux/systemd自启动java程序
https://www.cnblogs.com/yoyotl/p/8178363.html------------------------------------------------------------
[Unit]
Description=TestJava
After=network.target
[Service]
Type=forking
ExecStart=/home/test/startTest.sh
ExecStop=/home/test/stopTest.sh
[Install]
WantedBy=multi-user.target
-------------------------------------------------------------
How to Autorun application at the start up in Linux
https://developer.toradex.com/knowledge-base/how-to-autorun-application-at-the-start-up-in-linuxHow to automatically run program on Linux startup
https://www.simplified.guide/linux/automatically-run-program-on-startupSystemd 入门教程:实战篇
https://www.ruanyifeng.com/blog/2016/03/systemd-tutorial-part-two.htmlSystemd 入门教程:命令篇
http://www.ruanyifeng.com/blog/2016/03/systemd-tutorial-commands.html