这是第一次写博客,是有关JAVA页面设计当中的布局管理器,可能大多数人会选择使用 NetBeans 或者是Eclipse 的组件来实现可视化拖拽组件来达到自己页面设计布局,因为是第一次做界面,总结一下,以供以后复习能用到。
JAVA中Layout Mananager这次界面中主要用到的有BorderLayout、FlowLayout、GridLayout、GridLayBagout
1、BorderLayout是JFrame中的默认布局方式,如果你没有在容器类明确的定义布局方式,它将是默认的布局方式,当你想在容器中添加组件的时候,默认添加到中央的位置,所以第二个组件会遮住第一个组件,下面是BorderLayout 一个小小的例子;
import javax.swing.*;
import java.awt.*;
public class BorderLayout1 {
public BorderLayout1(){
JFrame frame=new JFrame();
frame.add(BorderLayout.NORTH,new JButton("North"));
frame.add(BorderLayout.SOUTH,new JButton("South"));
frame.add(BorderLayout.WEST,new JButton("West"));
frame.add(BorderLayout.EAST,new JButton("East"));
frame.add(BorderLayout.CENTER,new JButton("Center"));
frame.setVisible(true);
frame.setSize(400,200);
}
public static void main(String[] args) {
new BorderLayout1();
}
} |
总结:在整体的界面当中没有很规范能够使用这种布局方式,需要和其他的布局方式进行搭配才能够达到自己想要的界面布局效果。
2、FlowLayout 设置流布局以后你所要添加的组件就会按照顺序排列在容器里面,能保证没有组件会被阻挡起来,当时当你拉动界面的时候会很不满意,组将也同样会想水一样流动起来,如果有使用流布局的容器能够固定大小是最好不过的了,例子如下:
import javax.swing.*;
import java.awt.*; public class FlowLayout1{
public FlowLayout1() {
JFrame frame=new JFrame();
frame.setLayout(new FlowLayout());
for(int i = 1; i <=5; i++)
frame.add(new JButton("Button " + i));
frame.setVisible(true);
frame.setSize(500,100);
}
public static void main(String[] args) {
new FlowLayout1();
}
} |
3、GridLayout 表格布局能将你的组将整齐的摆放在容器当中,当组件的数量超出表格的数量的时候,表格会自动添加来满足组件的数量要求,同BorderLayout 相同,完整的界面一般不会是整齐的表格样式,所以这种布局方式和其他的搭配起来才能够真正的达到你想要的界面效果,下面是个小例子:
import javax.swing.*;
import java.awt.*; public class GridLayout1 {
public GridLayout1() {
JFrame frame=new JFrame();
frame.setLayout(new GridLayout(3,2)); //3行2列的表格布局
for(int i = 0; i < 7; i++)
frame.add(new JButton("Button " + i));
frame.setVisible(true);
frame.setSize(500,300);
}
public static void main(String[] args) {
new GridLayout1();
}
} |
4、GridBagLayout 这个布局方式是最复杂的,它动态的给每一个组件精确的进行位置的约束,为此还专门有个约束的对象GridBagConstraints,总共有11个参数能够对组件进行约束; GridBagConstraints(int gridx,int gridy,int gridwidth,int gridheight,double weightx,double weighty,int anchor,int fill, Insets,int ipadx,int ipady);
gridx和gridy是组件在网格中的位置,这位置的计算方法非常有趣,类似与直角坐标系里面的位置分布;
gridwidth和gridheight 这俩个参数是设置组件在表格当中的大小的,设置的时候要小心一点,自己要有一个界面的草图在旁边参考;
weightx和weighty参数可以设置当你的窗口被拉大(或拉小)的时候,组件所按照什么比例进行缩放,数字越大,组件变化的会越大;
anchor 参数是有两个组件,相对小的的组件应该放在哪里;
fill 参数是当组件所处的动态表格里面有空余的位置的时候,组件将按什么方向填充,这个参数在界面中比较关键一点;
Insets 参数是一个小的对象,其中也有4个不同的参数,分别是上,左,右,下来设置组件之间的间距;
ipadx和ipady是组件边框离组件中心的距离,对有些组件来说这个参数是没有必要的;
感觉有很多的参数来设置一个组件,还有专门的约束对象,其实每次并不是哪一个参数都要重新设置的,下面是一个例子
import javax.swing.*;
import java.awt.*; public class GridBagLayout1 {
public GridBagLayout1(){
JFrame frame =new JFrame();
GridBagLayout grid=new GridBagLayout();
GridBagConstraints c1=new GridBagConstraints();
frame.setLayout(grid);
//为button1进行约束
c1.gridwidth=2; c1.gridheight=1;
c1.insets=new Insets(5,5,0,0); //和上面的组件间距为5,右边为间距5
JButton button1=new JButton("button1");
grid.setConstraints(button1,c1);
frame.add(button1);
//为button2进行约束
c1.fill=GridBagConstraints.HORIZONTAL;
JButton button2=new JButton("button2");
grid.setConstraints(button2,c1);
frame.add(button2);
//为button3进行约束
c1.gridx=0; c1.gridy=1; //动态表格(0,1)位置
c1.gridwidth=4; //组件长占4个单元格,高占一个单元格
JButton button3=new JButton("button3");
grid.setConstraints(button3,c1);
frame.add(button3);
frame.setVisible(true);
frame.setSize(200,150);
}
public static void main(String[] args) {
new GridBagLayout1();
} } |
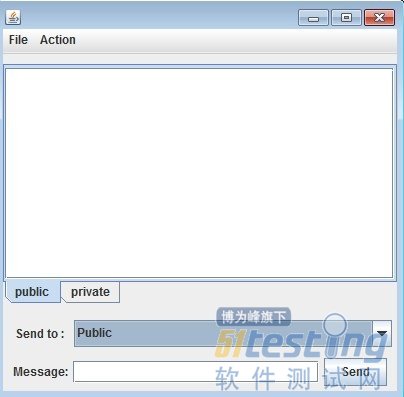
下面是学校实验里面的一个聊天界面的实现,里面综合了上面讲到的几种布局方式:
import javax.swing.*;
import java.awt.*; public class ChatDisplay extends JPanel{
private JPanel interfacePanel;
private JPanel userPanel;
private JLabel userLabel;
private JComboBox userComboBox;
private JLabel messageLabel;
private JButton sendButton;
private JTextField messageText;
private JTabbedPane textTabbedPane;
private JScrollPane publicScrollPane;
private JTextPane publicTextPane;
private JScrollPane privateScrollPane;
private JTextPane privateTextPane;
public ChatDisplay(){
interfacePanel=new JPanel();
interfacePanel.setLayout(new BorderLayout(10,10));
//两个菜单项
//实例化菜单与菜单项
JMenu[] menus={ new JMenu("File"),new JMenu("Action")};
JMenuItem[] items={new JMenuItem("Save"),new JMenuItem("Exit")};
menus[0].add(items[0]);
menus[0].add(items[1]);
//实例化菜单棒,添加菜单项至菜单棒
JMenuBar mb = new JMenuBar();
mb.add(menus[0]);
mb.add(menus[1]);
//设置菜单条的位置在界面的最上方
interfacePanel.add(mb,BorderLayout.NORTH);
//界面中央的信息面板
//实例化共有和私有的文本域 、 滚动面板、设置不可读
publicTextPane=new JTextPane();
publicScrollPane=new JScrollPane(publicTextPane);
publicTextPane.setEditable(false); privateTextPane=new JTextPane();
privateScrollPane=new JScrollPane(privateTextPane);
privateTextPane.setEditable(false);
//实例化动态选项卡
textTabbedPane=new JTabbedPane();
textTabbedPane.addTab("public",publicScrollPane);
textTabbedPane.addTab("private",privateScrollPane);
textTabbedPane.setTabPlacement(JTabbedPane.BOTTOM);
interfacePanel.add(textTabbedPane,BorderLayout.CENTER);
//界面底部的用户面板
//实例化并初始化化各组件
userPanel =new JPanel();
userLabel=new JLabel(" Send to :");
userComboBox=new JComboBox();
String users[]={"Public","ClientB","CientA"};
userComboBox.addItem(users[0]);
userComboBox.addItem(users[1]);
userComboBox.addItem(users[2]);
messageLabel=new JLabel("Message:");
messageText=new JTextField(22);
sendButton=new JButton("Send");
//为下面的uesePanel面板进行布局
//userPanel 设置为两行一列的网格布局,两行分别放两个面板,userPanel2.与userPanel
userPanel.setLayout(new GridLayout(2,1));
JPanel userPanel2 =new JPanel();
JPanel userPanel3 =new JPanel();
userPanel.add(userPanel2 );
userPanel.add(userPanel3); //第一行的面板 userPanel2 采用网格精准定位布局,并添加一个标签与组合框
userPanel2.add(userLabel);
userPanel2.add(userComboBox);
GridBagLayout gridbag=new GridBagLayout();
userPanel2.setLayout(gridbag);
//对第一行第二个组件组合框进行布局约束,实例化一个对象C
GridBagConstraints c=new GridBagConstraints();
//当组合框被拉伸后所按的的比例
c.weightx=1;
c.weighty=1;
//当组件框所占的单位行数还有剩余的时候,组件的填充方式为水平
c.fill=GridBagConstraints.HORIZONTAL;
//组件与组件之前的距离,参数依次为上 左 下 右
c.insets=new Insets(0,10,0,5);
//将布局约束添加在组合框上
gridbag.setConstraints(userComboBox,c); //第二行的面板 userPanel3采用流布局,添加一个标签,一个输入文本的框,一个发送按钮
userPanel3.setLayout(new FlowLayout());
userPanel3.add(messageLabel);
userPanel3.add(messageText);
userPanel3.add(sendButton);
//放置在页面下方,并添加面板到用户面板中去
interfacePanel.add(BorderLayout.SOUTH,userPanel);
JFrame frame=new JFrame();
frame.add(interfacePanel);
frame.setVisible(true);
frame.setSize(410,400);
}
public static void main(String[] args) {
new ChatDisplay();
}
}; |
界面效果如下:

应该总结一下,简单的界面实现,首先需要自己画一个草图,将自己需要的组件都放进去,然后开始敲键盘,复杂一点的界面,借助一点工具是必然的,这样可以省去很大的一部分时间,专注在功能的实现上面。