第五步:复制转换的脚本
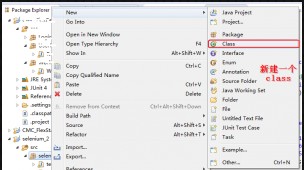
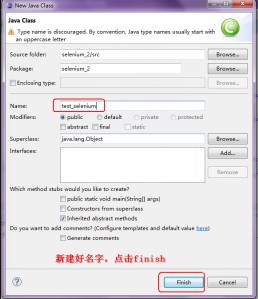
第六步:新建一个class
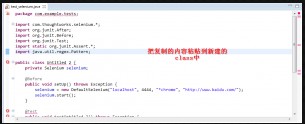
第七步:把复制的脚本粘贴到eclipse中
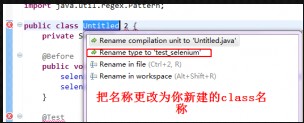
第八步:更改错误
错误1:

错误2:
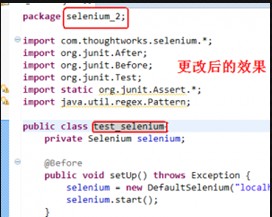
更改的效果:
 1. 打开Firefox,利用IDE录制脚本(依次点击浏览器界面:工具->Selenium IDE)
2. 把录制好的脚本转换成其他语言(非HTML)
备注1:可以点击Selenium IDE界面:Option->Format
或是导出为其他语言,点击Selenium IDE界面:文件->Export Test Case As..
备注2:这里以Java/JUnit4/Remote Control为例
3. 打开eclipse,新建一个class,把转换的脚本粘贴到class中
4. 在class中建立一个主函数
5. 打开selenium服务器(selenium.bat)
6. 选择class界面,点击右键,选择Run as->Java Application
7. 如果运行成功,在Console里面就不会报错,若不能允运行成功,其Console里面则会产生相应的提示信息
下面举例说明:
测试用例:
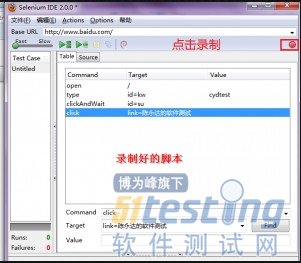
1. 打开百度网页,输入cydtest,点击百度一下
2.点击陈永达测试网站的连接,进入到陈永达测试网站
具体步骤:
第一步:

第二步:

第三步:录制脚本
第四步:转换语言

第五步:复制转换的脚本
第六步:新建一个class
第七步:把复制的脚本粘贴到eclipse中
第八步:更改错误
错误1:
错误2:
更改的效果:
错误3:

这里报错的原因是:test2()这个方法默认抛出异常
解决的方案1:把test2()方法
查看源代码打印帮助1 public void test2() throws Exception
更改为
查看源代码打印帮助1 public void test2()
方案2:把test2放在try..catch..中去调用
查看源代码打印帮助
1 try {
2 ts.test2();
3 } catch (Exception e1) {
4 e1.printStackTrace();
5 } |
第九步:打开selenium服务器
第十步:运行脚本

这样就能把你从IDE上录制的脚本拿到eclipse中运用了
下面是具体的脚本
</pre>
package selenium_2;
import com.thoughtworks.selenium.*;
import org.junit.After;
import org.junit.Before;
import org.junit.Test;
import static org.junit.Assert.*;
import java.util.regex.Pattern;
public class test_selenium{
private Selenium selenium;
@Before
public void setUp(){
//localhost:利用本机打开浏览器
//4444:打开的端口
//*chrome:用Firefox浏览器
//http://www.baidu.com/:在IDE界面Base URL里面的网站
selenium = new DefaultSelenium("localhost", 4444, "*iexplore", "http://www.baidu.com/");
//启动selenium,前提是selenium服务器已经启动
selenium.start();
}
@Test
public void test2(){
//这里open的地址,是上面地址补充,比如录制的网址为http://www.baidu.com/XXX.abc,那么这里open("/XXX.abc")
selenium.open("/");
//把窗口最大化
selenium.windowMaximize();
selenium.type("id=kw", "cydtest");
selenium.click("id=su");
selenium.waitForPageToLoad("30000");
selenium.click("link=陈永达的软件测试");
}
@After
public void tearDown() throws Exception {
//关闭selenium,及为关闭运行的浏览器
selenium.stop();
}
//更改完成后,就自己新建一个主函数
public static void main(String[] agrs){
//把class转换成一个实体
test_selenium ts=new test_selenium();
//用创建的实体调用你建立的方法,用于运行方法里面的具体操作
ts.setUp();
ts.test2();
}
}
<pre> |