Android应用自动化过程中,会遇见需要长按并拖动的场景,例如类似UC浏览器中,长按某个导航中的图标,使其处于可移动状态,然后再将其移动到另一个地方,与其它导航图标换个位置,在robotium中有个drag(float fromX, float toX, float fromY, float toY,int stepCount)方法,但由于drag没有长按这个步骤,因此不能使应用处于可移动的状态,是没法完成这样的常见而简单的操作的。
drag方法源码实现如下:
public void drag(float fromX, float toX, float fromY, float toY,
int stepCount) {
long downTime = SystemClock.uptimeMillis();
long eventTime = SystemClock.uptimeMillis();
float y = fromY;
float x = fromX;
float yStep = (toY - fromY) / stepCount;
float xStep = (toX - fromX) / stepCount;
MotionEvent event = MotionEvent.obtain(downTime, eventTime,MotionEvent.ACTION_DOWN, fromX, fromY, 0);
try {
inst.sendPointerSync(event);
} catch (SecurityException ignored) {}
for (int i = 0; i < stepCount; ++i) {
y += yStep;
x += xStep;
eventTime = SystemClock.uptimeMillis();
event = MotionEvent.obtain(downTime, eventTime,MotionEvent.ACTION_MOVE, x, y, 0);
try {
inst.sendPointerSync(event);
} catch (SecurityException ignored) {}
}
eventTime = SystemClock.uptimeMillis();
event = MotionEvent.obtain(downTime, eventTime, MotionEvent.ACTION_UP,toX, toY, 0);
try {
inst.sendPointerSync(event);
} catch (SecurityException ignored) {}
} |
可以看出其实是通过MotionEvent的ACTION_DOWN模拟屏幕按下操作,ACTION_MOVE模拟手势在屏幕上滑动,ACTION_UP模拟手势离开屏幕,从而完成整个拖动过程,而且其实robotium中的各种点击类方法也都是通过模拟不同的手势完成的。
因此要想完成长按并拖动的操作,只要在ACTION_DOWN之后,停留一段时间即可模拟长按操作。
/**
* 实现将一个视图拖动到另一个视图所在的位置
* @param viewFrom 起始View
* @param viewTo 终点View
* @throws Exception
*/
public void clickLongAndDrag(View viewFrom,View viewTo) throws Exception {
//获得视图View中手机屏幕上的绝对x、y坐标
final int[] location = new int[2];
final int[] location2 = new int[2];
viewFrom.getLocationOnScreen(location);
viewTo.getLocationOnScreen(location2);
float xStart=location[0];
float yStart=location[1];
float xStop=location2[0];
float yStop=location2[1];
Log.i(TAG, "xStart:"+String.valueOf(xStart));
Log.i(TAG, "yStart:"+String.valueOf(yStart));
Log.i(TAG, "xStop:"+String.valueOf(xStop));
Log.i(TAG, "yStop:"+String.valueOf(yStop));
long downTime = SystemClock.uptimeMillis();
long eventTime = SystemClock.uptimeMillis();
try{
MotionEvent event = MotionEvent.obtain(downTime, eventTime, MotionEvent.ACTION_DOWN, xStart+10f, yStart+10f, 0);
inst.sendPointerSync(event);
//event = MotionEvent.obtain(downTime, eventTime, MotionEvent.ACTION_MOVE, xStart+10f+1.0f, yStart+10f+1.0f, 0);
//inst.sendPointerSync(event);
//Thread.sleep(1000);
//延迟一秒,模拟长按操作
eventTime = SystemClock.uptimeMillis() + 1000;
//xStop加了10点坐标,获得的View坐标需根据应用实际情况稍做一点调整
event = MotionEvent.obtain(downTime, eventTime, MotionEvent.ACTION_MOVE, xStop+10f, yStop+50f, 0);
inst.sendPointerSync(event);
eventTime = SystemClock.uptimeMillis() + 1000;
//又再小小移动了一次,不这么做的话可以无法激活被测应用状态,导致View移动后又回复到原来位置
event = MotionEvent.obtain(downTime, eventTime, MotionEvent.ACTION_MOVE, xStop+10f, yStop+10f, 0);
inst.sendPointerSync(event);
eventTime = SystemClock.uptimeMillis() + 1000;
event = MotionEvent.obtain(downTime, eventTime, MotionEvent.ACTION_UP, xStop+10f, yStop+10f, 0);
inst.sendPointerSync(event);
}catch (Exception ignored) {
// Handle exceptions if necessary
}
} |
在本文中,你将会学习到如何在Eclipse中创建Android JUnit的单元测试工程以及在不同的条件下创建及运行自动测试用例。
准备工作
本文假设读者已经有一定的Android基础知识,并且已经安装了Eclipse和Android SDK等开发工具。本文将指导读者如何将Android Junit框架应用到Android应用中去。本文还特别重点展示了如何测试Android中的Activity和如何识别程序中的错误。
本文的示例代码可以在http://code.google.com/p/simple-calc-unit-testing/中下载
步骤1 被测试的应用SimpleCalc概况
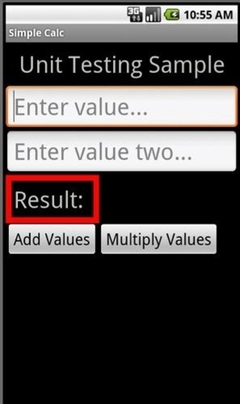
在本文中,将以一个写好了的应用SimpleCalc简单计算器为例子进行讲解。这个简单计算器有两个功能,允许用户输入两个数并将它们相加或相乘,最后显示结果,如下图所示:

步骤2 SimpleCalc的的界面设计
由于应用比较简单,只占一屏,所以我们在/res/layout/main.xml中设计如下代码所示:
<linearlayout p="" <="" xmlns:android="http://schemas.android.com/apk/res/android" style="line-height: normal !important;">
android:orientation="vertical" android:layout_width="fill_parent"
android:layout_height="fill_parent">
<textview p="" <="" android:layout_width="fill_parent" style="line-height: normal !important;">
android:layout_height="wrap_content" android:text="@string/hello"
android:gravity="center_horizontal" android:textSize="48px"
android:padding="12px" />
<edittext p="" <="android:id="@+id/value1" android:layout_height="wrap_content" style="line-height: normal !important;">
android:hint="@string/hint1" android:inputType="numberDecimal"
android:layout_width="fill_parent" android:textSize="48px">
<edittext p="" <="android:id="@+id/value2" android:layout_height="wrap_content" style="line-height: normal !important;">
android:hint="@string/hint2" android:inputType="numberDecimal"
android:layout_width="fill_parent" android:textSize="48px">
<framelayout p="" <="android:id="@+id/FrameLayout01" style="line-height: normal !important;">
android:layout_width="wrap_content" android:layout_height="wrap_content"
android:padding="12px" android:background="#ff0000">
<linearlayout p="" <="" android:id="@+id/LinearLayout02" style="line-height: normal !important;">
android:layout_width="wrap_content" android:layout_height="wrap_content"
android:orientation="horizontal" android:background="#000000"
android:padding="4px">
<textview p="" <="" android:layout_width="wrap_content" style="line-height: normal !important;">
android:layout_height="wrap_content" android:text="@string/resultLabel"
android:textSize="48px" android:id="@+id/resultLabel">
<textview p="" <="" android:layout_width="wrap_content" style="line-height: normal !important;">
android:layout_height="wrap_content" android:id="@+id/result"
android:textSize="48px" android:textStyle="bold"
android:layout_marginLeft="16px">
<linearlayout p="" <="" android:id="@+id/LinearLayout03" style="line-height: normal !important;">
android:layout_height="wrap_content" android:layout_width="fill_parent">
<button p=" android:id="@+id/addValues" android:layout_height="wrap_content">
android:text="@string/add" android:textSize="32px"
android:layout_width="wrap_content">
<button p="" <=" android:id="@+id/multiplyValues" android:layout_height="wrap_content">
android:text="@string/multiply" android:textSize="32px"
android:layout_width="wrap_content"> |
简单解析一下这个界面设计,我们使用了LinearLayout,以使得控件能在垂直方向竖向排列。界面中包括了显示标题“Unit Testing Sample”的textview,两个输入数字的edittext控件,一个FrameLayout控件中包含了一个水平的LinearLayout,在这个LinearLayout包含了一个显示结果的textview以及其提示文字“Result”,注意的是FrameLayout的背景颜色设置为红色,而LinearLayou设置成了黑色背景。
前言:使用Jmeter测试ActiveMQ的JMS消息,网上有一篇,但是图片看不了,具体参数填什么也不清楚,因此决定总结这篇
所使用的Jmeter版本2.8,activemq版本5.6
一、创建jndi.properties文件
由于 jmeter 是通过 jndi 来获得 jms 中相关对象的,如 ConnectionFactory 和 Destination,所以在 jmeter 的 classpath 中需要添加一个 jndi.properties 属性文件,用于配置jndi
创建jndi.properties文件,包含如下内容
java.naming.factory.initial = org.apache.activemq.jndi.ActiveMQInitialContextFactory
java.naming.provider.url = tcp://yourIP:61616
#指定connectionFactory的jndi名字,多个名字之间可以逗号分隔。
#以下为例:
#对于topic,使用(TopicConnectionFactory)context.lookup("connectionFactry")
#对于queue,(QueueConnectionFactory)context.lookup("connectionFactory")
connectionFactoryNames = connectionFactory #注册queue,格式:
#queue.[jndiName] = [physicalName]
#使用时:(Queue)context.lookup("jndiName"),此处是MyQueue
queue.MyQueue = example.MyQueue #注册topic,格式:
# topic.[jndiName] = [physicalName]
#使用时:(Topic)context.lookup("jndiName"),此处是MyTopic
topic.MyTopic = ActiveMQ.Advisory.Consumer.Topic.cacheupdate |
保存并把这个文件复制到 JMETER_HOME/bin(JMETER_HOME为 jmeter 的安装目录)目录中。
二、把jndi.properties放到jmeter的启动jar包中
由于bin目录并不在jmeter的classpath中,所以需要执行一些额外的工作来把jndi.properties添加到jmeter的classpath中,把jndi.properties打包到jmeter的启动jar包中。jmeter的启动jar包为JMETER_HOME/bin/ApacheJMeter.jar,所以需要把jndi.properties 打包到这个 jar 文件中。直接将文件拖入jar包中即可。
或者执行如下操作,打开命令行窗口,并定位到 JMETER_HOME/bin 目录,运行如下命令 jar uf ApacheJMeter.jar jndi.properties
三、添加activemq-all-5.2.0.jar包到Jmeter的lib库
将ACTIVE_HOME/activemq-all-5.2.0.jar文件复制到JMETER_HOME/lib目录中,jmeter在测试jms的时候会使用到activemq提供的jms的实现类,这些类并没有随jmeter一起分发,需要把这些类添加到jmeter的classpath中。
四、启动Jmeter测试JMS
添加线程组及JMS的sampler,有三种方式的JMS消息
1、Point-to-Point
填写参数如下:
QueueConnection Factory:connectionFactory
JNDI name Request queue:MyQueue
JNDI name Receive queue:MyQueue
Content:this is a test
Initial Context Factory:org.apache.activemq.jndi.ActiveMQInitialContextFactory
ProviderURL:tcp://yourIP:61616 |
2、Publisher
基本值同Point-to-Point,不同点在于Destination,填写JMS的topic目的地
若在ActiveMQ中Topics的名字为example.MyTopic
则jndi.properties文件中定义的topic如下:
topic.MyTopic = example.MyTopic
则Destination填写topic.后面的MyTopic
3、Subscriber
基本值同Publisher,不同在于可以根据需要填写Client ID,JMS Selector进行消息过滤
报错:Response message: javax.naming.NameNotFoundException:***
原因Destination中填写的错了,以为填写ActiveMQ中实际的Topic名
其实在jndi.properties文件中已经实例化了,topic.MyTopic = example.MyTopic,这里example.MyTopic就是ActiveMQ中的Topic名
因此实际填写时是填写topic.后的MyTopic
pylot是python编写的一款web压力测试工具。使用比较简单。而且测试结果相对稳定。
这里不得不鄙视一下apache 的ab测试,那结果真是让人蛋疼,同样的url,测试结果飘忽不定,看得人心惊肉跳,摸不着头脑。
下载
pylot官网:www.pylot.org/
下载地址:
http://www.pylot.org/download.html
最新的版本为 pylot_1.26.zip - 07/06/2009 (很久没更新了)
安装
简单安装:
解压即可。 (板砖飞过来了⊙﹏⊙b)
官网上的安装方法,比较麻烦。实际上,如果你不需要图形化的报告,只需要把 pylot_1.26.zip 下载,解压就可以用命令行使用了。
完全安装(复杂安装):
按照官网的方法:
第1步:下载Pylot (必须)
第2步:安装Python 2.5 + (必须)
第3步:安装wxPython(可选 - 用于GUI模式)
从这里获取安装程序:http://www.wxpython.org/download.php
第4步:安装numpy的(可选 - 用于报告以图表)
从这里获取安装程序:http://sourceforge.net/projects/numpy
第5步:安装matplotlib的(可选 - 用于报告以图表)
从这里获取安装程序:http://sourceforge.net/projects/matplotlib
Ps. 我估计在mac下是完全安装是最合适的。 若是在windows下面安装,matplotlib会非常麻烦,需要gcc的支持。我鼓捣了半天也没有搞定这个。
命令行方式的使用
配置要压测的url:
在 pylot 的目录下,编辑 testcases.xml 文件。
<testcases>
<!-- SAMPLE TEST CASE -->
<case>
<url>http://www.xxxxx.com/test11.php</url>
</case>
<!-- SAMPLE TEST CASE -->
<!--
<case>
<url>http://search.yahooapis.com/WebSearchService/V1/webSearch</url>
<method>POST</method>
<body><![CDATA[appid=YahooDemo&query=pylot]]></body>
<add_header>Content-type: application/x-www-form-urlencoded</add_header>
</case>
-->
</testcases> |
命令运行:
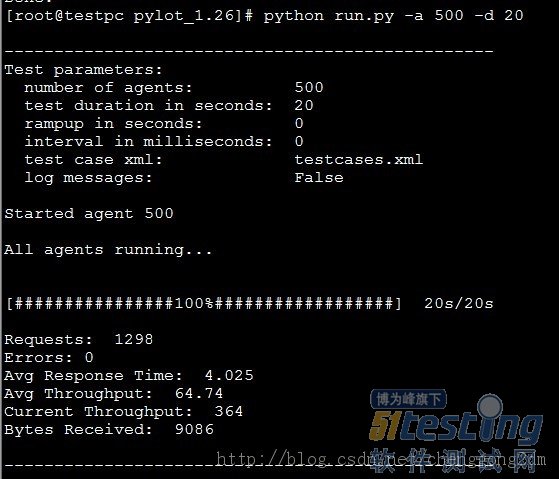
生成500个客户端,测试时间20秒:
python run.py -a 500 -d 20
结果说明
如图:

具体已经说的比较明白了。
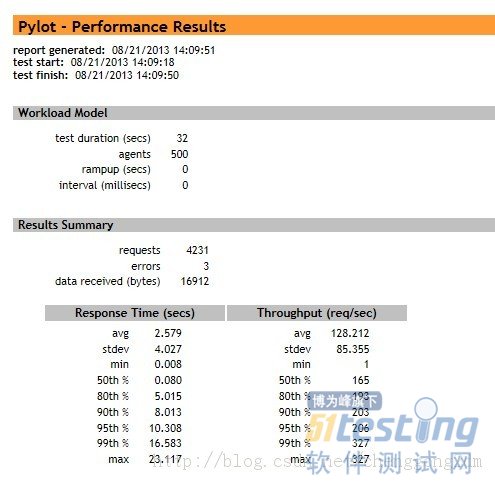
而且,最后,会提示还有一个html的测试结果页面,可供参考。

因为在windows下,我没有安装好matplotlib,所以看不到pylot的图形化报表,只能在ceonts下,跑命令了。
改天有时间,一定琢磨一下,把图形界面跑起来。
二维码,是一种采用黑白相间的平面几何图形通过相应的编码算法来记录文字、图片、网址等信息的条码图片。如下图

二维码的特点:
1. 高密度编码,信息容量大
可容纳多达1850个大写字母或2710个数字或1108个字节,或500多个汉字,比普通条码信息容量约高几十倍。
2. 编码范围广
该条码可以把图片、声音、文字、签字、指纹等可以数字化的信息进行编码,用条码表示出来;可以表示多种语言文字;可表示图像数据。
3. 容错能力强,具有纠错功能
这使得二维条码因穿孔、污损等引起局部损坏时,照样可以正确得到识读,损毁面积达50%仍可恢复信息。
4. 译码可靠性高
它比普通条码译码错误率百万分之二要低得多,误码率不超过千万分之一。
5. 可引入加密措施
保密性、防伪性好。
6. 成本低,易制作,持久耐用
正因为以上这些特点,二维码现在越来越流行,应用也是越来越广(详细了解请见百度百科,介绍不是本篇重点),所以掌握如何开发二维码是非常不错的知识储备,因此本篇博文将为大家讲解如何生成、解析二维码。
一、Java
所需jar包:QRCode.jar
http://download.csdn.net/detail/wangpeng047/4008532
TwoDimensionCode类:二维码操作核心类
package qrcode; import java.awt.Color;
import java.awt.Graphics2D;
import java.awt.image.BufferedImage;
import java.io.File;
import java.io.IOException;
import java.io.InputStream;
import java.io.OutputStream; import javax.imageio.ImageIO; import jp.sourceforge.qrcode.QRCodeDecoder;
import jp.sourceforge.qrcode.exception.DecodingFailedException; import com.swetake.util.Qrcode; public class TwoDimensionCode {
/**
* 生成二维码(QRCode)图片
* @param content 存储内容
* @param imgPath 图片路径
*/
public void encoderQRCode(String content, String imgPath) {
this.encoderQRCode(content, imgPath, "png", 7);
}
/**
* 生成二维码(QRCode)图片
* @param content 存储内容
* @param output 输出流
*/
public void encoderQRCode(String content, OutputStream output) {
this.encoderQRCode(content, output, "png", 7);
}
/**
* 生成二维码(QRCode)图片
* @param content 存储内容
* @param imgPath 图片路径
* @param imgType 图片类型
*/
public void encoderQRCode(String content, String imgPath, String imgType) {
this.encoderQRCode(content, imgPath, imgType, 7);
}
/**
* 生成二维码(QRCode)图片
* @param content 存储内容
* @param output 输出流
* @param imgType 图片类型
*/
public void encoderQRCode(String content, OutputStream output, String imgType) {
this.encoderQRCode(content, output, imgType, 7);
} /**
* 生成二维码(QRCode)图片
* @param content 存储内容
* @param imgPath 图片路径
* @param imgType 图片类型
* @param size 二维码尺寸
*/
public void encoderQRCode(String content, String imgPath, String imgType, int size) {
try {
BufferedImage bufImg = this.qRCodeCommon(content, imgType, size);
File imgFile = new File(imgPath);
// 生成二维码QRCode图片
ImageIO.write(bufImg, imgType, imgFile);
} catch (Exception e) {
e.printStackTrace();
}
} /**
* 生成二维码(QRCode)图片
* @param content 存储内容
* @param output 输出流
* @param imgType 图片类型
* @param size 二维码尺寸
*/
public void encoderQRCode(String content, OutputStream output, String imgType, int size) {
try {
BufferedImage bufImg = this.qRCodeCommon(content, imgType, size);
// 生成二维码QRCode图片
ImageIO.write(bufImg, imgType, output);
} catch (Exception e) {
e.printStackTrace();
}
}
/**
* 生成二维码(QRCode)图片的公共方法
* @param content 存储内容
* @param imgType 图片类型
* @param size 二维码尺寸
* @return
*/
private BufferedImage qRCodeCommon(String content, String imgType, int size) {
BufferedImage bufImg = null;
try {
Qrcode qrcodeHandler = new Qrcode();
// 设置二维码排错率,可选L(7%)、M(15%)、Q(25%)、H(30%),排错率越高可存储的信息越少,但对二维码清晰度的要求越小
qrcodeHandler.setQrcodeErrorCorrect('M');
qrcodeHandler.setQrcodeEncodeMode('B');
// 设置设置二维码尺寸,取值范围1-40,值越大尺寸越大,可存储的信息越大
qrcodeHandler.setQrcodeVersion(size);
// 获得内容的字节数组,设置编码格式
byte[] contentBytes = content.getBytes("utf-8");
// 图片尺寸
int imgSize = 67 + 12 * (size - 1);
bufImg = new BufferedImage(imgSize, imgSize, BufferedImage.TYPE_INT_RGB);
Graphics2D gs = bufImg.createGraphics();
// 设置背景颜色
gs.setBackground(Color.WHITE);
gs.clearRect(0, 0, imgSize, imgSize); // 设定图像颜色> BLACK
gs.setColor(Color.BLACK);
// 设置偏移量,不设置可能导致解析出错
int pixoff = 2;
// 输出内容> 二维码
if (contentBytes.length > 0 && contentBytes.length < 800) {
boolean[][] codeOut = qrcodeHandler.calQrcode(contentBytes);
for (int i = 0; i < codeOut.length; i++) {
for (int j = 0; j < codeOut.length; j++) {
if (codeOut[j][i]) {
gs.fillRect(j * 3 + pixoff, i * 3 + pixoff, 3, 3);
}
}
}
} else {
throw new Exception("QRCode content bytes length = " + contentBytes.length + " not in [0, 800].");
}
gs.dispose();
bufImg.flush();
} catch (Exception e) {
e.printStackTrace();
}
return bufImg;
}
/**
* 解析二维码(QRCode)
* @param imgPath 图片路径
* @return
*/
public String decoderQRCode(String imgPath) {
// QRCode 二维码图片的文件
File imageFile = new File(imgPath);
BufferedImage bufImg = null;
String content = null;
try {
bufImg = ImageIO.read(imageFile);
QRCodeDecoder decoder = new QRCodeDecoder();
content = new String(decoder.decode(new TwoDimensionCodeImage(bufImg)), "utf-8");
} catch (IOException e) {
System.out.println("Error: " + e.getMessage());
e.printStackTrace();
} catch (DecodingFailedException dfe) {
System.out.println("Error: " + dfe.getMessage());
dfe.printStackTrace();
}
return content;
}
/**
* 解析二维码(QRCode)
* @param input 输入流
* @return
*/
public String decoderQRCode(InputStream input) {
BufferedImage bufImg = null;
String content = null;
try {
bufImg = ImageIO.read(input);
QRCodeDecoder decoder = new QRCodeDecoder();
content = new String(decoder.decode(new TwoDimensionCodeImage(bufImg)), "utf-8");
} catch (IOException e) {
System.out.println("Error: " + e.getMessage());
e.printStackTrace();
} catch (DecodingFailedException dfe) {
System.out.println("Error: " + dfe.getMessage());
dfe.printStackTrace();
}
return content;
} public static void main(String[] args) {
String imgPath = "G:/TDDOWNLOAD/Michael_QRCode.png";
String encoderContent = "Hello 大大、小小,welcome to QRCode!" + "\nMyblog [ http://sjsky.iteye.com ]" + "\nEMail [ sjsky007@gmail.com]";
TwoDimensionCode handler = new TwoDimensionCode();
handler.encoderQRCode(encoderContent, imgPath, "png");
// try {
// OutputStream output = new FileOutputStream(imgPath);
// handler.encoderQRCode(content, output);
// } catch (Exception e) {
// e.printStackTrace();
// }
System.out.println("========encoder success");
String decoderContent = handler.decoderQRCode(imgPath);
System.out.println("解析结果如下:");
System.out.println(decoderContent);
System.out.println("========decoder success!!!");
}
} |
TwoDimensionCodeImage 类:二维码图片对象
package qrcode; import java.awt.image.BufferedImage; import jp.sourceforge.qrcode.data.QRCodeImage; public class TwoDimensionCodeImage implements QRCodeImage { BufferedImage bufImg;
public TwoDimensionCodeImage(BufferedImage bufImg) {
this.bufImg = bufImg;
}
@Override
public int getHeight() {
return bufImg.getHeight();
} @Override
public int getPixel(int x, int y) {
return bufImg.getRGB(x, y);
} @Override
public int getWidth() {
return bufImg.getWidth();
} } |
二、.NET
所需dll:ThoughtWorks.QRCode
http://download.csdn.net/detail/wangpeng047/4008536
这里代码思路跟上述java大同小异,这里就不给出源码了,可参见http://download.csdn.net/detail/ywjq/3454011
上面的java代码,笔者已经进行了简单的封装,方便大家适用不同场合,希望对大家能有所帮助
<PRE class=java name="code">package cn.com;
import java.text.DateFormat;
import java.text.ParseException;
import java.text.SimpleDateFormat;
import java.util.Calendar;
import java.util.Date;
import java.util.GregorianCalendar;
/**
* @author ty 1、DateFormat可以直接使用,的那其本身是一个抽象类,可以根据Localc指定区域不同得到不同的日期效果
* 2、SimpleDateFormat类时DateFormat类的子类;一般需要使用simpleDateFormate类来完成
*/
public class DateDemo {
public static void main(String[] args) {
// dateDemo();
// dateDemo2();
// dateFormat();
simpleDateFormat();
}
/* date使用 */
private static void dateDemo() {
Date date = new Date();
System.out.println("当前日期:" + date);
}
/*
* calendar使用:抽象类,需要通过实例化本类对象,可以通过calendar获得完整日期,获取的日期为0-11月,所以要加1,
* 通过此类可以轻松获得完整日期
*/
private static void dateDemo2() {
GregorianCalendar calendar = new GregorianCalendar();
System.out.println(calendar.get(Calendar.MONTH));
}
/*
* DateFormat,是专门格式化日期的操作,抽象类,内部提供实例化操作。得到日期的dateformat对象:getdateInstance;
* 得到日期时间的对象:getdateTimeinstance
*/
private static void dateFormat() {
DateFormat df1 = DateFormat.getDateInstance();
DateFormat df2 = DateFormat.getDateTimeInstance();
System.out.println("DATE:" + df1.format(new Date()));
System.out.println("DATETIME:" + df2.format(new Date()));
}
/*
* simpleDateFormat类。yyyy表示年,MM表示月,dd表示日,HH表示时,mm表示分,ss表示秒,SSS表示毫秒。
* 使用的时候要注意在构造对象时配匹
*/
private static void simpleDateFormat() {
String strDate = "2008-10-19 10:11:30.345";
String pat1 = "yyyy-MM-dd HH:mm:ss.SSSS";
String pat2 = "yyyy年MM月dd日 HH时mm分ss秒SSSS毫秒";
SimpleDateFormat sdf1 = new SimpleDateFormat(pat1);
SimpleDateFormat sdf2 = new SimpleDateFormat(pat2);
Date d = null;
try {
d = sdf1.parse(strDate);// 将给定的字符串中的日期提取出来
} catch (ParseException e) {
// TODO Auto-generated catch block
e.printStackTrace();
}
System.out.println(sdf2.format(d));// 将日期变为新的格式
}
}
</PRE><BR>
<BR>
<PRE></PRE>
<PRE></PRE>
简介
SQLite是轻量级嵌入式数据库引擎,它支持 SQL 语言,并且只利用很少的内存就有很好的性能。Android 集成了 SQLite 数据库 Android 在运行时(run-time)集成了 SQLite,所以每个 Android 应用程序都可以使用 SQLite 数据库。
对于熟悉 SQL 的开发人员来时,在 Android 开发中使用 SQLite 相当简单。但是,由于 JDBC 会消耗太多的系统资源,所以 JDBC 对于手机这种内存受限设备来说并不合适。因此,Android 提供了一些新的 API 来使用 SQLite 数据库,Android 开发中,程序员需要学使用这些 API。
数据库存储在 data/< 项目文件夹 >/databases/ 下。 Android 开发中使用 SQLite 数据库 Activites 可以通过 Content Provider 或者 Service 访问一个数据库。
创建数据库
创建数据库只要自定义一个类继承SQLiteOpenHelper即可。在SQLiteOpenHelper 的子类,至少需要实现三个方法:
1 构造函数,调用父类 SQLiteOpenHelper 的构造函数。这个方法需要四个参数:上下文环境(例如,一个 Activity),数据库名字,一个可选的游标工厂(通常是 Null),一个代表你正在使用的数据库模型版本的整数。
2 onCreate()方法,它需要一个 SQLiteDatabase 对象作为参数,根据需要对这个对象填充表和初始化数据。
3 onUpgrage() 方法,它需要三个参数,一个 SQLiteDatabase 对象,一个旧的版本号和一个新的版本号,这样你就可以清楚如何把一个数据库从旧的模型转变到新的模型。(Android中数据库升级使用SQLiteOpenHelper类onUpgrade方法说明)
下面示例代码展示了如何继承 SQLiteOpenHelper 创建数据库:
public class DBHelper extends SQLiteOpenHelper {
// 数据库名称
public static final String DBNAME = "crius.db";
// 数据库版本
public static final int VERSION = 2;
public DBHelper(Context c, String dbName) {
super(c, DBNAME, null, VERSION);
}
@Override
public void onCreate(SQLiteDatabase db) {
// TODO 创建数据库后,创建表
db.execSQL("create table if not exists draftbox(pkid integer primary key autoincrement,formcode varchar(20),date datetime,summary varchar(100), context text, imagefolder varchar(50)) ");
}
@Override
public void onUpgrade(SQLiteDatabase db, int oldVersion, int newVersion) {
// TODO 更改数据库版本的操作
}
@Override
public void onOpen(SQLiteDatabase db) {
super.onOpen(db);
// TODO 每次成功打开数据库后首先被执行
}
} |
对数据库表进行操作
接下来讨论具体如何插入数据、查询数据、删除数据等等。调用 getReadableDatabase() 或 getWriteableDatabase() 方法,你可以得到 SQLiteDatabase 实例,具体调用那个方法,取决于你是否需要改变数据库的内容。有两种方法可以对数据库表进行操作:使用execSQL方法执行SQL语句;使用insert、delete、update和query方法,把SQL语句的一部分作为参数。
插入数据:
使用SQLiteDatabase.insert()方法来插入数据:
public voidinsert(int formCode, String summary, String context, String folder) {
Log.i("SQLite", "----insert----");
ContentValues values = new ContentValues();
values.put("formcode", formCode);
values.put("date", (new TaskDate()).toString());
values.put("summary", summary);
values.put("context", context);
values.put("imagefolder", folder);
SQLiteDatabase db = getWritableDatabase();
db.beginTransaction();
try { db.insert("draftbox",null, values);db.setTransactionSuccessful(); } catch (Exception e) {
return ;
} finally {
db.endTransaction();
}
db.close();} |
使用SQLiteDatabase.execSQL()方法来插入数据:
public int insert(Person person) { Log.i("SQLite", "----insert----"); SQLiteDatabase db = getWritableDatabase(); db.beginTransaction(); try { db.execSQL("insert into " + "draftbox" + " values(?, ?, ?, ?)", new Object[] { person.formCode, person.summary, person.context, person.folder}); db.setTransactionSuccessful(); } catch (Exception e) { return 0; } finally { db.endTransaction(); } db.close(); return 1; } |
删除数据:
使用SQLiteDatabase.delete()方法来删除数据(删除所有数据db.delete(<表名>, null, null)):
public int delete(Person person) {
Log.e("SQLite", "----delete----");
SQLiteDatabase db = dbHelper.getWritableDatabase();
db.beginTransaction();
try {
db.delete(Person.TABLENAME , "id"+ "=?", new String[] { person.id});
db.setTransactionSuccessful();
} catch (Exception e) {
return 0;
} finally {
db.endTransaction();
}
db.close();
return 1;
} |
使用SQLiteDatabase.execSQL()方法来删除数据:
public int delete(Person person) {
Log.e("SQLite", "----delete----");
SQLiteDatabase db = dbHelper.getWritableDatabase();
db.beginTransaction();
try {
db.execSQL("delete from " + Person.TABLENAME + " where id = ?",
new Object[] { person.id });
db.setTransactionSuccessful();
} catch (Exception e) {
return 0;
} finally {
db.endTransaction();
}
db.close();
return 1;
} |
修改数据:
使用SQLiteDatabase.update()方法来修改数据:
public int update(Person person) {
Log.e("SQLite", "----update----");
ContentValues values = new ContentValues();
values.put("formcode", person.formCode);
values.put("summary", person.summary);
values.put("context", person.context);
values.put("imagefolder", person.folder);
SQLiteDatabase db = dbHelper.getWritableDatabase();
db.beginTransaction();
try {
db.update(Person.TABLENAME, values , "id" + "=?",new String[] {person.id});
db.setTransactionSuccessful();
} catch (Exception e) {
return 0;
} finally {
db.endTransaction();
}
db.close();
return 1;
} |
使用SQLiteDatabase.execSQL()方法来修改数据:
public int update(Person person) {
Log.e("SQLite", "----update----");
SQLiteDatabase db = dbHelper.getWritableDatabase();
db.beginTransaction();
try {
db.execSQL("update " + Person.TABLENAME
+ " set formCode=?, summary=?, context=? where id=?", new Object[] {
person.formCode,person.summary, person.context, person.id});
db.setTransactionSuccessful();
} catch (Exception e) {
return 0;
} finally {
db.endTransaction();
}
db.close();
return 1;
} |
查询数据:
使用SQLiteDatabase.rawQuery()方法来查询数据:
Cursor c=db.rawQuery( "SELECT formCode,summary,context,imagefolder FROM draftbox WHERE id=? ", person.id);
使用SQLiteDatabase.query()方法来查询数据:
/**
*
* @param table 表名
* @param columns 列名字符串数组
* @param selection 筛选条件
* @param selectionArgs 筛选条件参数数组
* @param groupBy 分组字段
* @param having
* @param orderBy 排序字段
* @return Cursor对象
*/ public Cursor query(String table, String[] columns, String selection, String[] selectionArgs, String groupBy, String having, String orderBy); Cursor c=db.query("draftbox" , columns, selection, selectionArgs,groupBy, having, orderBy);
|
不管你如何执行查询,都会返回一个 Cursor,这是 Android 的 SQLite 数据库游标,Cursor 是每行的集合。
使用 moveToFirst() 定位第一行。
你必须知道每一列的名称。
你必须知道每一列的数据类型。
Cursor 是一个随机的数据源。
所有的数据都是通过下标取得。
关于 Cursor 的重要方法:
close()
关闭游标,释放资源
copyStringToBuffer(int columnIndex, CharArrayBuffer buffer)
在缓冲区中检索请求的列的文本,将将其存储
getColumnCount()
返回所有列的总数
getColumnIndex(String columnName)
返回指定列的名称,如果不存在返回-1
getColumnIndexOrThrow(String columnName)
从零开始返回指定列名称,如果不存在将抛出IllegalArgumentException 异常。
getColumnName(int columnIndex)
从给定的索引返回列名
getColumnNames()
返回一个字符串数组的列名
getCount()
返回Cursor 中的行数
moveToFirst()
移动光标到第一行
moveToLast()
移动光标到最后一行
moveToNext()
移动光标到下一行
moveToPosition(int position)
移动光标到一个绝对的位置
moveToPrevious()
移动光标到上一行
现在让我们看看如何循环 Cursor 取出我们需要的数据:
Cursor result=db.rawQuery("SELECT pkid, date, context FROM draftbox",null);
result.moveToFirst();
while (!result.isAfterLast()) {
int id=result.getInt(0);
String date=result.getString(1);
//通过字段字取值
String context=result.getString(result.getColumnIndex("context"));
result.moveToNext();
}
result.close(); |
SQLite 数据库管理工具 在 Android 中使用 SQLite 数据库管理工具 在其他数据库上作开发,一般都使用工具来检查和处理数据库的内容,而不是仅仅使用数据库的 API。
使用 Android 模拟器,有两种可供选择的方法来管理数据库。
首先,模拟器绑定了 sqlite3 控制台程序,可以使用 adb shell 命令来调用他。只要你进入了模拟器的 shell,在数据库的路径执行 sqlite3 命令就可以了。
数据库文件一般存放在: /data/data/<项目文件夹>/databases/<数据库名>如果你喜欢使用更友好的工具,你可以把数据库拷贝到你的开发机上,使用 SQLite-aware 客户端来操作它。这样的话,你在一个数据库的拷贝上操作,如果你想要你的修改能反映到设备上,你需要把数据库备份回去。
把数据库从设备上考出来,你可以使用 adb pull 命令(或者在 IDE 上做相应操作)。
存储一个修改过的数据库到设备上,使用 adb push 命令。 一个最方便的 SQLite 客户端是 FireFox SQLite Manager 扩展,它可以跨所有平台使用。
//每次只返回一条记录,如果要保存所有记录,不能用局部变量。
int _callback(void *olt_temp, int argc, char *value[], char *name[])
{
//olt_temp: 与sqlite3_exec中的第四个参数相同
//argc: 字段数
//value: 值
//name: 字段名
return 0; //0表示成功,继续收到其它数据,
//其它值表示终止,不会再继续收到数据。
} sqlite3* m_pDB;
if(0 != ::sqlite3_open16(path, &m_pDB))
{
//error
//return false;
}
int ire = sqlite3_exec(pDB, pSql, _callback, NULL, &m_pErrMsg);
if (NULL != m_pErrMsg)
{
::sqlite3_free(m_pErrMsg);
m_pErrMsg = NULL;
}
if (0 != ire)
{
//执行失败
//return false;
}
sqlite3_close(m_pDB); |
一、界面测试点:
1、界面的设计风格是否与UI的设计风格统一;
2、界面中的文字简洁易懂;
3、界面中没有错别字;
二、用户名与密码在输入时,要考虑:
1、正确的用户名与正确的密码;
2、正确的用户名与错误的密码;
3、错误的用户名与正确的密码;
4、错误的用户名与错误的密码;
5、空的用户名和空的密码;
6、正确的用户名和空的密码;
7、空的用户名和正确的密码;
8、用户名的前/中/后含有空格;
9、密码的前/中/后含有空格;
10、用户名与密码使用的字符范围及位数限制的测试(等价类及边界值,会用到强制的复制与粘贴来实现不允许输入的字符,以及一些保留字的测试);
11、牵扯到验证码的,还要考虑文字是否扭曲过度导致辨认难度大,考虑颜色(色盲使用者),刷新或换一个按钮是否好用;
三、安全性测试:
1、密码是否隐蔽显示;
2、输入特殊字符串(null,NULL,javascript,<script>,</script>,<title>,<html>,<td>)、输入脚本函数(<script>alert("abc")</script>)、doucment.write("abc")、<b>hello</b>);
3、不能直接输入,就copy,是否数据检验出错;
这要准确定位每一个输入框的功能,每一种错误情况下,出现的错误提示要准确或者合适。
四、其他测试点:
1、输入框之间考虑tab键是否支持;
2、登录按钮要考虑回车键是否支持;
3、取消后的默认位置(一般为空白的用户名输入框);
4、登录后的跳转页面是否正确(一般为首页);
5、要考虑多次点击登录和取消按钮的界面反应;
6、考虑是否支持多用户在同一机器上登录;
7、考虑一用户在多台机器上登录;
8、登录页面中的注册等链接是否正确。