
What is load testing?- Load testing is to test that if the application works fine with the loads that result from large number of simultaneous users, transactions and to determine weather it can handle peak usage periods.
What is Performance testing?- Timing for both read and update transactions should be gathered to determine whether system functions are being performed in an acceptable timeframe. This should be done standalone and then in a multi user environment to determine the effect of multiple transactions on the timing of a single transaction.
Did u use LoadRunner? What version?- Yes. Version 7.2.
Explain the Load testing process?-
Step 1: Planning the test. Here, we develop a clearly defined test plan to ensure the test scenarios we develop will accomplish load-testing objectives. Step 2: Creating Vusers. Here, we create Vuser scripts that contain tasks performed by each Vuser, tasks performed by Vusers as a whole, and tasks measured as transactions. Step 3: Creating the scenario. A scenario describes the events that occur during a testing session. It includes a list of machines, scripts, and Vusers that run during the scenario. We create scenarios using LoadRunner Controller. We can create manual scenarios as well as goal-oriented scenarios. In manual scenarios, we define the number of Vusers, the load generator machines, and percentage of Vusers to be assigned to each script. For web tests, we may create a goal-oriented scenario where we define the goal that our test has to achieve. LoadRunner automatically builds a scenario for us. Step 4: Running the scenario.
We emulate load on the server by instructing multiple Vusers to perform tasks simultaneously. Before the testing, we set the scenario configuration and scheduling. We can run the entire scenario, Vuser groups, or individual Vusers. Step 5: Monitoring the scenario.
We monitor scenario execution using the LoadRunner online runtime, transaction, system resource, Web resource, Web server resource, Web application server resource, database server resource, network delay, streaming media resource, firewall server resource, ERP server resource, and Java performance monitors. Step 6: Analyzing test results. During scenario execution, LoadRunner records the performance of the application under different loads. We use LoadRunner’s graphs and reports to analyze the application’s performance.
When do you do load and performance Testing?- We perform load testing once we are done with interface (GUI) testing. Modern system architectures are large and complex. Whereas single user testing primarily on functionality and user interface of a system component, application testing focuses on performance and reliability of an entire system. For example, a typical application-testing scenario might depict 1000 users logging in simultaneously to a system. This gives rise to issues such as what is the response time of the system, does it crash, will it go with different software applications and platforms, can it hold so many hundreds and thousands of users, etc. This is when we set do load and performance testing.
What are the components of LoadRunner?- The components of LoadRunner are The Virtual User Generator, Controller, and the Agent process, LoadRunner Analysis and Monitoring, LoadRunner Books Online.
What Component of LoadRunner would you use to record a Script?- The Virtual User Generator (VuGen) component is used to record a script. It enables you to develop Vuser scripts for a variety of application types and communication protocols.
What Component of LoadRunner would you use to play Back the script in multi user mode?- The Controller component is used to playback the script in multi-user mode. This is done during a scenario run where a vuser script is executed by a number of vusers in a group.
What is a rendezvous point?- You insert rendezvous points into Vuser scripts to emulate heavy user load on the server. Rendezvous points instruct Vusers to wait during test execution for multiple Vusers to arrive at a certain point, in order that they may simultaneously perform a task. For example, to emulate peak load on the bank server, you can insert a rendezvous point instructing 100 Vusers to deposit cash into their accounts at the same time.
What is a scenario?- A scenario defines the events that occur during each testing session. For example, a scenario defines and controls the number of users to emulate, the actions to be performed, and the machines on which the virtual users run their emulations.
Explain the recording mode for web Vuser script?- We use VuGen to develop a Vuser script by recording a user performing typical business processes on a client application. VuGen creates the script by recording the activity between the client and the server. For example, in web based applications, VuGen monitors the client end of the database and traces all the requests sent to, and received from, the database server. We use VuGen to: Monitor the communication between the application and the server; Generate the required function calls; and Insert the generated function calls into a Vuser script.
Why do you create parameters? - Parameters are like script variables. They are used to vary input to the server and to emulate real users. Different sets of data are sent to the server each time the script is run. Better simulate the usage model for more accurate testing from the Controller; one script can emulate many different users on the system.
What is correlation? Explain the difference between automatic correlation and manual correlation? - Correlation is used to obtain data which are unique for each run of the script and which are generated by nested queries. Correlation provides the value to avoid errors arising out of duplicate values and also optimizing the code (to avoid nested queries). Automatic correlation is where we set some rules for correlation. It can be application server specific. Here values are replaced by data which are created by these rules. In manual correlation, the value we want to correlate is scanned and create correlation is used to correlate.
How do you find out where correlation is required? Give few examples from your projects? - Two ways: First we can scan for correlations, and see the list of values which can be correlated. From this we can pick a value to be correlated. Secondly, we can record two scripts and compare them. We can look up the difference file to see for the values which needed to be correlated. In my project, there was a unique id developed for each customer, it was nothing but Insurance Number, it was generated automatically and it was sequential and this value was unique. I had to correlate this value, in order to avoid errors while running my script. I did using scan for correlation.
Where do you set automatic correlation options? - Automatic correlation from web point of view can be set in recording options and correlation tab. Here we can enable correlation for the entire script and choose either issue online messages or offline actions, where we can define rules for that correlation. Automatic correlation for database can be done using show output window and scan for correlation and picking the correlate query tab and choose which query value we want to correlate. If we know the specific value to be correlated, we just do create correlation for the value and specify how the value to be created.
What is a function to capture dynamic values in the web Vuser script? - Web_reg_save_param function saves dynamic data information to a parameter.
When do you disable log in Virtual User Generator, When do you choose standard and extended logs? - Once we debug our script and verify that it is functional, we can enable logging for errors only. When we add a script to a scenario, logging is automatically disabled. Standard Log Option: When you select
Standard log, it creates a standard log of functions and messages sent during script execution to use for debugging. Disable this option for large load testing scenarios. When you copy a script to a scenario, logging is automatically disabled Extended Log Option: Select
extended log to create an extended log, including warnings and other messages. Disable this option for large load testing scenarios. When you copy a script to a scenario, logging is automatically disabled. We can specify which additional information should be added to the extended log using the Extended log options.
How do you debug a LoadRunner script? - VuGen contains two options to help debug Vuser scripts-the Run Step by Step command and breakpoints. The Debug settings in the Options dialog box allow us to determine the extent of the trace to be performed during scenario execution. The debug information is written to the Output window. We can manually set the message class within your script using the lr_set_debug_message function. This is useful if we want to receive debug information about a small section of the script only.
How do you write user defined functions in LR? Give me few functions you wrote in your previous project? - Before we create the User Defined functions we need to create the external
library (DLL) with the function. We add this library to VuGen bin directory. Once the library is added then we assign user defined function as a parameter. The function should have the following format: __declspec (dllexport) char* (char*, char*)Examples of user defined functions are as follows:GetVersion, GetCurrentTime, GetPltform are some of the user defined functions used in my earlier project.
What are the changes you can make in run-time settings? - The Run Time Settings that we make are: a) Pacing - It has iteration count. b) Log - Under this we have Disable Logging Standard Log and c) Extended Think Time - In think time we have two options like Ignore think time and Replay think time. d) General - Under general tab we can set the vusers as process or as multithreading and whether each step as a transaction.
Where do you set Iteration for Vuser testing? - We set Iterations in the Run Time Settings of the VuGen. The navigation for this is Run time settings, Pacing tab, set number of iterations.
How do you perform functional testing under load? - Functionality under load can be tested by running several Vusers concurrently. By increasing the amount of Vusers, we can determine how much load the server can sustain.
What is Ramp up? How do you set this? - This option is used to gradually increase the amount of Vusers/load on the server. An initial value is set and a value to wait between intervals can be
specified. To set Ramp Up, go to ‘Scenario Scheduling Options’
What is the advantage of running the Vuser as thread? - VuGen provides the facility to use multithreading. This enables more Vusers to be run per
generator. If the Vuser is run as a process, the same driver program is loaded into memory for each Vuser, thus taking up a large amount of memory. This limits the number of Vusers that can be run on a single
generator. If the Vuser is run as a thread, only one instance of the driver program is loaded into memory for the given number of
Vusers (say 100). Each thread shares the memory of the parent driver program, thus enabling more Vusers to be run per generator.
If you want to stop the execution of your script on error, how do you do that? - The lr_abort function aborts the execution of a Vuser script. It instructs the Vuser to stop executing the Actions section, execute the vuser_end section and end the execution. This function is useful when you need to manually abort a script execution as a result of a specific error condition. When you end a script using this function, the Vuser is assigned the status "Stopped". For this to take effect, we have to first uncheck the “Continue on error” option in Run-Time Settings.
What is the relation between Response Time and Throughput? - The Throughput graph shows the amount of data in bytes that the Vusers received from the server in a second. When we compare this with the transaction response time, we will notice that as throughput decreased, the response time also decreased. Similarly, the peak throughput and highest response time would occur approximately at the same time.
Explain the Configuration of your systems? - The configuration of our systems refers to that of the client machines on which we run the Vusers. The configuration of any client machine includes its hardware settings, memory, operating system, software applications, development tools, etc. This system component configuration should match with the overall system configuration that would include the network infrastructure, the web server, the database server, and any other components that go with this larger system so as to achieve the load testing objectives.
How do you identify the performance bottlenecks? - Performance Bottlenecks can be detected by using monitors. These monitors might be application server monitors, web server monitors, database server monitors and network monitors. They help in finding out the troubled area in our scenario which causes increased response time. The measurements made are usually performance response time, throughput, hits/sec, network delay graphs, etc.
If web server, database and Network are all fine where could be the problem? - The problem could be in the system itself or in the application server or in the code written for the application.
How did you find web server related issues? - Using Web resource monitors we can find the performance of web servers. Using these monitors we can analyze throughput on the web server, number of hits per second that
occurred during scenario, the number of http responses per second, the number of downloaded pages per second.
How did you find database related issues? - By running “Database” monitor and help of “Data Resource Graph” we can find database related issues. E.g. You can specify the resource you want to measure on before running the controller and than you can see database related issues
Explain all the web recording options?
What is the difference between Overlay graph and Correlate graph? - Overlay Graph: It overlay the content of two graphs that shares a common x-axis. Left Y-axis on the merged graph show’s the current graph’s value & Right Y-axis show the value of Y-axis of the graph that was merged. Correlate Graph: Plot the Y-axis of two graphs against each other. The active graph’s Y-axis becomes X-axis of merged graph. Y-axis of the graph that was merged becomes merged graph’s Y-axis.
How did you plan the Load? What are the Criteria? - Load test is planned to decide the number of users, what kind of machines we are going to use and from where they are run. It is based on 2 important documents, Task Distribution Diagram and Transaction profile. Task Distribution Diagram gives us the information on number of users for a particular transaction and the time of the load. The peak usage and off-usage are decided from this Diagram. Transaction profile gives us the information about the transactions name and their priority levels with regard to the scenario we are deciding.
需要import的东西有:
from com.android.monkeyrunner import MonkeyRunner,MonkeyDevice
from com.android.monkeyrunner.easy import EasyMonkeyDevice
from com.android.monkeyrunner.easy import By
from com.android.chimpchat.hierarchyviewer import HierarchyViewer
from com.android.hierarchyviewerlib.device import ViewNode
from com.android.monkeyrunner import MonkeyView |
1. MonkeyRunner和MonkeyDevice是最基础的类.
2. EasyMonkeyDevice提供了一些根据ID进行touch,type,locate,getText的方法.具体见源码:
http://source-android.frandroid.com/sdk/monkeyrunner/src/com/android/monkeyrunner/easy/EasyMonkeyDevice.java
3. By提供了根据ID返回PyObject的方法,使用EasyMonkeyDevice和By的配合可以利用ID做很多事情.
4. HierarchyViewer提供了根据ID找到ViewNode,对viewnode的一些操作等
5. ViewNode类的一个对象就代表了一个控件.控件上的所有属性,包括mID,mText,height,width都可以从这个类得到.从viewnode的java源码中可以得到非常多的信息
MonkeyView这个类我还没有搞清楚,从源码来看,也可以从这个类得到很多信息,包括parent,text等等.但是我对monkeyview对象的操作一直不成功,所有方法的调用都提示 No accessibility event has occured yet.目前还没有查出原因和解决方法.
最基本的操作
device = MonkeyRunner.waitForConnection() #等待设备的连接
easy_device = EasyMonkeyDevice(device) #得到一个EasyMonkeyDevice对象
hierarchy_viewer = device.getHierarchyViewer()#得到一个HierarchyViewer对象 |
基本上所有的程序都会用到这几个对象来对控件进行操作
几种得到控件上的文字的方法
1. 用id通过By来获取:text=easy_device.getText(By.id('id/text'))
2. 先获得ViewNode:viewnode = hierarchy_viewer.findViewById('id/text')
再调用HierarchyViewer的方法:text=hierarchy_viewer.getText(viewnode)
3. 直接从ViewNode的属性表中得到:text=viewnode_text.namedProperties.get("text:mText").value
其实前两种方法本质上都是把第三种方法写成自己的函数而已.
需要声明的是,上面的方法得到的text如果是英文的话,就不会有什么问题.如果是gbk编码的中文则在monkeyrunner中无法正常显示,你将会得到一些乱码.这个问题今天研究了一整天,还没有得到解决,希望能有人提供些帮助啊!
按钮如何点击!!!
monkeyrunner上press一个button有很三种办法
1. 通过MonkeyDevice的touch()方法.这是最直接也是最容易出错的方法,因为button在不同的手机上像素坐标是可能发生变化的.通过查看help文档,可以发现device 提供了非常方便好用的功能:有drag、press、touch、type
drag()模拟在screen上的drag操作,需要解锁或者在屏幕实现上下滑动时可以使用
如:device.drag((50,350),(50,100),0.1,10)
Args:前两个表示开始与结束的像素坐标,后两个表示完成的耗时与分步
2. 根据ID进行touch。使用HierarchyViewer的话,你可以很容易得看到各个控件的ID,然后使用下面的语句去按按钮:
easy_device.touch(By.id(id),MonkeyDevice.DOWN_AND_UP).当然,这个方法会出现一个让人头疼的问题,对于下拉列表和弹出框,这个touch常常会出错。因为下拉列表和弹出框的的坐标系问题,你获取到的button坐标是相对于列表和弹出框的,并不是相对于屏幕。在这种情况下,你只能自己去计算一个坐标变换。把相对坐标变换成屏幕坐标。这个函数附在最后。
3. 直接根据button上的mText去定位butto.这个用法就比较高级了,虽然MonkeyDevice提供了一个方法叫 getViewsByText,这个方法能根据提供的text去找monkeyview,但是我死活没法用它。没办法,只能自己写函数。这个函数也在最后。(因为该死的编码问题,暂时只能找到英文的button)
关于中文编码
monkeyrunner是Jython写的.而Jython是不支持东南亚语言的.如果在程序中获取到的值是gbk编码的,想直接打印出来的话,会提示unknown encoding gbk.
那么如何解决这个问题?
很自然想到可以对这个值做decode么?decode成unicode.很遗憾,不可以.我们只能对这个gbk编码的值再做个utf-8编码来进行显示.而且显示的还是乱码
python中编码的转换实际上是str和unicode的转换.
直接写a='中文',a的类型是一个str.
如果写a=u'中文',a的类型是一个unicode.
#Usage: monkeyrunner recorder.py
#recorder.py http://mirror.yongbok.net/linux/android/repository/platform/sdk/monkeyrunner/scripts/monkey_recorder.py
from com.android.monkeyrunner import MonkeyRunner as mr
from com.android.monkeyrunner.recorder import MonkeyRecorder as recorder
device = mr.waitForConnection()
recorder.start(device)
#END recorder.py
#Press ExportAction to save recorded scrip to a file
#Example of result:
#PRESS|{'name':'MENU','type':'downAndUp',}
#TOUCH|{'x':190,'y':195,'type':'downAndUp',}
#TYPE|{'message':'',} |
============================================================================================
#Usage: monkeyrunner playback.py "myscript"
#playback.py http://mirror.yongbok.net/linux/android/repository/platform/sdk/monkeyrunner/scripts/monkey_playback.py
import sys
from com.android.monkeyrunner import MonkeyRunner
# The format of the file we are parsing is very carfeully constructed.
# Each line corresponds to a single command. The line is split into 2
# parts with a | character. Text to the left of the pipe denotes
# which command to run. The text to the right of the pipe is a python
# dictionary (it can be evaled into existence) that specifies the
# arguments for the command. In most cases, this directly maps to the
# keyword argument dictionary that could be passed to the underlying
# command.
# Lookup table to map command strings to functions that implement that
# command.
CMD_MAP = {
'TOUCH': lambda dev, arg: dev.touch(**arg),
'DRAG': lambda dev, arg: dev.drag(**arg),
'PRESS': lambda dev, arg: dev.press(**arg),
'TYPE': lambda dev, arg: dev.type(**arg),
'WAIT': lambda dev, arg: MonkeyRunner.sleep(**arg)
}
# Process a single file for the specified device.
def process_file(fp, device):
for line in fp:
(cmd, rest) = line.split('|')
try:
# Parse the pydict
rest = eval(rest)
except:
print 'unable to parse options'
continue
if cmd not in CMD_MAP:
print 'unknown command: ' + cmd
continue
CMD_MAP[cmd](device, rest)
def main():
file = sys.argv[1]
fp = open(file, 'r')
device = MonkeyRunner.waitForConnection()
process_file(fp, device)
fp.close();
if __name__ == '__main__':
main() |
第五步:复制转换的脚本
第六步:新建一个class
第七步:把复制的脚本粘贴到eclipse中
第八步:更改错误
错误1:

错误2:
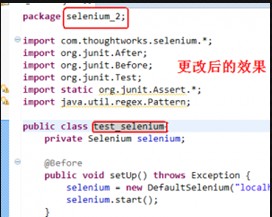
更改的效果:
 1. 打开Firefox,利用IDE录制脚本(依次点击浏览器界面:工具->Selenium IDE)
2. 把录制好的脚本转换成其他语言(非HTML)
备注1:可以点击Selenium IDE界面:Option->Format
或是导出为其他语言,点击Selenium IDE界面:文件->Export Test Case As..
备注2:这里以Java/JUnit4/Remote Control为例
3. 打开eclipse,新建一个class,把转换的脚本粘贴到class中
4. 在class中建立一个主函数
5. 打开selenium服务器(selenium.bat)
6. 选择class界面,点击右键,选择Run as->Java Application
7. 如果运行成功,在Console里面就不会报错,若不能允运行成功,其Console里面则会产生相应的提示信息
下面举例说明:
测试用例:
1. 打开百度网页,输入cydtest,点击百度一下
2.点击陈永达测试网站的连接,进入到陈永达测试网站
具体步骤:
第一步:

第二步:

第三步:录制脚本
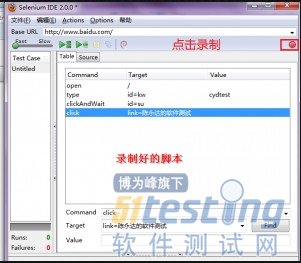
第四步:转换语言

第五步:复制转换的脚本

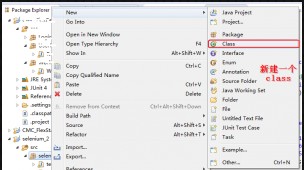
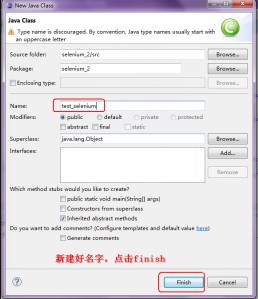
第六步:新建一个class

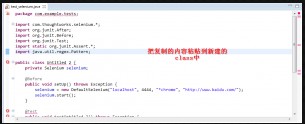
第七步:把复制的脚本粘贴到eclipse中

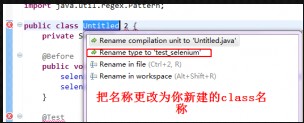
第八步:更改错误
错误1:

错误2:

更改的效果:

错误3:
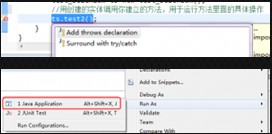
这里报错的原因是:test2()这个方法默认抛出异常
解决的方案1:把test2()方法
查看源代码打印帮助1 public void test2() throws Exception
更改为
查看源代码打印帮助1 public void test2()
方案2:把test2放在try..catch..中去调用
查看源代码打印帮助
1 try {
2 ts.test2();
3 } catch (Exception e1) {
4 e1.printStackTrace();
5 } |
第九步:打开selenium服务器
第十步:运行脚本

这样就能把你从IDE上录制的脚本拿到eclipse中运用了
下面是具体的脚本
</pre>
package selenium_2;
import com.thoughtworks.selenium.*;
import org.junit.After;
import org.junit.Before;
import org.junit.Test;
import static org.junit.Assert.*;
import java.util.regex.Pattern;
public class test_selenium{
private Selenium selenium;
@Before
public void setUp(){
//localhost:利用本机打开浏览器
//4444:打开的端口
//*chrome:用Firefox浏览器
//http://www.baidu.com/:在IDE界面Base URL里面的网站
selenium = new DefaultSelenium("localhost", 4444, "*iexplore", "http://www.baidu.com/");
//启动selenium,前提是selenium服务器已经启动
selenium.start();
}
@Test
public void test2(){
//这里open的地址,是上面地址补充,比如录制的网址为http://www.baidu.com/XXX.abc,那么这里open("/XXX.abc")
selenium.open("/");
//把窗口最大化
selenium.windowMaximize();
selenium.type("id=kw", "cydtest");
selenium.click("id=su");
selenium.waitForPageToLoad("30000");
selenium.click("link=陈永达的软件测试");
}
@After
public void tearDown() throws Exception {
//关闭selenium,及为关闭运行的浏览器
selenium.stop();
}
//更改完成后,就自己新建一个主函数
public static void main(String[] agrs){
//把class转换成一个实体
test_selenium ts=new test_selenium();
//用创建的实体调用你建立的方法,用于运行方法里面的具体操作
ts.setUp();
ts.test2();
}
}
<pre> |
操作步骤:
1.注册数据库驱动程序
2.获取数据库连接对象
3.建立数据库操作语句
4.执行并返回结果
5.释放连接
CODE
1. 配置peoperties属性文件
DRIVERS=oracle.jdbc.driver.OracleDriver
URL=jdbc:oracle:thin:@localhost:1521:orcl
USERNAME=user
PASSWORD=password
2. 解析配置文件属性
package com.jdbc; import java.io.IOException;
import java.io.InputStream;
import java.util.Properties; public class DBConfig extends Properties{
private static final long serialVersionUID = 6988299229093520679L;
private static DBConfig dbConfig = null;
private DBConfig() {
try{
InputStream inStream = DBConfig.class.getResourceAsStream("/dbConfig.properties");
this.load(inStream);
}catch (IOException e) {
e.printStackTrace();
}
}
public static DBConfig getInstance() {
if(dbConfig == null){
synchronized (DBConfig.class) {
if(dbConfig == null){
dbConfig = new DBConfig();
}
}
}
return dbConfig;
}
} |
3. 加载驱动获取连接操作
package com.jdbc; import java.sql.Connection;
import java.sql.DriverManager;
import java.sql.ResultSet;
import java.sql.SQLException;
import java.sql.Statement; public class DBUtils { private static String DB_DRIVERS;
private static String DB_URL;
private static String DB_USER;
private static String DB_PASSWORD;
static {
DBConfig config = DBConfig.getInstance();
DB_DRIVERS = config.getProperty(DBConstant.DB_DRIVERS);
DB_URL = config.getProperty(DBConstant.DB_URL);
DB_USER = config.getProperty(DBConstant.DB_USERNAME);
DB_PASSWORD = config.getProperty(DBConstant.DB_PASSWORD);
}
/**
* 获取数据库连接
* @return conn 数据库连接
* @throws ClassNotFoundException if the class cannot be located
* @throws SQLException if a database access error occurs
*/
public static Connection getConnection() throws ClassNotFoundException, SQLException{
Connection conn = null;
try {
// 1.注册数据库驱动程序
Class.forName(DB_DRIVERS);
// 2.获取数据库连接对象
conn = DriverManager.getConnection(DB_URL, DB_USER, DB_PASSWORD);
} catch (ClassNotFoundException e) {
throw new ClassNotFoundException("数据库驱动注册失败" + e.getMessage());
}catch (SQLException e) {
throw new SQLException("获取数据库连接对象失败" + e.getMessage());
}
return conn;
}
/**
* 释放数据库连接
*/
public static void release(ResultSet rs, Statement stmt, Connection conn) {
try {
if (rs != null) {
rs.close();
}
if (stmt != null) {
stmt.close();
}
if (conn != null) {
conn.close();
}
} catch (SQLException e) {
e.printStackTrace();
}
} } |
4.操作
package com.jdbc; import java.sql.Connection;
import java.sql.PreparedStatement;
import java.sql.ResultSet; public class TestDb {
public static void main(String[] args) throws Exception {
String sql = "select * from producttype where typeid = ?";
// 获取数据库连接对象
Connection conn = DBUtils.getConnection();
// 建立数据库操作语句
PreparedStatement pstm = conn.prepareStatement(sql);
pstm.setInt(1, 21);
// 执行操作语句
ResultSet rs = pstm.executeQuery();
// 获取执行结果
while(rs.next()){
System.out.println(rs.getInt("typeid"));
}
// 关闭连接
DBUtils.release(rs, pstm, conn);
}
} |
常用JDBC驱动
Mysql | http://www.mysql.com/products/connector/j/ |
Oracle | http://www.oracle.com/technology/software/tech/java/sqlj_jdbc/index.html |
SQL Server by jTDS | http://sourceforge.net/project/showfiles.php?group_id=33291 |
Postgres | http://jdbc.postgresql.org/download.html |
SAP DB | http://www.sapdb.org/sap_db_jdbc.htm |
SyBase by jTDS | http://jtds.sourceforge.net/ |
1. 如何写性能测试用例
由于性能测试与功能测试有很大的区别,所以讨论出的结果可能与预先的设想有一定的区别。
性能测试的目的:
为了验证系统是否达到用户提出的性能指标,同时发现系统中存在的性能瓶颈,起到优化系统的目的。
性能测试指标的来源:
用户对各项指标提出的明确需求;如果用户没有提出性能指标则根据用户需求、测试设计人员的经验来设计各项测试指标。(需求+经验)
主要的性能指标:
服务器的各项指标(CPU、内存占用率等)、后台数据库的各项指标、网络流量、响应时间。
BUG观点:
1、性能测试就象人在无风情况下跑步(正常情况下的性能指标);
2、压力测试就象人在微风中跑步(在正常的基础上加大多少百分比压力的性能指标);
3、负载测试就象人在强风中跑步(不断加压,直到系统崩溃)。
HTTP观点:
1、 负载测试是正常情况下持续的加压;
2、 压力测试是直接加压达到一个极限值。
大家统一的观点:
性能测试、压力测试、负载测试密不可分,可统称为性能测试。
性能测试要点:
1、 性能测试是在功能测试完成之后进行。
2、 性能测试计划、方案一般与测试用例统一在一个文档里。
3、 测试环境应尽量与用户环境保持一致。
4、 性能测试一般使用测试工具和测试人员编制测试脚本来完成,性能测试的环境应单独运行尽量避免与其他软件同时使用。
5、 性能测试的重点在于前期数据的设计与后期数据的分析。
6、 性能测试的用例主要涉及到整个系统架构的问题,所以测试用例一旦生成,改动一般不大,所以做性能测试的重复使用率一般比较高。(说明:当系统中出现的某个功能点需要修改,它一般只会影响到功能测试的设计用例,而对于性能测试,很少影响到性能测试的设计用例。但是如果某个功能有较大的修改,性能测试也应该进行重新测试。)
2. Loadrunner性能测试一个实例(经典)
随着测试越来越重要,其中的性能测试也受到越来越多的关注。比较普遍的性能测试工具是Loadrunner7.51,但是很多人对此性能工具不是很熟悉。本人也是总结心得体会,将做过的性能测试实例以饷大家,希望对各位做测试的朋友有所帮助。
该方案是针对某公司试题库的性能测试。该试题库是用来对公司内部员工培训结果的一个考核。试题库在公司内部web服务器上,假设开设50个账号和密码可供50个考生同时参加考试。要求,每台机器只能由一个用户使用,每个用户只能使用各自不同的账号登录考试系统,做完题目后,要求提交考试结果,若在制定的时间内不提交,则系统强制提交考试结果。
但是,一般测试部门不可能有50台机器同时进行测试的。所以,可以借Loadrunner7.51模拟IP地址,修改脚本来协助测试。但是,为了保证测试结果,建议搜罗公司中所有可用的机器进行复测,因为有时候是不可以完全信赖工具的。
现场测试环境
硬件:50台PC机,Web服务器
软件:Loadrunner7.0,Win2000,IE5.0和IE6.0
人员:质控部2人,执行现场测试
项目部22人,提供现场环境
技术部各1人,提供技术支持
测试要求
50个用户拥有独立IP地址,不同的用户及密码登录,试题完成后各自同时提交。
测试内容
50个用户以不同的用户名和密码登录试题库。试题完成后,提交考试结果。测试考试结果是否能正常提交以及正确评分。
测试方案
1、 完全20台实际的PC机进行现场测试。
(1) 准备工作,并做计划。第一轮测试执行三遍,设定用户考试内容全部同时提交,第一遍全部使用IE5.0,第二遍10台使用IE5.0,10台使用IE6.0,第三遍全部使用IE6.0
(2) At 9:00 ,20个用户同时登录系统
(3) At 9:05 ,20个用户同时全部提交
(4) 分别记录第一轮测试(三遍)的结果
(5) 第二轮测试准备工作,设定15个用户考试内容同时提交,另外5个用户延时5分钟提交,全部使用IE5.0
(6) At 9:15 ,20个用户同时登录系统
(7) At 9:20 ,15个用户同时提交
(8) At 9:25 ,剩余5个用户同时提交
(9) 记录第二轮测试结果
(10) 第三轮测试准备工作,设定15个用户考试内容同时提交,另外5个用户延时5分钟提交,全部使用IE6.0
(11) At 9:15 ,20个用户同时登录系统
(12) At 9:20 ,15个用户同时提交
(13) At 9:25 ,剩余5个用户同时提交
(14) 记录第三轮测试结果
(15) 第四轮测试准备工作,设定15个用户考试内容同时提交,另外5个用户延时5分钟提交,正常提交用户使用IE5.0,延时提交用户使用IE6.0
(16) At 9:15 ,20个用户同时登录系统
(17) At 9:20 ,15个用户同时提交
(18) At 9:25 ,剩余5个用户同时提交
(19) 记录第四轮测试结果
(20) 第五轮测试准备工作,设定15个用户考试内容同时提交,另外5个用户延时5分钟提交,正常提交用户使用IE6.0,延时提交用户使用IE5.0
(21) At 9:15 ,20个用户同时登录系统
(22) At 9:20 ,15个用户同时提交
(23) At 9:25 ,剩余5个用户同时提交
(24) 记录第五轮测试结果
(25) 第六轮测试准备工作,设定15个用户考试内容同时提交,另外5个用户延时5分钟提交,正常提交用户其中10个使用IE5.0,5个使用IE6.0,延时提交用户使用IE5.0
(26) At 9:15 ,20个用户同时登录系统
(27) At 9:20 ,15个用户同时提交
(28) At 9:25 ,剩余5个用户同时提交
(29) 记录第六轮测试结果
(30) 第七轮测试准备工作,设定10个用户考试内容同时提交,另外10个用户分两次分别延时5分钟、15提交
(31) At 9:35 ,20个用户同时登录系统
(32) At 9:40 ,10个用户同时提交
(33) At 9:45 ,剩余的其中5个用户同时提交
(34) At 9:55 ,剩余的5个用户同时提交
(35) 记录第七轮测试结果,参见第二轮测试-第六轮测试过程分别对IE5.0和IE6.0的情况进行测试
(36) 第八轮测试准备工作,设定其中10个用户不提交,由系统强行提交
(37) At 10:10 ,20个用户同时登录系统
(38) At 10:15 ,10个用户同时提交
(39) 其余用户的内容由系统强行提交
(40) 记录第八轮测试结果,参见第二轮测试-第六轮测试过程分别对IE5.0和IE6.0的情况进行测试
(41) 第九轮测试准备工作,设定其中10个用户同时提交,5个用户延时5分钟提交,其余用户由系统强行提交
(42) At 10:25 ,20个用户同时登录系统
(43) At 10:30 ,10个用户同时提交
(44) At 10:35 ,剩余的其中5个用户同时提交
(45) 剩余5个用户系统强制提交
(46) 记录第九轮测试结果,参见第二轮测试-第六轮测试过程分别对IE5.0和IE6.0的情况进行测试
2、 模拟20个用户进行测试。其中,10台是PC机,另外10台机器的IP地址是Loadrunner模拟出来的。
(1) 在10台实际的PC机中抽取其中一台虚拟10个IP地址,包括自身的IP地址,该机器上共11个IP地址,这11个IP地址只能全部使用IE5.0或者全部使用IE6.0
(2) 其余9台实际的PC机分别由9个人操作,另外一台机器由一位质控部人员操作
(3) 对于异常情况,延时提交和强制提交全部由实际的机器来模拟
(4) 其余过程参见1
3、 模拟20个用户进行测试。其中,5台是PC机,另外15台机器的IP地址是用Loadrunner模拟出来的。
(1) 在5台实际的PC机中抽取其中一台虚拟15个IP地址,包括自身的IP地址,该机器上共16个IP地址,这16个IP地址只能全部使用IE5.0或者全部使用IE6.0
(2) 其余4台实际的PC机分别由4个人操作,另外一台机器由一位质控部人员操作
(3) 对于异常情况,延时提交和强制提交全部由实际的机器来模拟
(4) 其余过程参见1
4、 模拟35个用户进行测试。其中,20台是PC机,另外15台机器的IP地址是用Loadrunner模拟出来的。
(1) 在20台实际的PC机中抽取其中两台分别虚拟7个、8个IP地址,这17个IP地址只能全部使用IE5.0或者全部使用IE6.0
(2) 其余18台实际的PC机分别由18个人操作,另外两台机器由两位质控部人员操作
(3) 对于异常情况,延时提交和强制提交全部由实际的机器来模拟
(4) 其余过程参见1
5、 模拟50台用户进行测试。其中,20台是PC机,另外30台机器的IP地址是用分别用两台实际的PC机模拟出来的。记录测试结果。
(1) 在20台实际的PC机中抽取其中两台分别虚拟15个IP地址,这32个IP地址只能全部使用IE5.0或者全部使用IE6.0
(2) 其余18台实际的PC机分别由18个人操作,另外两台机器由两位质控部人员操作
(3) 对于异常情况,延时提交和强制提交全部由实际的机器来模拟
(4) 其余过程参见1
6、 对5中所述情况重复测试两次。
7、 为了保证结果的正确性,完全50台实际的PC机进行现场测试。过程参见1
测试过程
注:该测试过程针对虚拟IP地址情况。
1、 一台PC机上创建15个虚拟的IP地址。首先,启动IP Wizard,如下:开始程序->Loadrunner->Tools->IP Wizard
点击“Add”,添加你计划虚拟的IP地址。但是注意不能添加已经被占用的IP地址。
2、 启动Virtual User Generator,并录制脚本,由于50个用户的账号和密码各不相同,所以,要修改脚本,设置参数。我是录制了一个脚本,复制了49份,在每个脚本中手工修改了各自不同的地方。
3、 启动Loadrunner Controller,先将刚才保存的脚本添加进来。然后点击“Scenario”菜单,激活其中的“Enable IP Spoofer”。
4、 点击屏幕右方的“Generators”,添加已经建立的IP,然后connect建立连接。
5、对连接起来的不同用户(IP地址)分配不同的脚本,在Controller中的“design”中,点击“Load Generators”其中,每个脚本有一个用户执行。
6、 执行Scenario
摘要: 12.1 前端性能测试 性能测试通常我们最关心的是后端服务器的处理能力,而前端的性能通常被大家忽视,本章节将对前端的性能测试内容进行介绍。 随着性能测试工作的深入开展,性能测试工作也越发精细,在服务器、数据库、中间件、网络、源代码等方面进行性能调优、性能得到提升后,现在越来越多的公司已经关注产品前端的性能表现。 图12-0 五大主流浏览器综合性能对比测试文章 注: ...
阅读全文
单元测试(unit testing),是指对软件中的最小可测试单元进行检查和验证。对于单元测试中单元的含义,一般来说,要根据实际情况去判定其具体含义,如C语言中单元指一个函数,Java里单元指一个类,图形化的软件中可以指一个窗口或一个菜单等。总的来说,单元就是人为规定的最小的被测功能模块。单元测试是在软件开发过程中要进行的最低级别的测试活动,软件的独立单元将在与程序的其他部分相隔离的情况下进行测试。
二. Xcode中的UnitTest
Xcode中集成了单元测试框架OCUnit,可以完成不同侧重点的测试。Xcode下的单元测试分为logic uint tests和application unit tests,两种类型的单元测试都需要对应一个自己的Target。
logic uint tests在编译阶段进行,并且只能在模拟器中进行,并且需要配置一个单独的schemes来运行。主要是针对数据层的各个模块进行测试,如果数据层的模块划分比较理想解耦相对彻底,则可以通过逻辑单元测试对各模块给出各种输入,然后对各数据模块的输出进行判断,来判断各数据模块是否正常。
application unit tests在程序运行阶段进行,可以在模拟器和真机上进行,可以在应用的schemes或者单独配置的schemes里面运行。主要是针对应用中的相对比较重要的类以及部分简单的界面操作进行测试,完成逻辑单元测试以外的检测。
xcode可以通过2种方式创建UnitTest,一种是创建工程时自带UnitTest,一种时在已有工程添加UnitTest。
三. Xcode创建带UnitTest的工程(Xcode 4.6.2)
如果在新建工程的时候选中
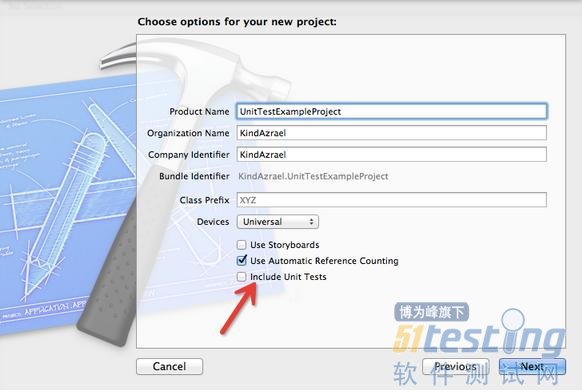
并且新建的工程是一个应用,那么系统会默认生成application unit tests;新建其它类型的工程选中Include Unit Tests的话,系统默认生成logic uint tests。系统自动生成的测试单元时会自动生成对应的target,并且一个target只能对应一中类型的单元测试,但可以包含多个测试文件,针对工程中不同的类进行测试。
四. Xcode向已有工程添加UnitTest(Xcode 4.6.2)
如果在新建工程的时候没有选择Include Unit Tests的话,则可以手动去添加单元测试。
下面首先介绍下向工程添加单元测试的target:
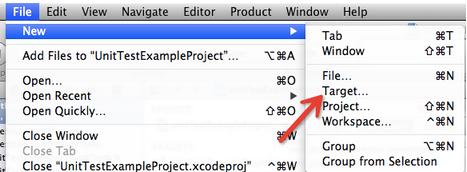
1、选则File->New->New Target,在左侧栏中选中iOS->other,右边选择Cocoa Touch Unit Tests Bundle,如图
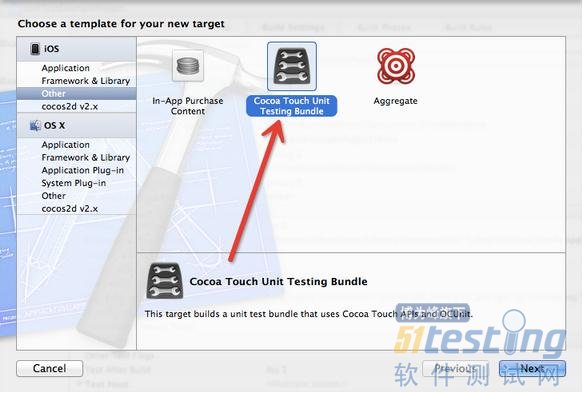
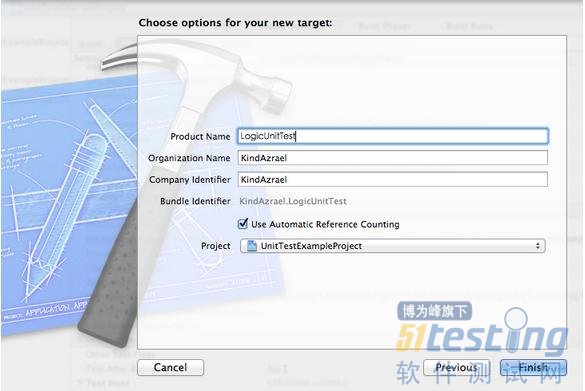
Next后位target完成命名
这样就完成了向工程中添加单元测试用的target。效果如下
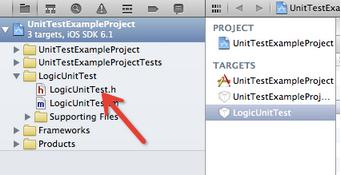
其实按如上步骤添加单元测试target的话,生成的就是一个logic uint tests。
一般情况下Xcode在你添加新的target的时候会自动的添加一个schemes,该schemes的命名与你添加的target一样。
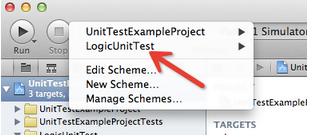
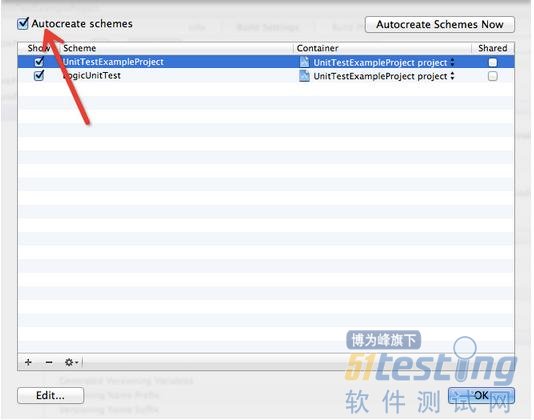
如果你不想在新建target的时候新建scheme(因为application unit tests可以在真机和模拟器上运行,并且时在程序运行时进行测试,所以完全可以和应用本身的target共用一个scheme,这样进行应用单元测试的时候就不用切换scheme。)可以选择上图的Manage Schemes,去掉Autocreate schemes,如下图:
3、搜索Test Host,设置其值为$(BUNDLE_LOADER)效果如图

4、使新建的单元测试target依赖与编译应用的target,效果如图

5、如果是在新建的时候系统默认新建了scheme,则可以通过新的scheme来进行application tests,如果没有默认新建scheme,则可以编辑用来编译工程的scheme,选择左侧的Test如图:

点击底部的“+”,将单元测试的target添加进来。如图
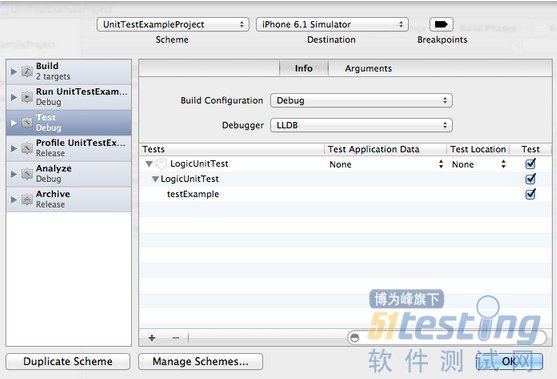
这样原来的logic unit tests就配置成application unit tests了。可以按运行logic unit tests的方法运行application unit tests,来验证是否配置正确。
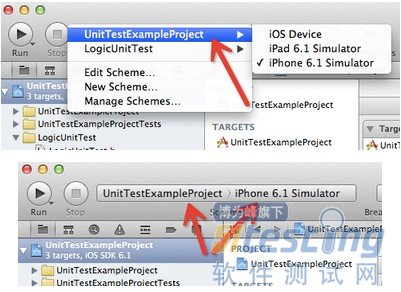
选择Product ->Test(或者Command+U)
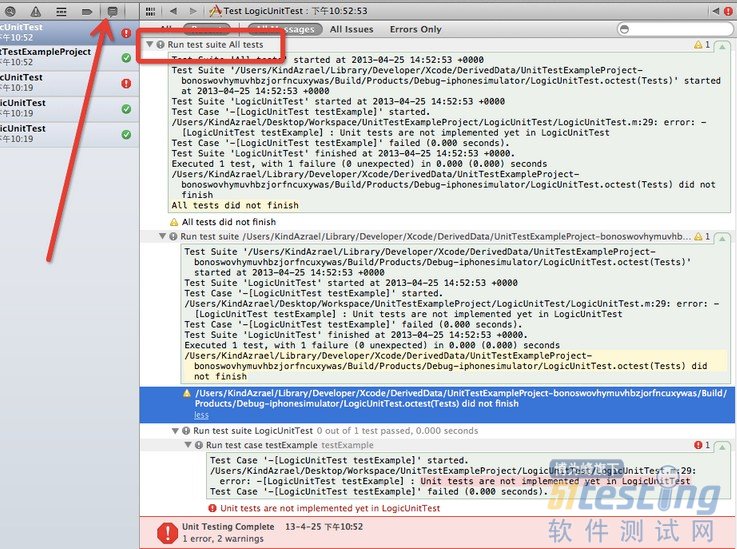
可以对比Logic UnitTest 运行完的report和 Application UnitTest运行的report有不一样的地方,就是上图方框这一栏 Application UnitTest
有 “Run test suit all tests” 这一栏。
根据上一节计划,这里我们来学习一下如何验证页面元素。
----//验证页面元素
验证页面上的UI元素,是你在自动化测试案例过程中最常用到的特性。Selenese通过各种方式验证UI元素。
举例,你是否正在测试一下情况:
(1)一个UI元素存在于页面上某个位置;
(2)特定文本存在于页面上某个位置;
(3)特定文本存在于页面上指定位置;
如果你要测试文本标题,那么文本内容和它所在的页面顶部位置,测试案例都需要关心。如果你要测试主页上的某个图片,但是开发人员经常改变图片所在的位置,那么你只要测试特定图片是否存在于页面上某个位置就行了。
1.assertion或者verification?
断言(assertion)或者验证(verification)关系到如何管理“失败”。断言会使当前案例运行失败,并终止案例执行;验证也会使案例运行失败,但允许案例继续执行。

代码说明:
我们打开selenium的下载页面。验证代码页面中出现的“Downloads”文本标记。
第二行(assertTitle)和第三行(verifyText)都是验证页面时候有“Downloads”,但如果第二行出现错误,则程序终止运行。第三行出现错误,给出错误提示,但不影响第四行程序的运行。
2.verifyTextPresent命令

代码说明:
打开淘宝网首页,搜索框输入“手机”关键字,点击搜索按钮。我们在搜索后的页面中检查时候有“手机”文字。
verifyTextPresent命令用来验证特定的文本是否存在页面的某处。
Selenium在当前测试页面上搜寻和验证“手机”是否存在于某处。当你只关心页面上是否存在特定文本时使用。
3.verifyElementPresent命令
当测试特定UI元素是否存在、且不关心其内容时,使用verifyElementPresent命令,这一命令不检查文本,仅检查HTML tag。

代码说明:
打开百度首页,验证百度是否存在图片。//div/p/img 验证被<img>标识的图片在页面上是否存在。
为什么是//div/p/img?我们点击百度首页上面的图片查看元素。
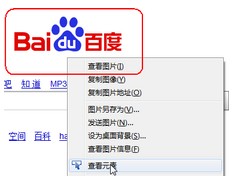
查看图片代码:

看到图片所在位置的层次了吧!丫的,我整了白天才明白是这样子的。
还可以用verifyElementPresent命令检查链接、图片、分区等。

4.verifyText命令
当文本和它的UI元素都要被测试时,使用verifyText命令,verifyText必须使用定位器,如果你选择XPath或者DOM定位器,就可以检查特定文本是否出现在页面上的特定位置(相对于其他元素而言)

相关文章:
菜鸟学自动化测试(一)----selenium IDE
菜鸟学自动化测试(二)----selenium IDE 功能扩展
菜鸟学自动化测试(三)----selenium 命令
把前段时间的研究成果记录一下。主要是通过调用应用软件的ID进行操作软件,此操作需要用到以下类和工具:
1、安卓自有目录\tools\hierarchyviewer.bat工具可以用来查看应用程序的ID。
操作hierarchyviewer.bat工具步骤:
(1)、启动安卓模拟器,打开需要查看ID的软件界面。此处以google搜索界面为例。然后双击打开hierarchyviewer.bat,显示搜索界面的activity,即下图左侧被选中的项,表示搜索界面的完整包名。

(2)点击Load View Hierarchy按钮,展现该搜索界面的层级图。选中指定的控件,查看ID名称。

在属性显示区域可以看到各个控件所处的坐标位置,以及可以查看模拟器上任务栏的高度,这些信息可以用于坐标计算中。
2、通过EasyMonkeyDevice类和By类来调用控件ID。
一些常用控件的写法如下:
(1)输入框的ID写法:
easy_device.type(By.id('id/name_text),'zhangsan')
(2)复选框/单选/按钮的ID写法:
easy_device.touch(By.id('id/login_button'),MonkeyDevice.DOWN_AND_UP)
(3)当两个ID名称相同时,可以使用层级进行定位
easy_device.touch(By.id('id/parent_button'),MonkeyDevice.DOWN_AND_UP,By.id('id/current_button'),MonkeyDevice.DOWN_AND_UP)
通过ID进行计算器操作示例calculator.py:
from com.android.monkeyrunner import MonkeyRunner,MonkeyDevice
from com.android.monkeyrunner.easy import EasyMonkeyDevice
from com.android.monkeyrunner.easy import By
from com.android.chimpchat.hierarchyviewer import HierarchyViewer
from com.android.hierarchyviewerlib.device import ViewNode
device = MonkeyRunner.waitForConnection()
package = 'com.android.calculator2'
activity = 'com.android.calculator2.Calculator'
runComponent = package + '/' + activity
device.startActivity(component=runComponent)
MonkeyRunner.sleep(3.0)
easy_device = EasyMonkeyDevice(device) #init easymonkeydevice object must start activity at first.Because the init method
will getHierarchyViewer();
easy_device.touch(By.id('id/digit7'),MonkeyDevice.DOWN_AND_UP)
easy_device.touch(By.id('id/mul'),MonkeyDevice.DOWN_AND_UP)
easy_device.touch(By.id('id/digit8'),MonkeyDevice.DOWN_AND_UP)
easy_device.touch(By.id('id/equal'),MonkeyDevice.DOWN_AND_UP)
MonkeyRunner.sleep(1.0)
pic = device.takeSnapshot()
pic.writeToFile('D:\\monkeyrunner\\result.png','png')
print 'test finished!' |
3、运行文件模拟计算7*8=56,生成result.png。monkeyrunner calculator.py

用ID进行参数差不多都是这个思路。但是对于列表、或者弹出框则无法直接通过点击ID操作成功,需要计算ID的坐标。
1 log文件分类简介
实时打印的主要有:logcat main,logcat radio,logcat events,tcpdump,还有高通平台的还会有QXDM日志
状态信息的有:adb shell cat /proc/kmsg ,adb shell dmesg,adb shell dumpstate,adb shell dumpsys,adb bugreport,工程模式等
2 LOG抓取详解
l 实时打印
adb logcat -b main -v time>app.log 打印应用程序的log
adb logcat -b radio -v time> radio.log 打印射频相关的log,SIM STK也会在里面,modem相关的ATcommand等,当然跟QXDM差的很远了。
adb logcat -b events -v time 打印系统事件的日志,比如触屏事件。。。
//android log的抓取
adb logcat
//kernel log的抓取
adb shell cat /proc/kmsg
//log 信息的保存
mkdir /data/anr
logcat *:V > /data/anr/android
demsg >/data/anr/kernel
//按ctrl+c结束log输出
adb pull /data/anr ./log/ |
tcpdump 是很有用的,对于TCP/IP协议相关的都可以使用这个来抓,adb shell tcpdump -s 10000 -w /sdcard/capture.pcap,比如抓mms下载的时候的UA profile,browser上网的时候,使用proxy的APN下载,streaming的相关内容包括UA profile等。
最后是高通平台的QXDM,不管是不是Android,只要使用高通芯片,都会对它很熟悉,当然了,不是高通的芯片就不用提它了。这个不多讲,内容丰富,射频,电话,上网,...凡是高通提供的解决方案,这个都可以抓。(QXDM 的LOG抓取方法请参考QPST、QXDM的基本使用说明及作用)
l 状态信息
o bugreport(命令adb bugreport>bugreport.log)。里面包含有dmesg,dumpstate和dumpsys。
o dumpstate是系统状态信息,里面比较全,包括手机当前的内存信息、cpu信息、logcat缓存,kernel缓存等等。
o adb shell dumpsys这个是关于系统service的内容都在这个里面,这个命令还有更详尽的用法,比如adb shell dumpsys meminfo system是查看system这个process的内存信息。
o kmsg抓取
adb shell cat /proc/kmsg > kmsg.txt,打开后查msm_kgsl字段
说明:用于检索用printk生成的内核消息。任何时刻只能有一个具有超级用户权限的进程可以读取这个文件。也可以用系统调用syslog检索这些消息。通常使用工具dmesg或守护进程klogd检索这些消息。proc是一个内存文件系统, 每次读文件kmsg实际是内核内部的循环缓冲区,每读过后,循环缓冲区的东西就被认为已经处理过了(也就是变成无效内容),所以你再次读为空是很正常的 为什么会这样处理呢,循环缓冲区大小有限,内核又随时可能往里面写东西,所以这样处理很正常. 你去查一下/proc/kmsg的信息有没有跟系统日志关联,如果有的话,你就可以读日志文件
o dmsg抓取
adb shell dmesg > dmesg.txt
说明:dmesg用来显示开机信息,kernel会将开机信息存储在ring buffer中。您若是开机时来不及查看信息,可利用dmesg来查看。dmesg是kernel的log,凡是跟kernel相关的,比如driver出了问题(相机,蓝牙,usb,启动,等等)开机信息亦保存在/var/log目录中,名称为dmesg的文件里。more /var/log/dmesg
o 工程模式下log的抓取
对于Apollo手机请拨打*#*#8888#*#* ,然后勾选相应的LOG。待测试结束后,通过SD卡导出LOG到PC.
3.Log分析:
Get Log from Android System
adb bugreport > bugreport.txt
copy bugreport to the current directory. |
bugreport里面包含了各种log信息,大部分log也可以通过直接运行相关的程序来直接获得.
步骤如下:
1.adb shell 2.进入相关工具程式的目录 3.执行相关程式 4.得到相关信息
下面以输出进程信息为例 1.adb shell 2.输入ps -P 3.可以看到相关进程信息
Log Archive Analysis
1.bugreport
bugreport记录android启动过程的log,以及启动后的系统状态,包括进程列表,内存信息,VM信息等等到.
单独察看某个数据可使用cat指令察看,例如cat /proc/meminfo
2.bugreport结构分析
(1)dumpstate
MEMORY INFO
获取该log:读取文件/proc/meminfo
系统内存使用状态
CPU INFO
获取该log:执行/system/bin/top -n 1 -d 1 -m 30 -t
系统CPU使用状态
PROCRANK
获取该log:执行/system/bin/procrank
执行/system/xbin/procrank后输出的结果,查看一些内存使用状态
VIRTUAL MEMORY STATS
获取该log:读取文件/proc/vmstat
虚拟内存分配情况
vmalloc申请的内存则位于vmalloc_start~vmalloc_end之间,与物理地址没有简单的转换关系,虽然在逻辑上它们也是连续的,但是在物理上它们不要求连续。
VMALLOC INFO
获取该log:读取文件/proc/vmallocinfo
虚拟内存分配情况
SLAB INFO
获取该log:读取文件/proc/slabinfo
SLAB是一种内存分配器.这里输出该分配器的一些信息
ZONEINFO
获取该log:读取文件/proc/zoneinfo
zone info
SYSTEM LOG(需要着重分析)
获取该log:执行/system/bin/logcat -v time -d *:v
会输出在程序中输出的Log,用于分析系统的当前状态
VM TRACES
获取该log:读取文件/data/anr/traces.txt
因为每个程序都是在各自的VM中运行的,这个Log是现实各自VM的一些traces
EVENT LOG TAGS
获取该log:读取文件/etc/event-log-tags
EVENT LOG
获取该log:执行/system/bin/logcat -b events -v time -d *:v
输出一些Event的log
RADIO LOG
获取该log:执行/system/bin/logcat -b radio -v time -d *:v
显示一些无线设备的链接状态,如GSM,PHONE,STK(Satellite Tool Kit)…
NETWORK STATE
获取该log:执行/system/bin/netcfg (得到网络链接状态)
获取该log:读取文件/proc/net/route (得到路由状态)
显示网络链接和路由
SYSTEM PROPERTIES
获取该log:参考代码实现
显示一些系统属性,如Version,Services,network…
KERNEL LOG
获取该log:执行/system/bin/dmesg
显示Android内核输出的Log
KERNEL WAKELOCKS
获取该log:读取文件/proc/wakelocks
内核对一些程式和服务唤醒和休眠的一些记录
KERNEL CPUFREQ
(Linux kernel CPUfreq subsystem) Clock scaling allows you to change the clock speed of the CPUs on the fly.
This is a nice method to save battery power, because the lower the clock speed is, the less power the CPU consumes.
PROCESSES |
获取该log:执行ps -P
显示当前进程
PROCESSES AND THREADS
获取该log:执行ps -t -p -P
显示当前进程和线程
LIBRANK
获取该log:执行/system/xbin/librank
剔除不必要的library
BINDER FAILED TRANSACTION LOG
获取该log:读取文件/proc/binder/failed_transaction_log
BINDER TRANSACTION LOG
获取该log:读取文件/proc/binder/transaction_log
BINDER TRANSACTIONS
获取该log:读取文件/proc/binder/transactions
BINDER STATS
获取该log:读取文件/proc/binder/stats
BINDER PROCESS STATE
获取该log:读取文件/proc/binder/proc/*
bind相关的一些状态
FILESYSTEMS
获取该log:执行/system/bin/df
主要文件的一些容量使用状态(cache,sqlite,dev…)
PACKAGE SETTINGS
获取该log:读取文件/data/system/packages.xml
系统中package的一些状态(访问权限,路径…),类似Windows里面的一些lnk文件吧.
PACKAGE UID ERRORS
获取该log:读取文件/data/system/uiderrors.txt
错误信息
KERNEL LAST KMSG LOG
最新kernel message log
LAST RADIO LOG
最新radio log
KERNEL PANIC CONSOLE LOG
KERNEL PANIC THREADS LOG
控制台/线程的一些错误信息log
BACKLIGHTS
获取该log:获取LCD brightness读/sys/class/leds/lcd-backlight/brightness
获取该log:获取Button brightness读/sys/class/leds/button-backlight/brightness
获取该log:获取Keyboard brightness读/sys/class/leds/keyboard-backlight/brightness
获取该log:获取ALS mode读/sys/class/leds/lcd-backlight/als
获取该log:获取LCD driver registers读/sys/class/leds/lcd-backlight/registers
获取相关亮度的一些信息
(2)build.prop
VERSION INFO输出下列信息
当前时间
当前内核版本:可以读取文件(/proc/version)获得
显示当前命令:可以读取文件夹(/proc/cmdline)获得
显示系统build的一些属性:可以读取文件(/system/build.prop)获得
输出系统一些属性
gsm.version.ril-impl
gsm.version.baseband
gsm.imei
gsm.sim.operator.numeric
gsm.operator.alpha |
(3)dumpsys
执行/system/bin/dumpsys后可以获得这个log.
经常会发现该log输出不完整,因为代码里面要求该工具最多只执行60ms,可能会导致log无法完全输出来.
可以通过修改时间参数来保证log完全输出.
信息:
Currently running services
DUMP OF SERVICE services-name(running)
Log Code Analysis
Site: .\frameworks\base\cmds\dumpstate\ |
相关Log程序的代码可以从上面目录获取
Log Analysis Experience
分析步骤
1.查看一些版本信息
确认问题的系统环境
2.查看CPU/MEMORY的使用状况
看是否有内存耗尽,CPU繁忙这样的背景情况出现.
3.分析traces
因为traces是系统出错以后输出的一些线程堆栈信息,可以很快定位到问题出在哪里.
4.分析SYSTEM LOG
系统Log详细输出各种log,可以找出相关log进行逐一分析
实例分析
下面分析我写的一个测试例子,在OnCreate做一个死循环,这样主线程会被锁住,在按下硬件的Back之后会出现ANR的错误.
在traces中发现该程序的堆栈信息如下:
—– pid 20597 at 2010-03-15 01:29:53 —–
Cmd line: com.android.test
DALVIK THREADS:
"main" prio=5 tid=3 TIMED_WAIT
| group="main" sCount=1 dsCount=0 s=N obj=0x2aac6240 self=0xbda8
| sysTid=20597 nice=0 sched=0/0 cgrp=default handle=1877232296
at java.lang.VMThread.sleep(Native Method)
at java.lang.Thread.sleep(Thread.java:1306)
at java.lang.Thread.sleep(Thread.java:1286)
at android.os.SystemClock.sleep(SystemClock.java:114)
at com.android.test.main.onCreate(main.java:20)
at android.app.Instrumentation.callActivityOnCreate(Instrumentation.java:1047)
at android.app.ActivityThread.performLaunchActivity(ActivityThread.java:2459)
at android.app.ActivityThread.handleLaunchActivity(ActivityThread.java:2512)
at android.app.ActivityThread.access$2200(ActivityThread.java:119)
at android.app.ActivityThread$H.handleMessage(ActivityThread.java:1863)
at android.os.Handler.dispatchMessage(Handler.java:99)
at android.os.Looper.loop(Looper.java:123)
at android.app.ActivityThread.main(ActivityThread.java:4363)
at java.lang.reflect.Method.invokeNative(Native Method)
at java.lang.reflect.Method.invoke(Method.java:521)
at com.android.internal.os.ZygoteInit$MethodAndArgsCaller.run(ZygoteInit.java:868)
at com.android.internal.os.ZygoteInit.main(ZygoteInit.java:626)
at dalvik.system.NativeStart.main(Native Method)
"Binder Thread #2" prio=5 tid=11 NATIVE
| group="main" sCount=1 dsCount=0 s=N obj=0x2fb7c260 self=0×143860
| sysTid=20601 nice=0 sched=0/0 cgrp=default handle=1211376
at dalvik.system.NativeStart.run(Native Method)
"Binder Thread #1" prio=5 tid=9 NATIVE
| group="main" sCount=1 dsCount=0 s=N obj=0x2fb7c1a0 self=0x14c980
| sysTid=20600 nice=0 sched=0/0 cgrp=default handle=1207920
at dalvik.system.NativeStart.run(Native Method)
"Signal Catcher" daemon prio=5 tid=7 RUNNABLE
| group="system" sCount=0 dsCount=0 s=N obj=0x2fb7a1e8 self=0x126cc0
| sysTid=20599 nice=0 sched=0/0 cgrp=default handle=1269048
at dalvik.system.NativeStart.run(Native Method)
"HeapWorker" daemon prio=5 tid=5 VMWAIT
| group="system" sCount=1 dsCount=0 s=N obj=0x2e31daf0 self=0x135c08
| sysTid=20598 nice=0 sched=0/0 cgrp=default handle=1268528
at dalvik.system.NativeStart.run(Native Method)
—– end 20597 —– |
该文件的堆栈结构从下往上进行分析
(1)栈底at dalvik.system.NativeStart.run(Native Method)
系统为当前的task(应用程式)启动一个专用的虚拟机
(2) at android.app.ActivityThread.performLaunchActivity(ActivityThread.java:2459)
Activity Services是在后台负责管理Activity,它此时将测试例子的Activity启动起来了
(3)at com.android.test.main.onCreate(main.java:20)
启动测试程序
(4)栈顶at java.lang.VMThread.sleep(Native Method)
线程被sleep掉了,所以无法响应用户,出现ANR错误.
上面是对一个非常简单的问题的分析.
如果遇到比较复杂的问题还需要详细分析SYSTEM LOG.
1.比如网络异常,要通过SYSTEM LOG里面输出的网络链接信息来判断网络状态
2.数据传输,网络链接等耗时的操作需要分析SYSTEM LOG里面ActivityManager的响应时间