一点一滴,编程人生

  BlogJava :: 首页 :: 新随笔 :: 联系 :: 聚合  :: 管理 ::
  69 随笔 :: 0 文章 :: 25 评论 :: 0 Trackbacks

2012年7月31日 #

今天为了这个问题了忙乎了一整天,特此记录下,希望对有遇到同样问题的同学有帮助。事情的经过是这样的,原先使用atomikos一直把数据源用jndi配置到tomcat的context.xml下,一直这么用没有出现问题,配置如下
    <Resource name="jdbc/cms" auth="Container"
        type
="com.atomikos.jdbc.AtomikosDataSourceBean" factory="com.atomikos.tomcat.EnhancedTomcatAtomikosBeanFactory"
        uniqueResourceName
="jdbc/cms" xaDataSourceClassName="com.mysql.jdbc.jdbc2.optional.MysqlXADataSource"
        xaProperties.URL
="xxxx"
        xaProperties.user
="xxxx" xaProperties.password="xxxx"
        xaProperties.pinGlobalTxToPhysicalConnection
="true" maxLifetime="60" poolSize="4" />

最近项目要迁移到maven下,所以把context.xml的数据源配置挪到了spring.xml下,配置如下
    <bean id="myDataSource" class="com.atomikos.jdbc.AtomikosDataSourceBean" init-method="init" destroy-method="close">
       
<property name="uniqueResourceName" value="masterDB" />
       
<property name="xaDataSourceClassName" value="com.mysql.jdbc.jdbc2.optional.MysqlXADataSource"/>  <!-- SQLErrorCodes loaded: [DB2, Derby, H2, HSQL, Informix, MS-SQL, MySQL, Oracle, PostgreSQL, Sybase, Hana]  -->  
       
<property name="poolSize" value="0" /> 
       
<property name="minPoolSize" value="0"/>    
       
<property name="maxPoolSize" value="9"/>    
       
<property name="borrowConnectionTimeout" value="60"/>    
       
<property name="reapTimeout" value="20"/>    
       
<property name="maxIdleTime" value="60"/>    
       
<property name="maintenanceInterval" value="60"/>    
       
<property name="loginTimeout" value="60"/>
       
<property name="xaProperties">  
            
<props>
                
<prop key="url">xxxx</prop>  
                
<prop key="user">xxxx</prop>
                
<prop key="password">xxxx</prop>
            
</props>
        
</property>  
    
</bean>
因为上面这个配置我是照搬网上的,所以觉得没有问题,可是项目启动后,用此数据源提交事务时确报以下错误:

Raised -5: invalid arguments were given for the XA operation 或 XAER_INVAL: Invalid arguments (or unsupported command)

一开始我以为maven配置的mysql-connector-java驱动版本不对,或是atomikos版本不对,可是不管如何换版本都不行,就快要疯了的时候,我看到了原先jndi方式中有这么一行代码
xaProperties.pinGlobalTxToPhysicalConnection="true"
就因为缺少上面这句话导致了问题,上网查资料,据说是mysql xa bug,有兴趣的可以看如下连接,最后配置如下:
       <property name="xaProperties">  
            
<props>
                
<prop key="pinGlobalTxToPhysicalConnection">true</prop>  <!-- mysql必须配置此参数,要不然无法提交事务 -->
                
<prop key="url">xxxx</prop>  
                
<prop key="user">xxx</prop>
                
<prop key="password">xxxx</prop>
            
</props>
        
</property> 


posted @ 2017-06-28 19:32 writegull 阅读(2439) | 评论 (0)编辑 收藏

事情描述:
本人在阿里云上创建了一个linux服务器,跑了一个自己的测试web项目。搭建了redis。想方便测试用,就没有对redis进行任何安全防护并暴露在了公网上。期间阿里云发现了此问题,还发短信提醒我,由于最近在公司一直加班也没有时间理会,没想到就在今天真的被黑了,事后心想多亏是个测试服务器,如果是正式环境,也真危险,这个黑客也没有停下脚步,通过redis强大的能力在/root/.ssh目录下面上传了公钥,彻底攻破了服务器,免密码登录服务器,一般黑客到这步也就看看有没有兴趣的数据,这个黑客一看这就是个没有价值的测试服务器,所以心一横,在我这上面装了个DDOS攻击软件,把我的机器当起肉鸡。

1.这就是黑完后留下的公钥/私钥,删除authorized_keys,id_rsa, id_rsa.pub这三个文件吧,除非还想让他继续黑下去。。。。


2.通过redis的key *命令可以看到有个叫crackit的key。这就是黑客在入侵后留下来的,原先set的值是公钥,入侵成功之后就改成这个了,把这个key也删除掉吧。


3.修改redis默认端口吧,不让黑客利用6379端口。在redis安装目录中,修改redis.config文件。修改完了别忘了重启redis服务,

# redis-server /etc/redis/redis.conf 开启

# redis-cli shutdown 关闭


4.重启后查看redis是否运行
ps -x | grep redis
5.通过指定端口访问redis。
redis-cli -p 6666

6.给redis设置密码或者干脆设置成只能内网访问

7.通过top命令发现了几个可疑的程序


8.minerd这个程序是个用来挖掘莱特币的,这个黑客看来干了不少坏事啊。。我们用命令 ps -ef|grep minerd 查找一下这个进程,杀掉这个进程kill -9 18267,并且去/tmp目录删除minerd目录


9.黑客在tmp目录留下了一个叫1.sh的脚本,是用来下载挖掘莱特币程序的。也把它kill掉吧。以下是脚本内容。


10.通过cat /etc/passwd命令可以看到有一个叫作syss的非法用户,权限还很高,跟root一样,删掉他吧,这是黑客入侵后方便进入的。使用命令userdel -f syss 强制删除一个用户,哪怕他正在登录。


11.去/mnt目录上,可以看到黑客挂载了很多程序,删除他们吧。


12.通过nethogs软件可以按进程实时统计网络带宽利用率,这个用来看是否存在DDOS攻击最好不过了。

13.暂时解决对外DDOS攻击,最快的办法就是用防火墙,这个阿里云提供的脚本帮了大忙。直接上传到服务器上,运行一下世界就清静了。下载地址:
https://help.aliyun.com/knowledge_detail/5973920.html?spm=5176.7618386.5.1.H8H33f

 
posted @ 2015-12-15 01:13 writegull 阅读(4108) | 评论 (4)编辑 收藏

今天在修改server.xml调试程序时,遇到下面这个问题,clean,重启都不好使。

                Removing obsolete files from server..
               Could not clean server of obsolete files: null
                java.lang.NullPointerException
解决方法是把.metadata\.plugins\org.eclipse.wst.server.core这个目录下面的tmp0删除掉,再clean下就可以了。可能是缓存问题。
posted @ 2015-01-03 16:58 writegull 阅读(7267) | 评论 (0)编辑 收藏

有时候需要手动地去禁用一个uibutton,使用button.enabled = NO的时候虽然能够达到目的但也会带来副作用,那就是按钮变的半透明了。有时候应用不需要这种副作用,可以尝试使用button.userInteractionEnabled = NO来达到这个目的,在禁用按钮的同时也不会使得按钮变得半透明。
posted @ 2013-12-23 10:29 writegull 阅读(588) | 评论 (0)编辑 收藏

装win8后发现cpu占用率50%-60%,而且磁盘疯狂读写,是com surrogate这个程序,还有几个服务造成的,之后我把com surrogate结束进程了cpu使用率直接降低到10%以下,我就郁闷了。
解决方案:
1,在“更多电脑设置”那里的“用户”改为“本地用户”。
2,“离开”家庭组(一般都是它的原因)
3,“同步设置”关
4,一般“共享”什么的不到需要都是“关”的状态。
5,做完以上几点都不行,就真帮不了你了。
posted @ 2013-03-18 22:47 writegull 阅读(389) | 评论 (0)编辑 收藏

这个问题似乎只有在手动改变系统状态栏级别的情况才会出现

例如:self.window.windowLevel = UIWindowLevelStatusBar+1;

这样设置的话相当于影响了弹出短信或邮件控制器页面window的级别,所以造成不显示键盘问题(不过此问题在ios6以下没有)

解决方法:在当前视图控制器中加入下面的代码,即可解决

- (void) viewDidAppear:(BOOL)animated {

    [super viewDidAppear:animated];

    self.window.windowLevel = UIWindowLevelNormal;

}

posted @ 2012-10-30 21:08 writegull 阅读(1561) | 评论 (1)编辑 收藏

原文地址:http://blog.csdn.net/pjk1129/article/details/7255163

最近在做Apple的IOS开发,有开发静态库的需求,本身IOS的开发,只允许静态库或者Framework。在Xcode上没有找到允许编译,如同Android上的*.so和Win32上的dll这样的说法。不过Framework这样的框架,估计也是类似动态库的实现,不过没有具体研究过,后续继续深入研究。

我这个文档的静态库的开发是基于Xcode4.2和iOS SDK5.0编写的。Xcode4跟之前的Xcode3还是有不少的差别的。

下面就简单写一个静态库和一个调用静态库的例子。

静态库的编写:

1.静态库工程的建立:

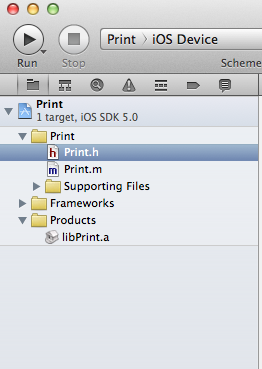
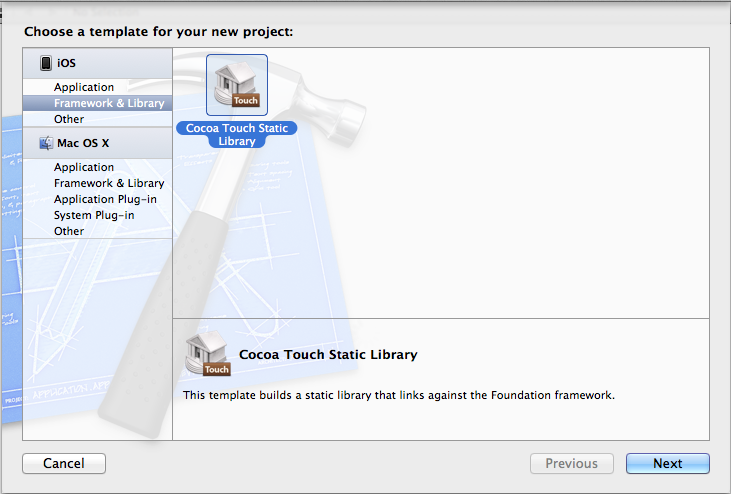
Xcode New一个新的project,选择IOS下面的Framework&Library,下面有一个Cocoa Touch Static Library。直接next去建立一个Print这样的工程。

2.工程建立

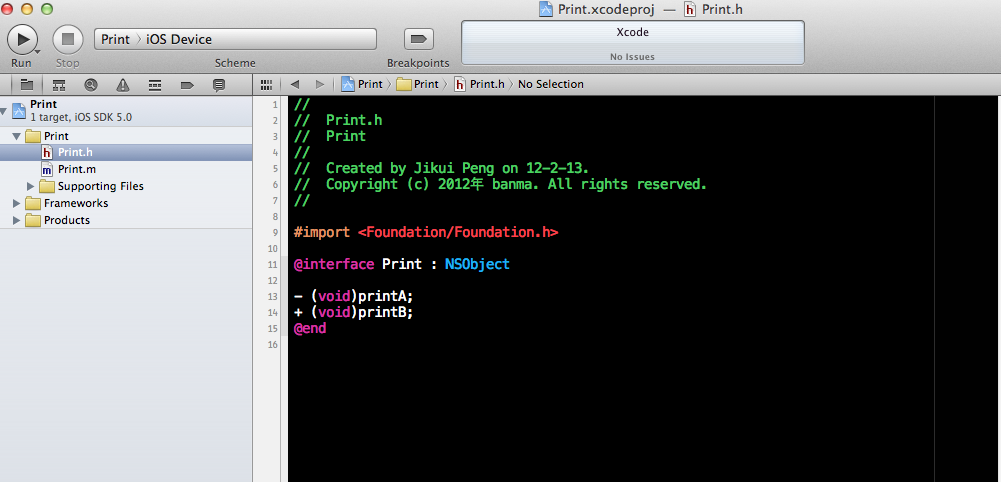
我们添加很简单的"- (void)printA;"和"+ (void)printB;"的方法,这个方法的实现也是很简单的,在*.m文件中的实现就是一个"NSLog(@“”);"这样我们编译出来的libstaticlib就可以被其他的IOS工程进行调用了。这块注意一下,目前我们的Print->iOS Device


3.编译前准备

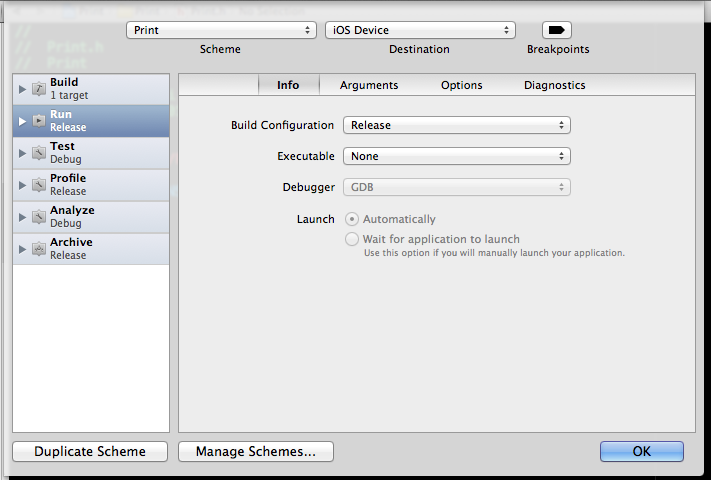
这里分release与debug版本,需要设置一下

4.OK,编译

我们可以在Products下面找到我们编译生成的libstaticlib.a这个文件。

注意未编译前为红色:左                             编译后为黑色: 右
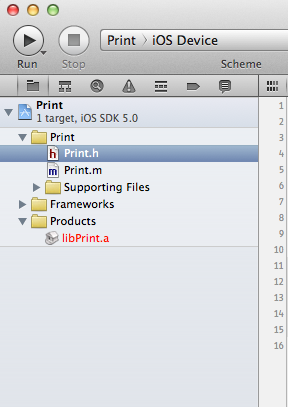
       

5.ok

在右边 这个文件上右键Open In Finder。这时候我们打开了一个文件夹,里面有一个libPrint.a。后面我们继续编写一个调用这个libPrint.a的App。但是这个App在编译时候会出错,通过这个错误的解决,说明Xcode的一些编译相关的东西。这里,我们在command下面根据路径找到这个文件,用这个非常重要的命令查看一下这个lib的信息!

打开终端写入如下命令:这是什么?这就是所在的路径 

以下均是在自己的mac上的路径。你需要将/Users/pjk1129/Library/Developer/Xcode/DerivedData/Print-dgfkluumuexoxhcapzidtsmdgqcj/Build/Products/ 替换成你的路径。

cd /Users/pjk1129/Library/Developer/Xcode/DerivedData/Print-dgfkluumuexoxhcapzidtsmdgqcj/Build/Products/  

我们手动打开这个路径:可以看到如下信息:Release-iphoneos


这个是给真机用的,那我们要给模拟器和真机封装的静态库应该都能用才好。这个下面介绍!!!!!  


然后再在终端 打开这个文件:cd /Users/user/Library/Developer/Xcode/DerivedData/UItab-dbvoszbzpavyglaboxgflvrnzfce/Build/Products/Debug-iphoneos

命令是:lipo -info libPrint.a,可以看到显示的结果是:Arch是  Arm7。下面我会具体介绍一下。


6.建立一个调用这个libPrint.a的应用

应用就很简单了,我们添加刚才libPrint.a的*.h文件。 然后在这个工程的Build Phases的Link Binary With Library里面添加我们刚才拷贝出来的那个libPrint.a。
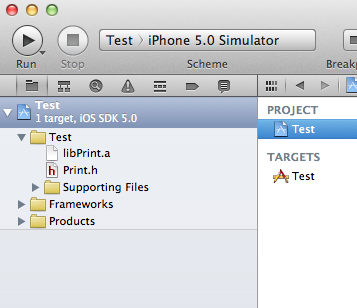


7.插入了h和a文件后

我们就可以在control里面调用这个libPrint.a 函数了。

#import "AstroDiskAppDelegate.h"

#import "Print.h"


@implementation AstroDiskAppDelegate


@synthesize window = _window;


- (void)dealloc

{

    [_window release];

    [_viewController release];

    [super dealloc];

}


- (BOOL)application:(UIApplication *)application didFinishLaunchingWithOptions:(NSDictionary *)launchOptions

{


    //调用libPrint.a

    [Print printB];

    Print  *print = [[[Print alloc] init] autorelease];

    [print printA];


    self.window = [[[UIWindow alloc] initWithFrame:[[UIScreen mainScreen] bounds]] autorelease];

    [self.window makeKeyAndVisible];

    return YES;

}


8.OK,编译运行这个应用程序。

编译出现错误了。这个就是这篇文档的关键了。主要就是为了介绍编译静态库相关的东西。


9.可以看到undefine symbols for architecture i386这样的错误。

其实这个错误原因很简单,就是因为,我们用错了编译出来的libUITab.a lib,在模拟器里面,我们需要的是基于i386构架编译的static lib,但是这个a文件,大家还记得前面说的arm6 arm7构架的么。这个a其实是在iphone这个arm构架上运行的代码。其实show in finder指向的是一个ios device的库,并不是i386模拟器下的库。那如何编译i386的库呢?看见第二张图片的Print>IOS Device了么?我们将这个iOS Device修改成iPhone5.0 Simulator。在进行编译,这样就可以编译出i386下面的库。这个时候我们show in finder打开的文件夹还是ios device下的库。我们最好自己去那个目录下看一下。这里我们用command去查看了一下目录情况,如下:可以看到一个iphoneos的目录和一个simulator的目录。


然后我们再看看这个目录与第4条所示的目录有什么不同! 同样也有一个libPrint.a文件。


10.错误原因分析

Release-iphoneos里面的是基于arm6 arm7编译出来的库文件。Release-iphonesimulator文件夹下面的是基于i386编译出来的文件。

11.合并.a文件,制作通用静态库

这二个库一个是用于真机运行的一个是用于模拟器运行的.其实我们可以利用lipo将这二个文件打包成一个通用的a文件。命令如下:

/Users/user/Library/Developer/Xcode/DerivedData/UITab-dgfkluumuexoxhcapzidtsmdgqcj/Build/Products替换成你的路径。 

/Users/user/Desktop/libPrint.a替换成合并后的路径。 

lipo -create /Users/pjk1129/Library/Developer/Xcode/DerivedData/Print-dgfkluumuexoxhcapzidtsmdgqcj/Build/Products/Release-iphonesimulator/libPrint.a  /Users/pjk1129/Library/Developer/Xcode/DerivedData/Print-dgfkluumuexoxhcapzidtsmdgqcj/Build/Products/Release-iphoneos/libPrint.a  -output /Users/pjk1129/Desktop/libPrint.a


12.打包以后的库文件,我们查看信息

然后打入如下命令:lipo -info /Users/pjk1129/Desktop/libPrint.a 

可以看到如下信息:


如上,你已经看到了,它具备了i386和arm7的条件。 现在我们这个静态库,支持的构架已经是armv7 i386了。


13.ok,经过上述步骤后

这个通用库生成后,我们将原来,调用这个库进行替换一下,在进行编译,成功编译,运行结果如下所示:
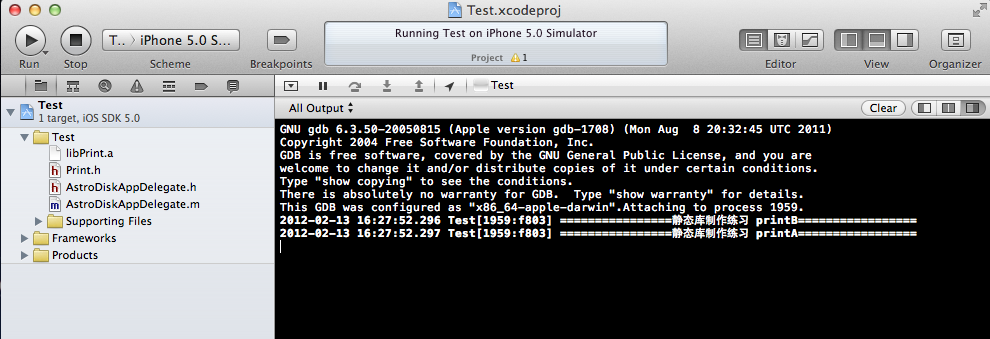

posted @ 2012-10-09 18:14 writegull 阅读(634) | 评论 (0)编辑 收藏

three20 wiki 地址:https://github.com/facebook/three20/wiki/Debugging

You can use Three20's debugging facilities instead of NSLog() / assert(). This would give you an ability to turn off debugging messages without commenting out all NSLog's, sort log messages by importance (errorwarninginfo).

Turn on debugging(打开调试)

These instructions are for Xcode 3:

  • Right-click on project, choose "Get Info".
  • In the "Build" tab, choose "Configuration => Debug" (you probably want to enable this only for debug builds)
  • While in the "Build" tab, search for "Preprocessor Macros" under the "GCC 4.2 - Preprocessing" section.
    • Add a declaration that reads DEBUG. That way you enable debugging in general.
    • Add a declaration that reads TTMAXLOGLEVEL=TTLOGLEVEL_INFO. By doing this, you set the default debugging output to beTTLOGLEVEL_INFO, the most descriptive one.

Debugging preprocessor macro

Use debugging

Logging

Use these instead of NSLog(). Which level gets printed to the console and which doesn't depends on what's set in preprocessor macros asTTMAXLOGLEVEL (see above).

TTDERROR(text, ...)    // Log level 1 TTDWARNING(text, ...)  // Log level 3 TTDINFO(text, ...)     // Log level 5 TTDPRINT(text, ...) 

Example

If I got this in AppDelegate.m of my project HelloWorld:

- (void)applicationDidFinishLaunching:(UIApplication *)application {	     TTDINFO(@"Hello!"); } 

...the console output would look like this:

2010-05-15 01:04:20.107 HelloWorld[65222:207] -[AppDelegate applicationDidFinishLaunching:](22): Hello! 

Conditional logging

This is a type of logging facility which only outputs something if a particular condition is met:

TTDCONDITIONLOG(condition, text, ...); 

Example

TTDCONDITIONLOG(TTDFLAG_URLREQUEST, @"Request parameters: %@", request.parameters); 

Debug-only assertions

Three20 also provides support for assertions which only work in the debug build.

TTDASSERT(condition_which_would_lead_to_application_termination_when_true); 

Example

// Not that implementing safeAddSubview: is a good idea - (void)safeAddSubview:(UIView*)view {     TTDASSERT(nil != view);     if (nil == view) {         return;     }     [self addSubview:view]; } 

See also

Links

posted @ 2012-09-27 10:30 writegull 阅读(395) | 评论 (0)编辑 收藏

翻译:http://www.joshsunshine.me.uk/2012/02/29/ios-development-remove-old-notifications-from-notification-center.html

不逐字翻译了,只是大体说一下。
看作者的意思,应该是他经常收到N多通知,而通过其中一条通知打开一个app以后,发现那个app的其它通知还在通知中心。作者不喜欢这样的情况。我以为我也存在的这样的情况,马上检查了一下,发现没有。看来是少数app的问题。但是也记录一下。作者总结的从通知中心移除通知的三种方法:
1.将app的BadgeNumber设为0,就是app图标右上角那个

[[UIApplication sharedApplication] setApplicationIconBadgeNumber:0];


2.如果BadgeNumber本身就是0的情况,可以先将其设1再设置成0

[[UIApplication sharedApplication] setApplicationIconBadgeNumber:1];
[[UIApplication sharedApplication] setApplicationIconBadgeNumber:0];

3.如果以上的办法都不好使的话,那就用本地通知欺骗一下。

UIApplication* application = [UIApplication sharedApplication];
NSArray* scheduledNotifications = [NSArray arrayWithArray:application.scheduledLocalNotifications];
application.scheduledLocalNotifications = scheduledNotifications;

就这么多了,我仔细想了一下,为什么我的应用从其中一条通知打开的时候,其它的通知消失掉:
因为我在程序启动的时候就执行了第一条:)

posted @ 2012-09-14 17:51 writegull 阅读(2745) | 评论 (0)编辑 收藏

使用MFMessageComposeViewController 编写发短信模块时界面是英文的情况下,用下面的方法可以解决问题

在plist里面Localization native development region 选择 china ,然后Localized resources can be mixed 选 YES,如果没有Localized resources can be mixed,需手动添加
posted @ 2012-09-10 18:12 writegull 阅读(693) | 评论 (0)编辑 收藏

1.图标的圆角效果是系统自动加上的。

2.光晕效果虽然也是系统加上的,但可以通过程序中设置参数来去掉内建光晕效果。

方法:在info.plist里面添加一条记录UIPrerenderedIcon,新版的XCODE 会自动识别为Icon already includes gloss effects 打上勾就OK了。如果没有识别的右边栏写上YES就可以

posted @ 2012-07-31 14:06 writegull 阅读(620) | 评论 (0)编辑 收藏