2009年6月24日
#
http://viralpatel.net/blogs/2009/12/tutorial-create-struts-2-application-eclipse-example.html problem:
HTTP Status 500
java.lang.NullPointerException
org.apache.struts2.impl.StrutsActionProxy.getErrorMessage(StrutsActionProxy.java:69)
com.opensymphony.xwork2.DefaultActionProxy.prepare(DefaultActionProxy.java:185)
resolve problem:
1. struts.xml should under src
2. in struts.xml:
<action name="login" method="
excute" class="net.viralpatel.struts2.LoginAction">
24.Sep.2009 | by Gusac | Filed in: Articles, Tutorials
With the lack of Graphical Interface on Windows 2008 Core server there comes a need of performing a lot of task through command line. One of which is checking file properties like file version, path, product verision etc. Luckily we have a command that makes this task simple. On a side note, We can also run the same command on other operating systems like Windows Xp, 2003, vista.
Here is the command:
wmic datafile where name='c:\\windows\\system32\\notepad.exe'
 Click here to view the enlarged screenshot
Notice that we have used two backslashes \\ in the file path. Also, notice that the path is enclosed in the single quotes.
The output will be confusing to read in command prompt window. To read and understand it better, we can take the output in text format and read it in notepad.
While doing so, please do NOT wrap the text.
wmic datafile where name='c:\\windows\\system32\\notepad.exe' > out.txt

Click here to view the enlarged screenshot
The output will reveal the file properties like Hidden, Path, Drive, Version Caption, Access rights etc.
To get one particular property of a file we need to modify the command a little bit. We need to use the GET Alias injunction to the command mentioned above. Let's say we want to check the version for the file notepad.exe. The command that is used for this is:
wmic datafile where name='c:\\windows\\system32\\notepad.exe' get version
Similarily, there is a list of properties that can be fetched through this command line. They are:
Access Rights
Caption
Class Name
Compressed
Compression Method
Computer System Class Name
Computer System Name
Creation Date
Current File Open Count
Description
Drive
Eight Dot Three File Name
Encrypted
Encryption Method
File Extension
File Name
File System Class Name
File System Name
File Type
Hidden
Install Date
Last Accessed
Last Modified
Manufacturer
Name
Path
Readable
Should Be Archived
Size
Status
System File
Version
Writeable
from
http://www.iis.net/ConfigReference/system.webServer/security/authentication/windowsAuthentication
The <windowsAuthentication> element defines configuration settings for the Internet Information Services (IIS) 7 Windows authentication module. You can use Windows authentication when your IIS 7 server runs on a corporate network that is using Microsoft Active Directory service domain identities or other Windows accounts to identify users. Because of this, you can use Windows authentication whether or not your server is a member of an Active Directory domain.
Windows authentication (formerly named NTLM, and also referred to as Windows NT Challenge/Response authentication) is a secure form of authentication because the user name and password are hashed before being sent across the network. When you enable Windows authentication, the client browser sends a strongly hashed version of the password in a cryptographic exchange with your Web server.
Windows authentication supports two authentication protocols, Kerberos and NTLM, which are defined in the <providers> element. When you install and enable Windows authentication on IIS 7, the default protocol is Kerberos. The <windowsAuthentication> element can also contain a useKernelMode attribute that configures whether to use the kernel mode authentication feature that is new to Windows Server 2008.
Windows authentication is best suited for an intranet environment for the following reasons:
- Client computers and Web servers are in the same domain.
- Administrators can make sure that every client browser is Internet Explorer 2.0 or later.
- HTTP proxy connections, which are not supported by NTLM, are not required.
- Kerberos version 5 requires a connection to Active Directory, which is not feasible in an Internet environment.
New in IIS 7.5
The <extendedProtection> element was introduced in IIS 7.5, which allows you to configure the settings for the new extended protection features that have been integrated into Windows authentication.
| Version |
Notes |
| IIS 7.5 |
The <extendedProtection> element was added in IIS 7.5. |
| IIS 7.0 |
The <windowsAuthentication> element was introduced in IIS 7.0. |
| IIS 6.0 |
The <windowsAuthentication> element replaces portions of the IIS 6.0 AuthType and AuthFlags metabase properties. |
The default installation of IIS 7 does not include the Windows authentication role service. To use Windows authentication on IIS, you must install the role service, disable Anonymous authentication for your Web site or application, and then enable Windows authentication for the site or application.
Note: After you install the role service, IIS 7 commits the following configuration settings to the ApplicationHost.config file.
<windowsAuthentication enabled="false" />
Windows Server 2008 or Windows Server 2008 R2
- On the taskbar, click Start, point to Administrative Tools, and then click Server Manager.
- In the Server Manager hierarchy pane, expand Roles, and then click Web Server (IIS).
- In the Web Server (IIS) pane, scroll to the Role Services section, and then click Add Role Services.
- On the Select Role Services page of the Add Role Services Wizard, select Windows Authentication, and then click Next.


- On the Confirm Installation Selections page, click Install.
- On the Results page, click Close.
Windows Vista or Windows 7
- On the taskbar, click Start, and then click Control Panel.
- In Control Panel, click Programs and Features, and then click Turn Windows Features on or off.
- Expand Internet Information Services, then World Wide Web Services, then Security.
- Select Windows Authentication, and then click OK.


How to enable Windows authentication for a Web site, Web application, or Web service
- Open Internet Information Services (IIS) Manager:
- If you are using Windows Server 2008 or Windows Server 2008 R2:
- On the taskbar, click Start, point to Administrative Tools, and then click Internet Information Services (IIS) Manager.
- If you are using Windows Vista or Windows 7:
- On the taskbar, click Start, and then click Control Panel.
- Double-click Administrative Tools, and then double-click Internet Information Services (IIS) Manager.
- In the Connections pane, expand the server name, expand Sites, and then the site, application, or Web service for which you want to enable Windows authentication.
- Scroll to the Security section in the Home pane, and then double-click Authentication.
- In the Authentication pane, select Windows Authentication, and then click Enable in the Actions pane.


How to enable Extended Protection for Windows authentication
- Open Internet Information Services (IIS) Manager:
- If you are using Windows Server 2008 or Windows Server 2008 R2:
- On the taskbar, click Start, point to Administrative Tools, and then click Internet Information Services (IIS) Manager.
- If you are using Windows Vista or Windows 7:
- On the taskbar, click Start, and then click Control Panel.
- Double-click Administrative Tools, and then double-click Internet Information Services (IIS) Manager.
- In the Connections pane, expand the server name, expand Sites, and then the site, application, or Web service for which you want to enable Extended Protection for Windows authentication.
- Scroll to the Security section in the Home pane, and then double-click Authentication.
- In the Authentication pane, select Windows Authentication.
- Click Enable in the Actions pane.


- Click Advanced Settings in the Actions pane.
- When the Advanced Settings dialog box appears, select one of the following options in the Extended Protection drop-down menu:
- Select Accept if you want to enable extended protection while providing down-level support for clients that do not support extended protection.
- Select Required if you want to enable extended protection without providing down-level support.


- Click OK to close the Advanced Settings dialog box.
The <windowsAuthentication> element is configurable at the site, application, or virtual directory level in the ApplicationHost.config file.
Attributes
| Attribute |
Description |
authPersistNonNTLM |
Optional Boolean attribute.
Specifies whether IIS automatically reauthenticates every non-NTLM (for example, Kerberos) request, even those on the same connection. False enables multiple authentications for the same connections.
Note: A setting of true means that the client will be authenticated only once on the same connection. IIS will cache a token or ticket on the server for a TCP session that stays established.
The default is false. |
authPersistSingleRequest |
Optional Boolean attribute.
Setting this flag to true specifies that authentication persists only for a single request on a connection. IIS resets the authentication at the end of each request, and forces reauthentication on the next request of the session.
The default value is false. |
enabled |
Required Boolean attribute.
Specifies whether Windows authentication is enabled.
The default value is false. |
useKernelMode |
Optional Boolean attribute.
Specifies whether Windows authentication is done in kernel mode. True specifies that Windows authentication uses kernel mode.
Kernel-mode authentication may improve authentication performance and prevent authentication problems with application pools that are configured to use a custom identity.
As a best practice, do not disable this setting if you use Kerberos authentication and have a custom identity on the application pool.
The default is true. |
Child Elements
| Element |
Description |
extendedProtection |
Optional element.
Specifies extended protection options for Windows authentication.
Note: This element was added in IIS 7.5. |
providers |
Optional element.
Specifies security support providers used for Windows authentication. |
Configuration Sample
The following default <windowsAuthentication> element is configured at the root ApplicationHost.config file in IIS 7.0, and disables Windows authentication by default. It also defines the two Windows authentication providers for IIS 7.0.
<windowsAuthentication enabled="false">
   <providers>
      <add value="Negotiate" />
      <add value="NTLM" />
   </providers>
</windowsAuthentication>
The following example enables Windows authentication and disables Anonymous authentication for a Web site named Contoso.
<location path="Contoso">
   <system.webServer>
      <security>
         <authentication>
            <anonymousAuthentication enabled="false" />
            <windowsAuthentication enabled="true" />
         </authentication>
      </security>
   </system.webServer>
</location>
The following examples disable Anonymous authentication for a site named Contoso, then enable Windows authentication for the site.
AppCmd.exe
appcmd.exe set config "Contoso" -section:system.webServer/security/authentication/anonymousAuthentication /enabled:"False" /commit:apphost

appcmd.exe set config "Contoso" -section:system.webServer/security/authentication/windowsAuthentication /enabled:"True" /commit:apphost
Note: You must be sure to set the commit parameter to apphost when you use AppCmd.exe to configure these settings. This commits the configuration settings to the appropriate location section in the ApplicationHost.config file.
C#
using System;
using System.Text;
using Microsoft.Web.Administration;

internal static class Sample {

   private static void Main() {

      using(ServerManager serverManager = new ServerManager()) {
         Configuration config = serverManager.GetApplicationHostConfiguration();

         ConfigurationSection anonymousAuthenticationSection = config.GetSection("system.webServer/security/authentication/anonymousAuthentication", "Contoso");
         anonymousAuthenticationSection["enabled"] = false;

         ConfigurationSection windowsAuthenticationSection = config.GetSection("system.webServer/security/authentication/windowsAuthentication", "Contoso");
         windowsAuthenticationSection["enabled"] = true;

         serverManager.CommitChanges();
      }
   }
}
VB.NET
Imports System
Imports System.Text
Imports Microsoft.Web.Administration

Module Sample
   Sub Main()
      Dim serverManager As ServerManager = New ServerManager
      Dim config As Configuration = serverManager.GetApplicationHostConfiguration

      Dim anonymousAuthenticationSection As ConfigurationSection = config.GetSection("system.webServer/security/authentication/anonymousAuthentication", "Contoso")
      anonymousAuthenticationSection("enabled") = False

      Dim windowsAuthenticationSection As ConfigurationSection = config.GetSection("system.webServer/security/authentication/windowsAuthentication", "Contoso")
      windowsAuthenticationSection("enabled") = True

      serverManager.CommitChanges()
   End Sub
End Module
JavaScript
var adminManager = new ActiveXObject('Microsoft.ApplicationHost.WritableAdminManager');
adminManager.CommitPath = "MACHINE/WEBROOT/APPHOST";

var anonymousAuthenticationSection = adminManager.GetAdminSection("system.webServer/security/authentication/anonymousAuthentication", "MACHINE/WEBROOT/APPHOST/Contoso");
anonymousAuthenticationSection.Properties.Item("enabled").Value = false;

var windowsAuthenticationSection = adminManager.GetAdminSection("system.webServer/security/authentication/windowsAuthentication", "MACHINE/WEBROOT/APPHOST/Contoso");
windowsAuthenticationSection.Properties.Item("enabled").Value = true;

adminManager.CommitChanges();
VBScript
Set adminManager = CreateObject("Microsoft.ApplicationHost.WritableAdminManager")
adminManager.CommitPath = "MACHINE/WEBROOT/APPHOST"

Set anonymousAuthenticationSection = adminManager.GetAdminSection("system.webServer/security/authentication/anonymousAuthentication", "MACHINE/WEBROOT/APPHOST/Contoso")
anonymousAuthenticationSection.Properties.Item("enabled").Value = False

Set windowsAuthenticationSection = adminManager.GetAdminSection("system.webServer/security/authentication/windowsAuthentication", "MACHINE/WEBROOT/APPHOST/Contoso")
windowsAuthenticationSection.Properties.Item("enabled").Value = True

adminManager.CommitChanges()
how to check window version
run: Winver
Here's How:
-
Open the System Information
Open the Start menu, and click on Programs -> Accessories -> System Tools -> System Information
-
Look in the System Summary
The System Information tool will display detailed information about your Windows operating system. Once opened it will show the "System Summary" – it’s an overview of your computer and operating system.
-
Look for the System Type Item
On the right hand side of the window you will see a list of items. Look for the item called "System Type".
The value of this item will tell you whether your computer is 32-bit or 64-bit:
- x86-based PC: It’s a 32-bit computer.
- x64-based PC: It’s a 64-bit computer.
摘要: ContentProvider何时创建呢?这是一个值得深思的问题?
据我这两天的了解是在你要用到的时候才会调用ContentProvider的onCreate函数进行创建。你就会什么时候叫要用到的时候呢?比如你要查询或删除修改数据库的时候通过ContentResolver的quire或delete来操纵数据时就会调用ContentProvider的onCreate函数,若已经创建了数...
阅读全文
View是在onTouchEvent(MotionEvent event)里对用户的动作做了一定的分析,从而通知我们是发生了点击还是长按等事件。
我们需要创建一个GestureDetector的对象,传入listener对象,view接收到的onTouchEvent中将event传给GestureDetector进行分析,listener会回调给我们相应的动作。其中GestureDetector.SimpleOnGestureListener(Framework帮我们简化了)是实现了上面提到的OnGestureListener和OnDoubleTapListener两个接口的类,我们只需要继承它并重写其中我们关心的回调即可。
,那么,这个类如何使用呢?以下是使用该类的一个范例:
private GestureDetector mGestureDetector;
@Override
public void onCreate(Bundle savedInstanceState) {
super.onCreate(savedInstanceState);
mGestureDetector = new GestureDetector(this, new MyGestureListener());
}
@Override
public boolean onTouchEvent(MotionEvent event) {
return mGestureDetector.onTouchEvent(event);
/* 有关上面的 onTouchEvent方法,我们可以直接判断MotionEvent的类型,
对于手势移动仅仅捕获ACTION_MOVE即可,
我们通过参数MotionEvent e1, MotionEvent e2,float distanceX, float distanceY可以获取操作变化。
比如 distanceX > 0 向右边移动,distanceX < 0 则向左边,distanceY > 0 向上滚动, distanceY < 0 向下滚动。
*/
}
class MyGestureListener extends GestureDetector.SimpleOnGestureListener{
@Override
public boolean onSingleTapUp(MotionEvent ev) {
Log.d("onSingleTapUp",ev.toString());
return true;
}
@Override
public void onShowPress(MotionEvent ev) {
Log.d("onShowPress",ev.toString());
}
@Override
public void onLongPress(MotionEvent ev) {
Log.d("onLongPress",ev.toString());
}
}
更多的回调消息,方便的对用户的动作进行响应
public interface OnGestureListener {
// Touch down时触发, e为down时的MotionEvent
boolean onDown(MotionEvent e);
// 在Touch down之后一定时间(115ms)触发,e为down时的MotionEvent
void onShowPress(MotionEvent e);
// Touch up时触发,e为up时的MotionEvent
boolean onSingleTapUp(MotionEvent e);
// 滑动时触发,e1为down时的MotionEvent,e2为move时的MotionEvent
boolean onScroll(MotionEvent e1, MotionEvent e2, float distanceX, float distanceY);
// 在Touch down之后一定时间(500ms)触发,e为down时的MotionEvent
void onLongPress(MotionEvent e);
// 滑动一段距离,up时触发,e1为down时的MotionEvent,e2为up时的MotionEvent
boolean onFling(MotionEvent e1, MotionEvent e2, float velocityX, float velocityY);
}
public interface OnDoubleTapListener {
// 完成一次单击,并确定没有二击事件后触发(300ms),e为down时的MotionEvent
boolean onSingleTapConfirmed(MotionEvent e);
// 第二次单击down时触发,e为第一次down时的MotionEvent
boolean onDoubleTap(MotionEvent e);
// 第二次单击down,move和up时都触发,e为不同时机下的MotionEvent
boolean onDoubleTapEvent(MotionEvent e);
}
boolean onDoubleTap(MotionEvent e)
解释:双击的第二下Touch down时触发
boolean onDoubleTapEvent(MotionEvent e)
解释:双击的第二下Touch down和up都会触发,可用e.getAction()区分。
boolean onDown(MotionEvent e)
解释:Touch down时触发
boolean onFling(MotionEvent e1, MotionEvent e2, float velocityX, float velocityY)
解释:Touch了滑动一点距离后,up时触发。
void onLongPress(MotionEvent e)
解释:Touch了不移动一直Touch down时触发
boolean onScroll(MotionEvent e1, MotionEvent e2, float distanceX, float distanceY)
解释:Touch了滑动时触发。
void onShowPress(MotionEvent e)
解释:Touch了还没有滑动时触发
(与onDown,onLongPress比较,onDown只要Touch down一定立刻触发。而Touchdown后过一会没有滑动先触发onShowPress再是onLongPress。
所以Touchdown后一直不滑动,onDown->onShowPress->onLongPress这个顺序触发。
boolean onSingleTapConfirmed(MotionEvent e)
boolean onSingleTapUp(MotionEvent e)
解释:上面这两个函数都是在touch down后又没有滑动(onScroll),又没有长按(onLongPress),然后Touchup时触发。
点击一下非常快的(不滑动)Touchup:
onDown->onSingleTapUp->onSingleTapConfirmed
点击一下稍微慢点的(不滑动)Touchup:
onDown->onShowPress->onSingleTapUp->onSingleTapConfirmed
protected void onNewIntent (Intent intent)
This is called for activities that set launchMode to "singleTop" in their package, or if a client used theFLAG_ACTIVITY_SINGLE_TOP flag when calling startActivity(Intent). In either case, when the activity is re-launched while at the top of the activity stack instead of a new instance of the activity being started, onNewIntent() will be called on the existing instance with the Intent that was used to re-launch it.
An activity will always be paused before receiving a new intent, so you can count on onResume() being called after this method.
Note that getIntent() still returns the original Intent. You can use setIntent(Intent) to update it to this new Intent.
在IntentActivity中重写下列方法:onCreate onStart onRestart onResume onPause onStop onDestroy onNewIntent
一、其他应用发Intent,执行下列方法:
I/@@@philn(12410): onCreate
I/@@@philn(12410): onStart
I/@@@philn(12410): onResume
发Intent的方法:
Uri uri = Uri.parse("philn://blog.163.com");
Intent it = new Intent(Intent.ACTION_VIEW, uri);
startActivity(it);
二、接收Intent声明:
<activity android:name=".IntentActivity" android:launchMode="singleTask"
android:label="@string/testname">
<intent-filter>
<action android:name="android.intent.action.VIEW" />
<category android:name="android.intent.category.DEFAULT" />
<category android:name="android.intent.category.BROWSABLE" />
<data android:scheme="philn"/>
</intent-filter>
</activity>
三、如果IntentActivity处于任务栈的顶端,也就是说之前打开过的Activity,现在处于
I/@@@philn(12410): onPause
I/@@@philn(12410): onStop 状态的话
其他应用再发送Intent的话,执行顺序为:
I/@@@philn(12410): onNewIntent
I/@@@philn(12410): onRestart
I/@@@philn(12410): onStart
I/@@@philn(12410): onResume
引言:
设计模式是经验的文档化。它是对被用来在特定场景下解决一般设计问题的类和相互通信的对象的描述。更通俗的来说,它是一个问题/解决方案对。一旦我们掌握了设计模式,就等于拥有了一支强有力的专家队伍。它甚至能够使面向对象的新手利用前人的经验找出职责明确的类和对象,从而获得优雅的解决方案。由于设计模式也是重构的目标,如果在设计的初期适当地引入设计模式,可以减少重构的工作量。
但是,我们也不能陷入模式的陷阱,为了使用模式而去套模式,那样会陷入形式主义。我们在使用模式的时候,一定要注意模式的意图(intent),而不要过多的去关注模式的实现细节,因为这些实现细节在特定情况下,可能会发生一些改变。不要顽固地认为设计模式一书中的类图或实现代码就代表了模式本身。
下面,我们来讨论一下为什么要在分布式、多层系统中使用Observer模式。
多层体系结构(multi-tier architecture):
三层体系结构是多层体系结构中最简单的一种,它一般包括:
- 表示层(presentation)-窗口、报表-
- 业务逻辑层(business logic)-管理业务过程的任务和规则。它又可以细分为领域对象层(代表领域概念)和服务层(提供数据库交互、安全性、打印报表)。
- 存储层(storage)-持久化存储机制。如数据库服务器等。
图一:三层体系结构

而Java 2平台企业版(J2EE)是一种利用Java 2平台来简化诸多与多级企业解决方案的开发、部署和管理相关的复杂问题的体系结构。它是开放的、基于标准的平台,用以开发、部署和管理N层结构、面向Web的,以服务器为中心的企业级应用。
为了支持领域对象的复用,并且使领域对象的接口变更所带来的影响最小化。我们将领域层(模型)和表示层(视图)相分离。
采用模型-视图模式的意义在于:
- 支持聚合度更高的模型定义,使模型的定义可以集中在领域过程的定义,而不是图形界面上。
- 允许将模型和用户界面并行开发。
- 使用户界面的需求变化对领域层所造成的影响最小化。
- 允许建立与一个现有的领域层对象相连接的新视图,同时不影响领域层。
- 允许一个模型同时有多个视图,例如使用SVG和表格。
- 允许模型层独立于用户界面层执行。
而这恰恰与Observer模式的意图相吻合。因此我们有必要跨层来实现Observer模式。
其实,在应用中更多的是采用MVC框架来架构整个企业应用的。在MVC框架中,Model和View之间存在着依赖关系,是Observer模式的典型应用。当然MVC框架还包括其它模式如Composite模式和Strategy模式。在J2EE平台中,我们可以把Web Tier(包括Jsp和servelet和JavaBean)看作是表示层,EJB Tier看作是领域层。而controller可能跨距Web Tier和 EJB Tier。
在Java类库中采用Java.util.Observable类和Java.util.Observer接口来实现Observer模式,它们在单个的Java VM.中运行的很好,但如果想在EJB中使用它们就会有一些问题。这正如我们引言中提到的,模式的具体实现在特定情况下,可能会发生一些改变。
值传递还是远程引用传递?
值传递:
在Java RMI中要求所有的参数和返回类型是JAVA的基本类型或实现Java.io.Serilizable的对象。串行化对象通过值传递(又名拷贝传递),而不是引用传递,这意味着在某一层中串行化对象的更并不自动影响到其它的对象。
远程引用传递:
对于EJB对象而言,它由两个接口(home接口和remote接口)和一个类组成。容器会根据ejb规范来生成实现上面两个接口的类(我们分别称为xxxEJBHome对象和xxxEjbObject对象)。在较多的容器的实现方案中,xxxEJBHome对象使用了factory模式来创建xxxEjbObject对象;xxxEjbObject对象则采用proxy模式,作为xxxBean的代理类。在生成以上两个对象的同时,容器会从部署文件中读取关于安全、事务、持久性等服务并在xxxEjbObject对象和xxxEJBHome对象中添加以上服务的代码。而且xxxEJBHome对象和xxxEjbObject对象都是分布式对象,我们在此只讨论xxxEjbObject对象。所谓分布式对象,从本质上来讲,分为3个部分:object server、skeleton、stub。其中object server和skeleton位于服务器端,而stub位于客户端。Object server负责实现业务逻辑,skeleton负责marshal和unmarshal方法签名。
图二:分布式对象

显然,EJB的客户(调用EJB的对象)可以是任何对象,包括EJB和一般的Java类甚至是用任何语言写的corba客户端。
从EJB的客户视角来看的话,我们只能看到一个home接口、一个remote接口(对于实体bean的话,还可以看见一个主键类,而bean类对客户是不可见的)。但我们从上面的论述,我们可以知道,对于remote接口中地方法调用,实际上是多态地调用XXX_Stub类。即XXX_Stub对象对客户具有可见性(但这种可见性是透明的,即客户不知道这种可见性的存在)。由于,XXX_Stub对象和Object Server实现了相同的接口,并且Object server真正实现了业务逻辑。所以,当在客户端调用XXX_Stub对象的方法时候,XXX_Stub对象通过socket通信机制将方法签名传给XXX_Skeleton对象,XXX_Skeleton对象在去委托Object Server完成业务处理逻辑。因此,Object Server本身发生了改变。我们称XXX_Stub对象是Object Server对象的远程引用,并认为当分布式对象作为参数传递的时候,是通过引用传递的(会产生副作用
RMI的定义
Java RMI (Remote Method Invocation 远程方法调用)是用Java在JDK1.1中实现的,它大大增强了Java开发分布式应用的能力。Java作为一种风靡一时的网络开发语言,其巨大的威力就体现在它强大的开发分布式网络应用的能力上,而RMI就是开发百分之百纯Java的网络分布式应用系统的核心解决方案之一。其实它可以被看作是RPC的Java版本。但是传统RPC并不能很好地应用于分布式对象系统。而Java RMI 则支持存储于不同地址空间的程序级对象之间彼此进行通信,实现远程对象之间的无缝远程调用。
RMI目前使用Java远程消息交换协议JRMP(Java Remote Messaging Protocol)进行通信。JRMP是专为Java的远程对象制定的协议。因此,Java RMI具有Java的“Write Once,Run Anywhere”的优点,是分布式应用系统的百分之百纯Java解决方案。用Java RMI开发的应用系统可以部署在任何支持JRE(Java Run Environment Java,运行环境)的平台上。但由于JRMP是专为Java对象制定的,因此,RMI对于用非Java语言开发的应用系统的支持不足。不能与用非Java语言书写的对象进行通信。
RMI 和CORBA常被视为相互竞争的技术,因为两者都提供对远程分布式对象的透明访问。但这两种技术实际上是相互补充的,一者的长处正好可以弥补另一者的短处。RMI 和 CORBA 的结合产生了 RMI-IIOP,RMI-IIOP 是企业服务器端 Java 开发的基础
1997 年,IBM 和 Sun Microsystems启动了一项旨在促进 Java 作为企业开发技术的发展的合作计划。两家公司特别着力于如何将 Java 用作服务器端语言,生成可以结合进现有体系结构的企业级代码。所需要的就是一种远程传输技术,它兼有 Java 的 RMI(Remote Method Invocation,远程方法调用)较少的资源占用量和更成熟的 CORBA(Common Object Request Broker Architecture,公共对象请求代理体系结构)技术的健壮性。出于这一需要,RMI-IIOP问世了,它帮助将 Java 语言推向了目前服务器端企业开发的主流语言的领先地位。
RMI的组成
一个正常工作的RMI系统由下面几个部分组成:
1、远程服务的接口定义
2、远程服务接口的具体实现
3、桩(Stub)和框架(Skeleton)文件
4、一个运行远程服务的服务器
5、一个RMI命名服务,它允许客户端去发现这个远程服务
6、类文件的提供者(一个HTTP或者FTP服务器)
7、一个需要这个远程服务的客户端程序
RMI的实现
下面我们一步一步建立一个简单的RMI系统。首先在你的机器里建立一个新的文件夹,以便放置我们创建的文件,为了简单起见,我们只使用一个文件夹存放客户端和服务端代码,并且在同一个目录下运行服务端和客户端。
如果所有的RMI文件都已经设计好了,那么你需要下面的几个步骤去生成你的系统:
1、 编写并且编译接口的Java代码
2、 编写并且编译接口实现的Java代码
3、 从接口实现类中生成 Stub 和 Skeleton 类文件
4、 编写远程服务的主运行程序
5、 编写RMI的客户端程序
6、 安装并且运行RMI系统
1、接口
第一步就是建立和编译服务接口的Java代码。这个接口定义了所有的提供远程服务的功能,下面是源程序:
1. //Calculator.java
2. //define the interface
3. import java.rmi.Remote;
4.
5. public interface Calculator extends Remote
6. {
7. public long add(long a, long b)
8. throws java.rmi.RemoteException;
9.
10. public long sub(long a, long b)
11. throws java.rmi.RemoteException;
12.
13. public long mul(long a, long b)
14. throws java.rmi.RemoteException;
15.
16. public long div(long a, long b)
17. throws java.rmi.RemoteException;
18. }
注意,这个接口继承自Remote,每一个定义的方法都必须抛出一个RemoteException异常对象。
建立这个文件,把它存放在刚才的目录下,并且编译。
>javac Calculator.java
2、接口的具体实现
下一步,我们就要写远程服务的具体实现,这是一个CalculatorImpl类文件:
1. //CalculatorImpl.java
2. //Implementation
3. import java.rmi.server.UnicastRemoteObject;
4.
5. public class CalculatorImpl extends UnicastRemoteObject implements Calculator
6. {
7.
8. // 这个实现必须有一个显式的构造函数,并且要抛出一个RemoteException异常
9. public CalculatorImpl()
10. throws java.rmi.RemoteException {
11. super();
12. }
13.
14. public long add(long a, long b)
15. throws java.rmi.RemoteException {
16. return a + b;
17. }
18.
19. public long sub(long a, long b)
20. throws java.rmi.RemoteException {
21. return a - b;
22. }
23.
24. public long mul(long a, long b)
25. throws java.rmi.RemoteException {
26. return a * b;
27. }
28.
29. public long div(long a, long b)
30. throws java.rmi.RemoteException {
31. return a / b;
32. }
33. }
同样的,把这个文件保存在你的目录里然后编译他。
这个实现类使用了UnicastRemoteObject去联接RMI系统。在我们的例子中,我们是直接的从UnicastRemoteObject 这个类上继承的,事实上并不一定要这样做,如果一个类不是从UnicastRmeoteObject上继承,那必须使用它的exportObject() 方法去联接到RMI。
如果一个类继承自UnicastRemoteObject,那么它必须提供一个构造函数并且声明抛出一个RemoteException对象。当这个构造函数调用了super(),它久激活UnicastRemoteObject中的代码完成RMI的连接和远程对象的初始化。
3、Stubs 和Skeletons
下一步就是要使用RMI编译器rmic来生成桩和框架文件,这个编译运行在远程服务实现类文件上。
>rmic CalculatorImpl
在你的目录下运行上面的命令,成功执行完上面的命令你可以发现一个Calculator_stub.class文件,如果你是使用的Java2SDK,那么你还可以发现Calculator_Skel.class文件。
4、主机服务器
远程RMI服务必须是在一个服务器中运行的。CalculatorServer类是一个非常简单的服务器。
1. //CalculatorServer.java
2. import java.rmi.Naming;
3.
4. public class CalculatorServer {
5.
6. public CalculatorServer() {
7. try {
8. Calculator c = new CalculatorImpl();
9. Naming.rebind("rmi://localhost:1099/CalculatorService", c);
10. } catch (Exception e) {
11. System.out.println("Trouble: " + e);
12. }
13. }
14.
15. public static void main(String args[]) {
16. new CalculatorServer();
17. }
18. }
建立这个服务器程序,然后保存到你的目录下,并且编译它。
5、客户端
客户端源代码如下:
//CalculatorClient.java
import java.rmi.Naming;
import java.rmi.RemoteException;
import java.net.MalformedURLException;
import java.rmi.NotBoundException;
public class CalculatorClient {
public static void main(String[] args) {
try {
Calculator c = (Calculator)
Naming.lookup(
"rmi://localhost
/CalculatorService");
System.out.println( c.sub(4, 3) );
System.out.println( c.add(4, 5) );
System.out.println( c.mul(3, 6) );
System.out.println( c.div(9, 3) );
}
catch (MalformedURLException murle) {
System.out.println();
System.out.println(
"MalformedURLException");
System.out.println(murle);
}
catch (RemoteException re) {
System.out.println();
System.out.println(
"RemoteException");
System.out.println(re);
}
catch (NotBoundException nbe) {
System.out.println();
System.out.println(
"NotBoundException");
System.out.println(nbe);
}
catch (
java.lang.ArithmeticException
ae) {
System.out.println();
System.out.println(
"java.lang.ArithmeticException");
System.out.println(ae);
}
}
}
保存这个客户端程序到你的目录下(注意这个目录是一开始建立那个,所有的我们的文件都在那个目录下),并且编译他。
6、运行RMI系统
现在我们建立了所有运行这个简单RMI系统所需的文件,现在我们终于可以运行这个RMI系统啦!来享受吧。
我们是在命令控制台下运行这个系统的,你必须开启三个控制台窗口,一个运行服务器,一个运行客户端,还有一个运行RMIRegistry。
首先运行注册程序RMIRegistry,你必须在包含你刚写的类的那么目录下运行这个注册程序。
>rmiregistry
好,这个命令成功的话,注册程序已经开始运行了,不要管他,现在切换到另外一个控制台,在第二个控制台里,我们运行服务器CalculatorService,因为RMI的安全机制将在服务端发生作用,所以你必须增加一条安全策略。以下是对应安全策略的例子
grant {
permission java.security.AllPermission "", "";
};
注意:这是一条最简单的安全策略,它允许任何人做任何事,对于你的更加关键性的应用,你必须指定更加详细安全策略。
现在为了运行服务端,你需要除客户类(CalculatorClient.class)之外的所有的类文件。确认安全策略在policy.txt文件之后,使用如下命令来运行服务器。
> java -Djava.security.policy=policy.txt CalculatorServer
这个服务器就开始工作了,把接口的实现加载到内存等待客户端的联接。好现在切换到第三个控制台,启动我们的客户端。
为了在其他的机器运行客户端程序你需要一个远程接口(Calculator.class) 和一个stub(CalculatorImpl_Stub.class)。 使用如下命令运行客户端
> java -Djava.security.policy=policy.txt CalculatorClient
如果所有的这些都成功运行,你应该看到下面的输出:
1
9
18
3
如果你看到了上面的输出,恭喜你,你成功了,你已经成功的创建了一个RMI系统,并且使他正确工作了。即使你运行在同一个计算机上,RMI还是使用了你的网络堆栈和TCP/IP去进行通讯,并且是运行在三个不同的Java虚拟机上。这已经是一个完整的RMI系统。
摘要: java语言里包含了许多对设计模式的直接支持,如command模式,agent模式,observer模式等。虽然java提供的对这些模式的支持很简单,不能满足比较复杂的应用。但在简单的场景下,使用这些类往往能够得到立杆见影的效果。所以,如果没有什么特殊需求,还是最好利用java的这些类。
Observ...
阅读全文
接口:空心圆+直线(唐老鸭类实现了‘讲人话’);
依赖:虚线+箭头(动物和空气的关系);
关联:实线+箭头(企鹅需要知道气候才迁移);
聚合:空心四边形+实线+箭头(雁群和大雁的关系);
合成/组合:实心四边形+实线+箭头(鸟和翅膀的关系);
泛化/继承:空心三角形+实线(动物和鸟的继承关系);
实现:空心三角形+虚线(实现大雁飞翔的接口);
UML类图
-
-
1. 首先看“动物”矩形框,它代表一个类。该类图分为三层,第一层显示类的名称,如果是抽象类就要用斜体显示。第二层是类的特性,通常就是字段和属性。第三层是类的操作,通常是方法和行为。
-
注意前面的符号,‘+’表示public, ‘—’ 表示private, ‘#’表示protected.
-
2. “飞翔”矩形框表示一个接口图,它与类图的区别主要是顶端有《interface》显示,第一行是接口名称,第二行是接口方法。接口还有另一种表示方法,俗称棒棒糖表示法,就是唐老鸭类实现了“讲人话”的接口。
-
-
interface IFly interface Ilanguage
{ {
void Fly(); void Speak();
} }
-
3. 动物,鸟,鸭,唐老鸭他们之间都是继承的关系,继承关系用空心三角形+实现来表示。
-
-
4.“大雁”实现了“飞翔”接口。实现接口用空心三角形+虚线来表示。(注:下面的图中应为空心三角形)
-
-
class Bird:Animal class WideGoose:IFly
{ {
//继承动物类 //实现飞翔接口
} }
-
5. 企鹅与气候有很大的关系,企鹅需要“知道”气候的变化,需要“了解”气候规律。当一个类“知道”另一个类时,可以用关联(association)关系。关联关系用实线箭头来表示。
-
-
-
class Penguin :Bird
{
private Climate climate;//在企鹅Penguin中,引用到气候Climate对象
}
-
6. “大雁”和“雁群”这两个类。大雁是群居动物,每只大雁都属于一个雁群,一个雁群可以有多只大雁。所以它们之间就满足聚合(Aggregation)关系。聚合表示一种弱的“拥有”关系,体现的是A对象可以包含B对象,但B对象不是A对象的一部分。聚合关系用空心的菱形+ 实线箭头表示。
-
-
-
class WideGooseAggregate
{
private WideGoose[] arrayWideGoose;
//在雁群WideGooseAggregate类中,有大雁数组对象arrayWideGoose
}
-
7. “鸟”和“翅膀”这两个类。鸟和翅膀似整体和部分的关系,并且翅膀和鸟的生命周期是相同的,在这里鸟和其翅膀就是合成关系。合成(composition)是一种强的“拥有”关系,体现了严格的部分和整体的关系,部分和整体的生命周期一样。合成关系用实心的的菱形+实线箭头来表示。另外,合成关系的连线两端还有一个数字“1”和数字“2”,,这被称为基数。表明这一端的类可以有几个实例,很显然,一个鸟应该有两支翅膀。如果一个类可能有无数个实例,则就用“n”来表示。关联关系,聚合关系也可以有基数的。
-
class Bird
{
private Wing wing;
public Bird()
{
wing=new Wing();
//在鸟Bird类中,初始化时,实例化翅膀Wing,它们之间同时生成
}
}
-
8. “动物”、“氧气”与“水”之间。动物有几大特征,比如有新陈代谢,能繁殖。而动物要有生命,需要氧气,水以及食物等。也就是说动物依赖于氧气和水。它们之间是依赖关系(Dependency),用虚线箭头来表示。
-
-
-
-
abstract class Animal
{
public bolism(Oxygen oxygen,Water water)
{
}
}
在manifest文件里->activity 添加
<intent-filter>
<action android:name="android.intent.action.VIEW" />
<category android:name="android.intent.category.DEFAULT" />
<data android:mimeType="*/*">
</intent-filter>
这样就把当前程序注册为 可以打开/查看所有类型的文件. 或者要查看jpeg, mimeType要改为: image/jpeg
当在文件管理器里点击任何文件, 系统都会试图去执行你的程序.
转自 http://chaozhong84.spaces.live.com/blog/cns!FC149E9A3FC0182B!297.trak
【Android】【转】Android Log Analysis
---------------------------------------------------
本文原创,转载请注明出处,如有错误之处欢迎指出
---------------------------------------------------
Get Log from Android System
adb bugreport > bugreport.txt
copy bugreport to the current directory.
bugreport里面包含了各种log信息,大部分log也可以通过直接运行相关的程序来直接获得.
步骤如下:
1.adb shell 2.进入相关工具程式的目录 3.执行相关程式 4.得到相关信息
下面以输出进程信息为例 1.adb shell 2.输入ps -P 3.可以看到相关进程信息
Log Archive Analysis
1.bugreport
bugreport记录android启动过程的log,以及启动后的系统状态,包括进程列表,内存信息,VM信息等等到.
2.bugreport结构分析
(1)dumpstate
MEMORY INFO
获取该log:读取文件/proc/meminfo
系统内存使用状态
CPU INFO
获取该log:执行/system/bin/top -n 1 -d 1 -m 30 -t
系统CPU使用状态
PROCRANK
获取该log:执行/system/bin/procrank
执行/system/xbin/procrank后输出的结果,查看一些内存使用状态
VIRTUAL MEMORY STATS
获取该log:读取文件/proc/vmstat
虚拟内存分配情况
vmalloc申请的内存则位于vmalloc_start~vmalloc_end之间,与物理地址没有简单的转换关系,虽然在逻辑上它们也是连续的,但是在物理上它们不要求连续。
VMALLOC INFO
获取该log:读取文件/proc/vmallocinfo
虚拟内存分配情况
SLAB INFO
获取该log:读取文件/proc/slabinfo
SLAB是一种内存分配器.这里输出该分配器的一些信息
ZONEINFO
获取该log:读取文件/proc/zoneinfo
zone info
SYSTEM LOG(需要着重分析)
获取该log:执行/system/bin/logcat -v time -d *:v
会输出在程序中输出的Log,用于分析系统的当前状态
VM TRACES
获取该log:读取文件/data/anr/traces.txt
因为每个程序都是在各自的VM中运行的,这个Log是现实各自VM的一些traces
EVENT LOG TAGS
获取该log:读取文件/etc/event-log-tags
EVENT LOG
获取该log:执行/system/bin/logcat -b events -v time -d *:v
输出一些Event的log
RADIO LOG
获取该log:执行/system/bin/logcat -b radio -v time -d *:v
显示一些无线设备的链接状态,如GSM,PHONE,STK(Satellite Tool Kit)...
NETWORK STATE
获取该log:执行/system/bin/netcfg (得到网络链接状态)
获取该log:读取文件/proc/net/route (得到路由状态)
显示网络链接和路由
SYSTEM PROPERTIES
获取该log:参考代码实现
显示一些系统属性,如Version,Services,network...
KERNEL LOG
获取该log:执行/system/bin/dmesg
显示Android内核输出的Log
KERNEL WAKELOCKS
获取该log:读取文件/proc/wakelocks
内核对一些程式和服务唤醒和休眠的一些记录
KERNEL CPUFREQ
(Linux kernel CPUfreq subsystem) Clock scaling allows you to change the clock speed of the CPUs on the fly.
This is a nice method to save battery power, because the lower the clock speed is, the less power the CPU consumes.
PROCESSES
获取该log:执行ps -P
显示当前进程
PROCESSES AND THREADS
获取该log:执行ps -t -p -P
显示当前进程和线程
LIBRANK
获取该log:执行/system/xbin/librank
剔除不必要的library
BINDER FAILED TRANSACTION LOG
获取该log:读取文件/proc/binder/failed_transaction_log
BINDER TRANSACTION LOG
获取该log:读取文件/proc/binder/transaction_log
BINDER TRANSACTIONS
获取该log:读取文件/proc/binder/transactions
BINDER STATS
获取该log:读取文件/proc/binder/stats
BINDER PROCESS STATE
获取该log:读取文件/proc/binder/proc/*
bind相关的一些状态
FILESYSTEMS
获取该log:执行/system/bin/df
主要文件的一些容量使用状态(cache,sqlite,dev...)
PACKAGE SETTINGS
获取该log:读取文件/data/system/packages.xml
系统中package的一些状态(访问权限,路径...),类似Windows里面的一些lnk文件吧.
PACKAGE UID ERRORS
获取该log:读取文件/data/system/uiderrors.txt
错误信息
KERNEL LAST KMSG LOG
最新kernel message log
LAST RADIO LOG
最新radio log
KERNEL PANIC CONSOLE LOG
KERNEL PANIC THREADS LOG
控制台/线程的一些错误信息log
BACKLIGHTS
获取该log:获取LCD brightness读/sys/class/leds/lcd-backlight/brightness
获取该log:获取Button brightness读/sys/class/leds/button-backlight/brightness
获取该log:获取Keyboard brightness读/sys/class/leds/keyboard-backlight/brightness
获取该log:获取ALS mode读/sys/class/leds/lcd-backlight/als
获取该log:获取LCD driver registers读/sys/class/leds/lcd-backlight/registers
获取相关亮度的一些信息
(2)build.prop
VERSION INFO输出下列信息
当前时间
当前内核版本:可以读取文件(/proc/version)获得
显示当前命令:可以读取文件夹(/proc/cmdline)获得
显示系统build的一些属性:可以读取文件(/system/build.prop)获得
输出系统一些属性
gsm.version.ril-impl
gsm.version.baseband
gsm.imei
gsm.sim.operator.numeric
gsm.operator.alpha
(3)dumpsys
执行/system/bin/dumpsys后可以获得这个log.
经常会发现该log输出不完整,因为代码里面要求该工具最多只执行60ms,可能会导致log无法完全输出来.
可以通过修改时间参数来保证log完全输出.
信息:
Currently running services
DUMP OF SERVICE services-name(running)
Log Code Analysis
Site: ."frameworks"base"cmds"dumpstate"
相关Log程序的代码可以从上面目录获取
Log Analysis Experience
分析步骤
1.查看一些版本信息
确认问题的系统环境
2.查看CPU/MEMORY的使用状况
看是否有内存耗尽,CPU繁忙这样的背景情况出现.
3.分析traces
因为traces是系统出错以后输出的一些线程堆栈信息,可以很快定位到问题出在哪里.
4.分析SYSTEM LOG
系统Log详细输出各种log,可以找出相关log进行逐一分析
实例分析
下面分析我写的一个测试例子,在OnCreate做一个死循环,这样主线程会被锁住,在按下硬件的Back之后会出现ANR的错误.
在traces中发现该程序的堆栈信息如下:
----- pid 20597 at 2010-03-15 01:29:53 -----
Cmd line: com.android.test
DALVIK THREADS:
"main" prio=5 tid=3 TIMED_WAIT
| group="main" sCount=1 dsCount=0 s=N obj=0x2aac6240 self=0xbda8
| sysTid=20597 nice=0 sched=0/0 cgrp=default handle=1877232296
at java.lang.VMThread.sleep(Native Method)
at java.lang.Thread.sleep(Thread.java:1306)
at java.lang.Thread.sleep(Thread.java:1286)
at android.os.SystemClock.sleep(SystemClock.java:114)
at com.android.test.main.onCreate(main.java:20)
at android.app.Instrumentation.callActivityOnCreate(Instrumentation.java:1047)
at android.app.ActivityThread.performLaunchActivity(ActivityThread.java:2459)
at android.app.ActivityThread.handleLaunchActivity(ActivityThread.java:2512)
at android.app.ActivityThread.access$2200(ActivityThread.java:119)
at android.app.ActivityThread$H.handleMessage(ActivityThread.java:1863)
at android.os.Handler.dispatchMessage(Handler.java:99)
at android.os.Looper.loop(Looper.java:123)
at android.app.ActivityThread.main(ActivityThread.java:4363)
at java.lang.reflect.Method.invokeNative(Native Method)
at java.lang.reflect.Method.invoke(Method.java:521)
at com.android.internal.os.ZygoteInit$MethodAndArgsCaller.run(ZygoteInit.java:868)
at com.android.internal.os.ZygoteInit.main(ZygoteInit.java:626)
at dalvik.system.NativeStart.main(Native Method)
"Binder Thread #2" prio=5 tid=11 NATIVE
| group="main" sCount=1 dsCount=0 s=N obj=0x2fb7c260 self=0x143860
| sysTid=20601 nice=0 sched=0/0 cgrp=default handle=1211376
at dalvik.system.NativeStart.run(Native Method)
"Binder Thread #1" prio=5 tid=9 NATIVE
| group="main" sCount=1 dsCount=0 s=N obj=0x2fb7c1a0 self=0x14c980
| sysTid=20600 nice=0 sched=0/0 cgrp=default handle=1207920
at dalvik.system.NativeStart.run(Native Method)
"Signal Catcher" daemon prio=5 tid=7 RUNNABLE
| group="system" sCount=0 dsCount=0 s=N obj=0x2fb7a1e8 self=0x126cc0
| sysTid=20599 nice=0 sched=0/0 cgrp=default handle=1269048
at dalvik.system.NativeStart.run(Native Method)
"HeapWorker" daemon prio=5 tid=5 VMWAIT
| group="system" sCount=1 dsCount=0 s=N obj=0x2e31daf0 self=0x135c08
| sysTid=20598 nice=0 sched=0/0 cgrp=default handle=1268528
at dalvik.system.NativeStart.run(Native Method)
----- end 20597 -----
该文件的堆栈结构从下往上进行分析
(1)栈底at dalvik.system.NativeStart.run(Native Method)
系统为当前的task(应用程式)启动一个专用的虚拟机
(2) at android.app.ActivityThread.performLaunchActivity(ActivityThread.java:2459)
Activity Services是在后台负责管理Activity,它此时将测试例子的Activity启动起来了
(3)at com.android.test.main.onCreate(main.java:20)
启动测试程序
(4)栈顶at java.lang.VMThread.sleep(Native Method)
线程被sleep掉了,所以无法响应用户,出现ANR错误.
上面是对一个非常简单的问题的分析.
如果遇到比较复杂的问题还需要详细分析SYSTEM LOG.
1.比如网络异常,要通过SYSTEM LOG里面输出的网络链接信息来判断网络状态
2.数据传输,网络链接等耗时的操作需要分析SYSTEM LOG里面ActivityManager的响应时间
转自:http://blog.csdn.net/liujian885/archive/2010/03/22/5404834.aspx
http://hi.baidu.com/donghaozheng/blog/item/30a00d4f9fca873baec3ab69.html
在 android 的API中有提供 SystemClock.setCurrentTimeMillis()函数来修改系统时间,可惜无论你怎么调用这个函数都是没用的,无论模拟器还是真机,在logcat中总会得到"Unable to open alarm driver: Permission denied ".这个函数需要root权限或者运行与系统进程中才可以用。
本来以为就没有办法在应用程序这一层改系统时间了,后来在网上搜了好久,知道这个目的还是可以达到的。
第一个方法简单点,不过需要在Android系统源码的环境下用make来编译:
1. 在应用程序的AndroidManifest.xml中的manifest节点中加入android:sharedUserId="android.uid.system"这个属性。
2. 修改Android.mk文件,加入LOCAL_CERTIFICATE := platform这一行
3. 使用mm命令来编译,生成的apk就有修改系统时间的权限了。
第二个方法麻烦点,不过不用开虚拟机跑到源码环境下用make来编译:
1. 同上,加入android:sharedUserId="android.uid.system"这个属性。
2. 使用eclipse编译出apk文件,但是这个apk文件是不能用的。
3. 用压缩软件打开apk文件,删掉META-INF目录下的CERT.SF和CERT.RSA两个文件。
4. 使用目标系统的platform密钥来重新给apk文件签名。这步比较麻烦,首先找到密钥文件,在我的Android源码目录中的位置是"build\target\product\security",下面的platform.pk8和platform.x509.pem两个文件。然后用Android提供的Signapk工具来签名,signapk的源代码是在"build\tools\signapk"下,用法为"signapk platform.x509.pem platform.pk8 input.apk output.apk",文件名最好使用绝对路径防止找不到,也可以修改源代码直接使用。
这样最后得到的apk和第一个方法是一样的。
最后解释一下原理,首先加入android:sharedUserId="android.uid.system"这个属性。通过Shared User id,拥有同一个User id的多个APK可以配置成运行在同一个进程中。那么把程序的UID配成android.uid.system,也就是要让程序运行在系统进程中,这样就有权限来修改系统时间了。
只是加入UID还不够,如果这时候安装APK的话发现无法安装,提示签名不符,原因是程序想要运行在系统进程中还要有目标系统的platform key,就是上面第二个方法提到的platform.pk8和platform.x509.pem两个文件。用这两个key签名后apk才真正可以放入系统进程中。第一个方法中加入LOCAL_CERTIFICATE := platform其实就是用这两个key来签名。
这也有一个问题,就是这样生成的程序只有在原始的Android系统或者是自己编译的系统中才可以用,因为这样的系统才可以拿到platform.pk8和platform.x509.pem两个文件。要是别家公司做的Android上连安装都安装不了。试试原始的Android中的key来签名,程序在模拟器上运行OK,不过放到G3上安装直接提示"Package ... has no signatures that match those in shared user android.uid.system",这样也是保护了系统的安全。
最最后还说下,这个android:sharedUserId属性不只可以把apk放到系统进程中,也可以配置多个APK运行在一个进程中,这样可以共享数据,应该会很有用的。
博主补充:
signapk编译结束后在 android目录下/out/host/linux-x86/framework/signapk.jar
使用方法:java -jar signapk.jar platform.x509.pem platform.pk8 test.apk test_signed.apk
实践证明,第二种方法不需要删掉META-INF目录下的CERT.SF和CERT.RSA两个文件,直接signapk就可以。
|
(1) Looper类别用来为一个线程开启一个消息循环。默认情况下Android中新诞生的线程是没有开启消息循环的。(主线程除外,主线程系统会自动为其创建Looper对象,开启消息循环)
Looper对象通过MessageQueue来存放消息和事件。一个线程只能有一个Looper,对应一个MessageQueue。
(2) 通常是通过Handler对象来与Looper交互的。Handler可看做是Looper的一个接口,用来向指定的Looper发送消息及定义处理方法。
默认情况下Handler会与其被定义时所在线程的Looper绑定,比如,在主线程中定义,其是与主线程的Looper绑定。
mainHandler = new Handler() 等价于new Handler(Looper.myLooper()).
Looper.myLooper():Return the Looper object associated with the current thread 获取当前进程的looper对象。
还有一个类似的 Looper.getMainLooper() 用于获取主线程的Looper对象。
(3) 在非主线程中直接new Handler() 会报如下的错误:
E/AndroidRuntime( 6173): Uncaught handler: thread Thread-8 exiting due to uncaught exception
E/AndroidRuntime( 6173): java.lang.RuntimeException: Can't create handler inside thread that has not called Looper.prepare()
原因是非主线程中默认没有创建Looper对象,需要先调用Looper.prepare()启用Looper。
(4) Looper.loop(); 让Looper开始工作,从消息队列里取消息,处理消息。
注意:写在Looper.loop()之后的代码不会被执行,这个函数内部应该是一个循环,当调用mHandler.getLooper().quit()后,loop才会中止,其后的代码才能得以运行。
(5) 基于以上知识,可实现主线程给子线程(非主线程)发送消息。
把下面例子中的mHandler声明成类成员,在主线程通过mHandler发送消息即可。
(6) Android官方文档中Looper的介绍:
Class used to run a message loop for a thread. Threads by default do not have a message loop associated with them; to create one, call prepare() in the thread that is to run the loop, and then loop() to have it process messages until the loop is stopped.
Most interaction with a message loop is through the Handler class.
This is a typical example of the implementation of a Looper thread, using the separation ofprepare() and loop() to create an initial Handler to communicate with the Looper.
class LooperThread extends Thread {
public Handler mHandler;
public void run() {
Looper.prepare();
mHandler = new Handler() {
public void handleMessage(Message msg) {
// process incoming messages here
}
};
Looper.loop();
}
}
px (pixels) 像素
dip (device independent pixels) 设备独立像素
sp (scaled pixels - best for text size ) 放大像素,对文本大小最好
pt (points) 点
in (inches) 英寸
mm (millimeters) 毫米
很多网友可能发现在Android的layout文件中layout_width或layout_height有时候可能会指定具体的单位,比如有时候为px、dip或者sp等等。下面android123把常见的单位做下简单的介绍,比如说
px (pixels)像素 -- 一般我们HVGA代表320x480像素,这个用的比较多。
dip或dp (device independent pixels)设备独立像素 -- 这个和设备硬件有关,一般我们为了支持WVGA、HVGA和QVGA cwj推荐使用这个,不依赖像素。
sp (scaled pixels — best for text size)放大像素-- 主要处理字体的大小。
下面的几个是不常用的,大家也知道这里android123就不再过多的赘述。
in (inches)英寸
mm (millimeters)毫米
pt (points)点
px像素如何转为dip设备独立像素
最近有网友问如何将px像素转为dip独立设备像素,由于Android的设备分辨率众多,目前主流的为wvga,而很多老的设备为hvga甚至低 端的qvga,对于兼容性来说使用dip无非是比较方便的,由于他和分辨率无关和屏幕的密度大小有关,所以推荐使用,不过这里android123提示大 家,ophone os的手机对于dip的支持糟糕透了,显示的结果会放大很多,同时黑色的主题会导致常规的黑色文字让用户无法分辨。
px= (int) (dip*density+0.5f) //这里android开发网提示大家很多网友获取density的方法存在问题,从资源中获取的是静态定义的,一般为1.0对于HVGA是正好的,而对于wvga这样的应该从WindowsManager中获取,WVGA为1.5
QVGA HVGA WVGA区别
文章分类:移动开发
QVGA即"Quarter VGA"。顾名思义即VGA的四分之一尺寸,亦即在液晶屏幕(LCD)上输出的分辨率是240×320像素。QVGA支持屏幕旋转,可以开发出相应的程序,以显示旋转90°、180°、270°屏幕位置。由HandEra公司发布。多用于手持/移动设备。 需要说明的是有些媒体把QVGA屏幕当成与TFT和TFD等LCD材质相同的东西是错误的,QVGA屏幕的说法多见与日本的一些手机中,目前采用微软Pocket PC操作系统的智能手机屏幕也大多是320×240像素的QVGA屏幕。 所谓QVGA液晶技术,就是在液晶屏幕上输出的分辨率是240×320的液晶输出方式。这个分辨率其实和屏幕本身的大小并没有关系。比如说,如果2.1英寸液晶显示屏幕可以显示240×320分辨率的图像,就叫做“QVGA 2.1英寸液晶显示屏”;如果3.8英寸液晶显示屏幕可以显示240×320的图像,就叫做“QVGA 3.8英寸液晶显示屏”,以上两种情况虽然具有相同的分辨率,但是由于尺寸的不同实际的视觉效果也不同,一般 HVGA 即VGA(640*480)的一半,分辨率为(480*320),(3:2宽高比) 它是用于各种各样的PDA设备,首先是2002年的索尼Clie PEG - NR70, 来说屏幕小的一个画面自然也会细腻一些。 WVGA 数码产品屏幕材质的一种,VGA的另一种形式,比VGA分辨率高,别名 : Wide VGA, ,其分辩率为800×480象素。是扩大了VGA(640×480)的分辨率。应用于PDA和手机等,因为很多网页的宽度都是800,所以WVGA的屏幕会更加适和于浏览网页,可以说是未来手持设备的分辨率的大趋势
drawable-hdpi(高分辨率)目录下
这个主要是为了支持多分辨率的.
hdpi里面主要放高分辨率的图片,如WVGA (480x800),FWVGA (480x854)
mdpi里面主要放中等分辨率的图片,如HVGA (320x480)
ldpi里面主要放低分辨率的图片,如QVGA (240x320)
系统会根据机器的分辨率来分别到这几个文件夹里面去找对应的图片
android:padding 属性允许你设置相同的4个方向的间距值,组件的内容在间距内的中间。如果你要四个不同数值的间距值,,可以分别使用 android:paddingLeft,android:paddingRight,android:paddingTop和 android:paddingBottom。间距值是一个具体的数值,如果要5像素,则可以对应填写”5px”.
如 果你应用组件的默认背景(例如,通过android:backgound属性),背景将会同时显示在间距和组件上。为了避免这种情况,用 padding,还不如用margin,这可以只增加空白的空间,并不会撑大组件。你可以通过android:layoout_margin属性来实现。
例如:<com.android.motoswitch.HandleView
style="@style/HotseatButton"
android:id="@+id/all_apps_button"
android:layout_centerHorizontal="true"
android:layout_alignParentBottom="true"
android:src="@drawable/all_apps_button"
switcher:direction="horizontal"
/>
Android核心分析(22)-----Android应用框架之Activity 收藏
3 Activity设计框架
3.1 外特性空间的Activity
我们先来看看,Android应用开发人员接触的外特性空间中的Activity,对于AMS来讲,这个Activity就是客服端的Activity。应用程序员在建立Android应用时,构建Activity的子类就是Andoid外特性空间展现的接口。我们可以从下面的简单的例子描述看看Activity,到底如何建立的。
DemoActivity extend Activity
{
onCreate
onResume
onPause
onStop
}
在Android的外特性空间(SDK)中,Android应用程序员根本不知道进程是什么时候起来的,系统消息是如何传递过来的。这个DemoActivity是如何实例化的呢?并且该Activity是托管在哪个进程的呢?本节的分析将给出答案。
我们从ActivityThread中可以看到在应用进程中的Activity都被放置在mActivities中。
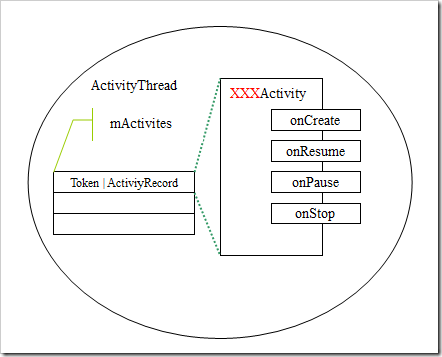
这些ActivityRecord记录了应用进程中,程序员建立的Activity子类的实例,我们称之为外特性空间的Activity。这些Activity类实例是放在应用程序端进行实际交互的Activity,而为了管理这些Activity,AMS内核中还有一个影子Activity,被称为HistoryRecord。
3.2 Activity与HistoryRecord的关系
在整个系统中,Activity实际上有两个实体。一个在应用进程中跟应用程序员打交道的Activity,一个是在AMS的中具有管理功能的History Record。应用进程中的Activity都登记ActivityThread实例中的mActivity数组中,而在AM端,HistroytRecord实例放置在mHistroy栈中。mHistory栈是Android管理Activity的场所,放置在栈顶的就是User看到的处于活动状态的Activity。
Activity与HistrotyRecord的关系图可以表示如下:
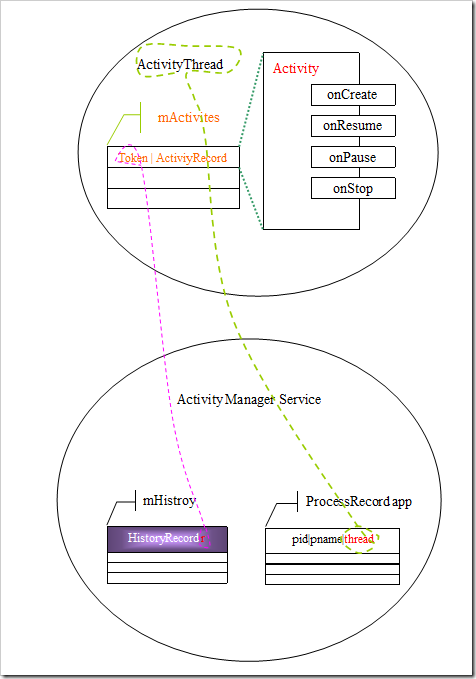
Activity的内核实体是依靠在ProcessRecord的成员变量中,通过ProcessRecord我们可以访问到所有的属于该Process的Activity。而在ProcessRecord记录了与应用进程之间的联系:IActivtityThread接口。通过该接口,可以访问到所对应的Activity的方法。在Launch Activity时,AMS将对应的HistoryRecord作为token传递到客服端和客服端的Activity建立联系。在AMS中Activity状态变化时,将通过该联系找到客服端的Activity,从而将消息或者动作传递应用程序面对的接口:xxxActivity。
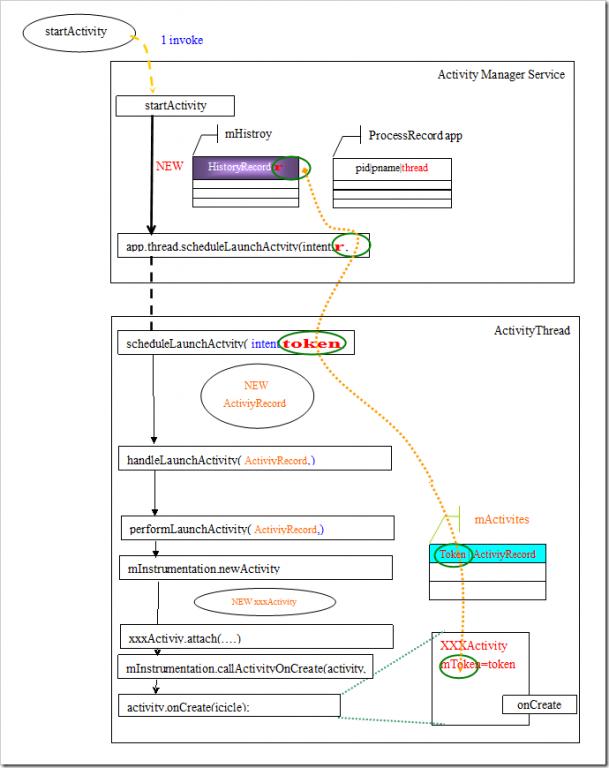
3.3 Actvity的Launch过程
1)发起请求startActivity(intent)
2)Activity Service Manager接收到请求执行StartActivity函数。
建立:HistoryRecord实例r.
将r 加入到mHistory顶。
(3)通过app.thread.scheduleLaunchActvity( app,r)@ActivityThread.java
(4)在App应用中建立新的ActivityRecord。
(5)建立新的Activity对象并放入到ActivityRecord中。
(6)将ActivityRecord加入到mActivites@ActivityThread
(7)发起Activity.onCreate(..),,该onCreate就是在你的应用程序XXXActivity中的onCreate。
3.4 Activity的Resume
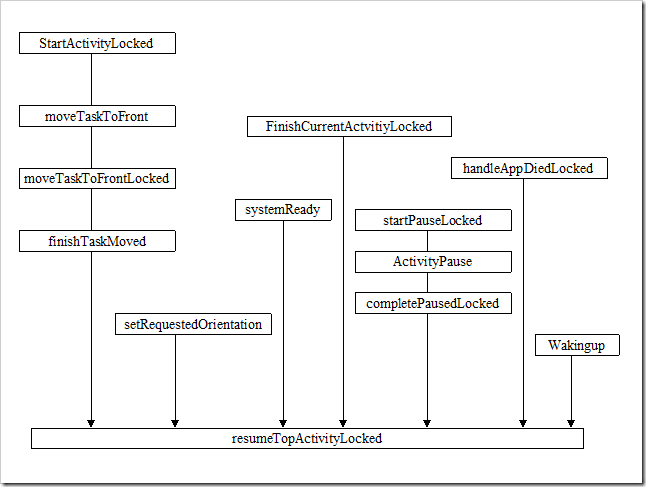
(1)Activity什么时候被Resume
(2)Rusume的过程
通过该过程的研究我们会进一步的了解到AMS与应用进程的交互过程。
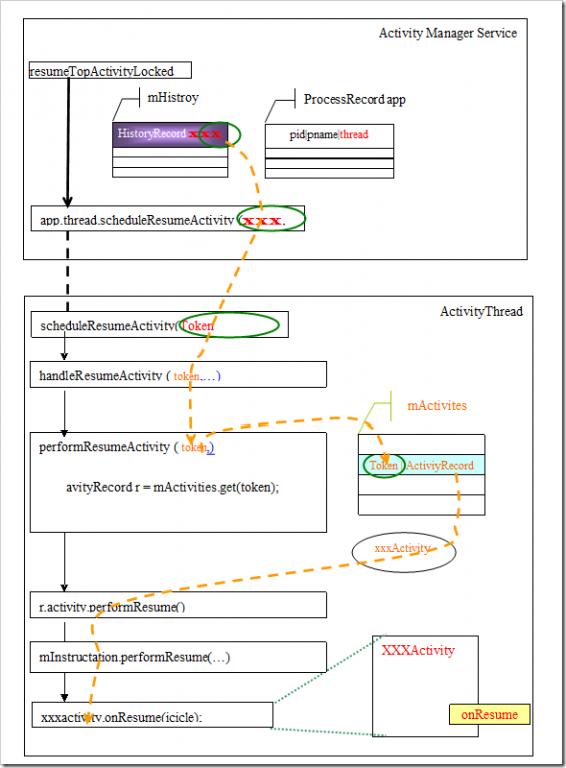
在AMS端,满足resume条件都会调用:Resume的核心函数:resumeTopActivityLocked@ActivityManagerService
XXX当前栈顶的HistroyRecord
1)窗口切换:隐藏前一个Activity的窗口,
2)更新LRUList,(LRUList是淘汰应用程序的依据之一)
3) XXX.app.thread.scheduleResumeActivity(XXX,
isNextTransitionForward());
4)completeResumeLocked
setFocusedActivityLocked
mFocusActivity=xxx //此时焦点Actvitiy切换了。
WM.setFocusedApp(xxx,
mWindowManager.executeAppTransition();
mNoAnimActivities.clear();
在应用程序端:
(5)scheduleResumeActivity
handleResumeActivity(IBinder token, boolean clearHide, boolean isForward) {
ActivityRecord r = performResumeActivity(token, clearHide);
ActivityRecord r = mActivities.get(token);
r.activity.performResume()
performResume
整个Resume的过程如下:
Android Application
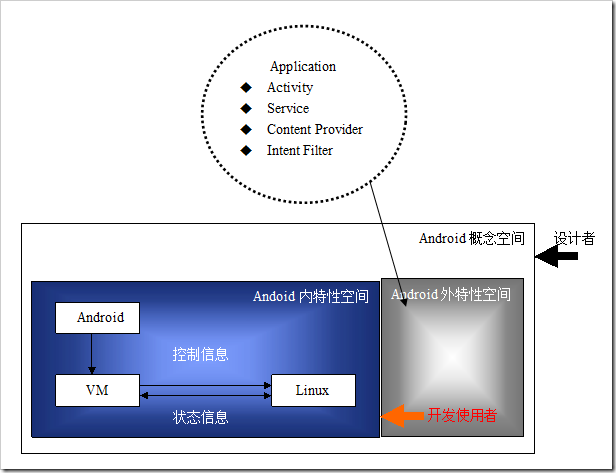
Android提供给开发程序员的概念空间中Application只是一个松散的表征概念,没有多少实质上的表征。在Android实际空间中看不到实际意义上的应用程序的概念,即使有一个叫Application的类,这个也就是个应用程序上下文状态,是一个极度弱化的概念。Application只是一个空间范畴的概念,Application就是Activity,Service之类的组件上下文描述。Application并不是Android的核心概念,而Activity才是Android的核心概念。
从Android的SDK文档中,我们知道一般情况Android应用程序是由以下四种组件构造而成的:Activity,Broadcast Intent Receiver,服务(Service),内容提供器(Content Provider)。我们可以使用下面的图来表示一下Android的概念空间。这些组件依附于应用程序中,应用程序并不会一开始就建立起来,而是在这些组件建立起来后,需要运行时,才开始建立应用程序对象。
2.1应用进程名称
为什么要从应用进程名称开始?作为内核研究,我们还是回到问题的最本质处:不管Activity,Service等组件如何设计和运行,它要提供服务,就必须要依附在Linux的进程上,建立消息循环,组件才能够真正的运作。Activity实例是如何Hosting在Linux进程上的?这个是我们首先想要弄明白的。
我们在的项目中看到android:process="string"这个定义。
allowClearUserData=["true" | "false"]
android:allowTaskReparenting=["true" | "false"]
android:backupAgent="string"
…
android:label="string resource"
android:manageSpaceActivity="string"
android:name="string"
android:permission="string"
android:persistent=["true" | "false"]
android:process="string"
android:restoreAnyVersion=["true" | "false"]
android:taskAffinity="string"
android:theme="resource or theme" >
. . .
在SDK用已经描述的很清楚到了。
android:process
The name of a process where all components of the application should run. Each component can override this default by setting its own process attribute.
By default, Android creates a process for an application when the first of its components needs to run. All components then run in that process. The name of the default process matches the package name set by the element.
By setting this attribute to a process name that's shared with another application, you can arrange for components of both applications to run in the same process — but only if the two applications also share a user ID and be signed with the same certificate.
为什么要提出这么一个定义?android:process名称。
默认状态下,Activity Manager Service在应用程序的第一个组件需要运行时将会为应用程序建立一个进程,而这个进程的名字就是android:process=”string”所指定,缺省的是应用程序包的名字。该进程一旦建立,后面的该应用的组件都将运行在该进程中,他们绑定的根据就是这个Android:Process指定的名称,因为在他们都在同一个应用程序包里,也就具有了同样的进程名字,于是他们都托管在了同一进程中。组件将通过ClassLoader从Package中获取到应用程序的信息。
在建立Actvitiy时,如果在应用进程端没有应用对象,系统在该过程中利用makeApplication建立一个Application对象,实例化"android.app.Application",建立一个应用程序上下文完成例如资源,package等信息管理。
2.2 ActivityThread运行框架
在分析中,我们可以看到真正对应应用进程的不是Application而是ActivityThread。我们从实际的应用堆栈可以看到:
NaiveStart.main()
ZygoteInit.main
ZygoteInit$MethodAndArgsCall.run
Method.Invoke
method.invokeNative
ActivityThread.main()
Looper.loop()
....
每个应用程序都以ActivityThread.main()为入口进入到消息循环处理。对于一个进程来讲,我们需要这个闭合的处理框架。
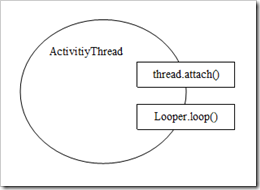
ActivitiyThread是应用程序概念空间的重要概念,他建立了应用进程运行的框架,并提供了一个IActivityThread接口作为与Activity Manager Service的通讯接口.通过该接口AMS可以将Activity的状态变化传递到客户端的Activity对象。
2.3 ActivitiyThread的建立
为了叙述的方便我将Actvitiy Manager Service简写成AMS。
在AMS中关于应用程序的概念是ProcessRecord,请求都是从Activity,Service…等开始的,在Activity需要Resume时,此时如果与Activity相关的应用进程没有起来,AM则启动应用进程。
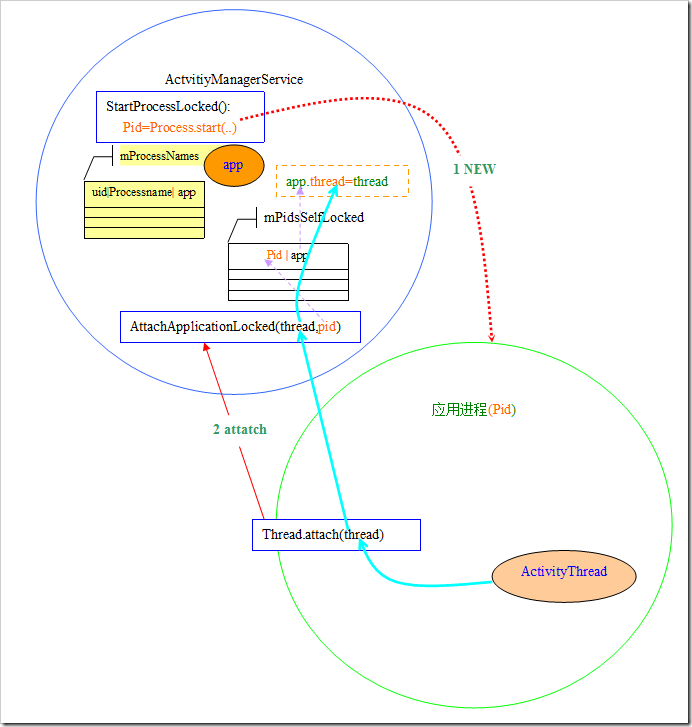
AMS与应用进程的绑定分为两个部分,第一部分就是AM建立应用进程,第二部分就是应用进程Attach到AM,与AM建立通讯通道。
1)创建建立进程:startProcessLocked(processName,Appinfo.uid)。该函数在StartSecificActivityLocked等调用。
(1)建立ProcessRecord对象app,并将该对象添加到mProcessNames中。应用对象在mProcessNames中使用应用名字和uid来标识自己。如果在同一个Package中的Activity,如果都使用默认设置,那么这些Activity都会托管在同一个进程中,这是因为他们在带的ApplicationInfo中的ProcessName都是一样的。
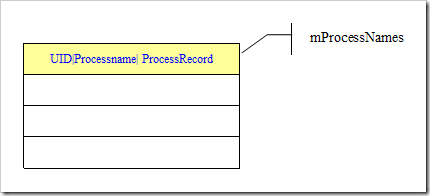
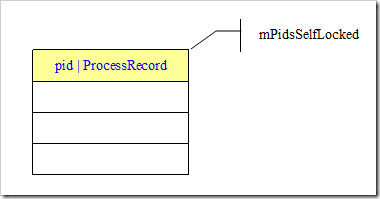
mPidsSelfLocked数组记录了PID,这个将会在应用进程跑起来后,将自己Attach到AM时,根据pid找到自己的前世:ProcessRecord.
2)android.app.ActivityThread进程启动
Android.app.ActivityThread进程建立后,将跳入到ActivityThread的main函数开始运行,进入消息循环。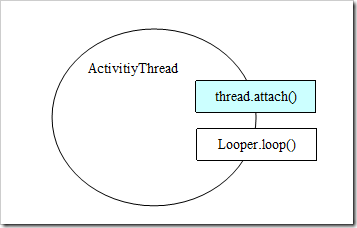
应用进程使用thread.attach()发起AMS的AttachApplicationLocked调用,并传递 ActvitiyThread对象和CallingPid。AttachApplicationLocked将根据CallingPid在mPidsSelfLocked找到对应的ProcessRecord实例app,将ActvitiyThread放置app.thread中。这样应用进程和AMS建立起来双向连接。AM可以使用AIDL接口,通过app.thread可以访问应用进程的对象。
应用程序通过ActivityThread提供的框架,建立消息循环Looper和Handler。从前面的相关章节我们知道有Looper和Handler,整个系统就可以运作了。
为了更为系统的了解应用程序的建立时序及其涉及到数据操作,我给出了应用进程的建立过程示意图:
摘要: 对象必须实现Serializable,对象代码如下:
Java代码
import java.io.Serializable;
import android.graphics.drawable.Drawable;
...
阅读全文
这个文档能给你一个满意的答复:)
Document Id: 26928Synopsis: du and df Differences (originally published 8/91)
Update date: 2001-05-13Description: du and df Differences
-- --- -- -----------
This article explains how reporting disk usage du and reporting free disk space
on file systems df may show different numbers.
du
--
The du user command gives the number of kilobytes contained in all files and,
recursively, directories within each specified directory or file (filename).
If filename is missing, `.' (the current directory) is used. A file which
has multiple links to it is only counted once.
EXAMPLE:
system % du
5 ./jokes
33 ./squash
44 ./tech.papers/lpr.document
217 ./tech.papers/new.manager
401 ./tech.papers
144 ./memos
80 ./letters
388 ./window
93 ./messages
15 ./useful.news
1211 .
Note that the last number, 1211 is the grand total (in kilobytes) for the
directory.
df
--
The df user command displays the following information:
amount of disk space occupied by currently mounted file systems
the amount of used and available space
how much of the file system's total capacity has been used
Used without arguments, df reports on all mounted file systems.
EXAMPLE:
system % df
Filesystem kbytes used avail capacity Mounted on
/dev/ip0a 7445 4714 1986 70% /
/dev/ip0g 42277 35291 2758 93% /usr
Note: used plus avail is less than the amount of space in the file system
(kilobytes) because the system reserves a fraction of the space in the file
system to allow its allocation routines to work well. The amount reserved is
typically about 10%. (This may be adjusted using the tunefs command. Refer to
the man pages on tunefs(8) for more information.) When all the space on a file
system, except for this reserve, is in use, only the super-user can allocate
new files and data blocks to existing files. This, however, may cause the file
system to be over allocated. When a file system is over allocated in this way,
df may report that the file system is more than 100% utilized.
If arguments to df are disk partitions (for example, /dev/ip0as or path names),
df produces a report on the file system containing the named file. Thus, df
shows the amount of space on the file system containing the current directory.
Problem Definition
------- ----------
This section gives the technical explanation of why du and df sometimes report
different totals of disk space usage.
When a program that is running in the background writes to a file while the
process is running, the file to which this process is writing is deleted.
Running df and du shows a discrepancy in the amount of disk space usage. The
df command shows a higher value.
Explanation Summary
----------- -------
When you open a file, you get a pointer. Subsequent writes to this file
references this file pointer. The write call does not check to see if the file
is there or not. It just writes to the specified number of characters starting
at a predetermined location. Regardless of whether the file exist or not, disk
blocks are used by the write operation.
The df command reports the number of disk blocks used while du goes through the
file structure and and reports the number of blocks used by each directory. As
far as du is concerned, the file used by the process does not exist, so it does
not report blocks used by this phantom file. But df keeps track of disk blocks
used, and it reports the blocks used by this phantom file.
du和df命令都被用于获得文件系统大小的信息:df用于报告文件系统的总块数及剩余块数,du -s /<filesystem>用于报告文件系统使用的块数。但是,我们可以发现从df命令算出的文件系统使用块数的值与通过du命令得出的值是不一致的。如下例:
# du -s /tmp 返回如下值:
---12920 /tmp
而 df /tmp返回如下值:
Filesystem --512-blocks-- Free --%Used --Iused-- %Iused --Mounted on
/dev/hd3 --------57344 --42208--- 26% ----391 ------4% --/tmp
从上面的值我们可以算出<total from df> - <Free from df> = <used block count>: 57344 - 42208 = 15136. 而15136大于12920。该值差异的存在是由于du与df命令实施上的不同: du -s命令通过将指定文件系统中所有的目录、符号链接和文件使用的块数累加得到该文件系统使用的总块数;而df命令通过查看文件系统磁盘块分配图得出总块数与剩余块数。
文件系统分配其中的一些磁盘块用来记录它自身的一些数据,如i节点,磁盘分布图,间接块,超级块等。这些数据对大多数用户级的程序来说是不可见的,通常称为Meta Data。
du命令是用户级的程序,它不考虑Meta Data,而df命令则查看文件系统的磁盘分配图并考虑Meta Data。df命令获得真正的文件系统数据,而du命令只查看文件系统的部分情况。例如,一个frag=4096 并且 nbpi=4096的空的大小为4MB的日志文件系统中Meta Data的分配情况如下:
1 4k block for the LVM
2 4k super blocks
2 4k blocks for disk maps
2 4k blocks for inode maps
2 4k blocks for .indirect
32 4k blocks for inodes
-------------------------
41 4k blocks for meta data on an empty 4MB file system
对于AIX 4.X版本:
执行 du /foo返回的结果如下:
----8 -------/foo/lost+found
----16 ------/foo
要使du命令输出的结果与df命令输出的结果匹配,我们必须要加上Meta Data。首先,将41个4k的块转换为以512字节为单位的值:
41 * 8 = 328
328(meta data) + 16(from du) = 344
所以有344个以512字节为单位的块分配给了这个空的文件系统。
而使用 df /foo命令我们可以得到下面的结果:
Filesystem --512-blocks --Free --%Used --Iused---%Iused --Mounted on
/dev/lv01 ------8192 -----7848 -----5% -----16 -----2% ----/foo
从中我们可以得到该文件系统使用的块数:8192(total blocks) - 7848(free blocks) = 344。该值与上面得出的值一致。
上面的换算方法对于空的文件系统很容易实现,但是对于非空的文件系统,由于Meta Data中文件间接块的大小不定,因此较难实现。所以我们不需要查看du 与 df返回的值的匹配关系,而只需要了解du -s命令返回的值反映了分配给文件及目录的磁盘块数,而df命令则反映了文件系统的实际分配情况。df命令反映的实际情况包含了用户数据(文件及目录)和Meta Data。
另一个表现出du与df命令不同之处的例子如下:
如果用户删除了一个正在运行的应用所打开的某个目录下的文件,则du命令返回的值显示出减去了该文件后的目录的大小。但df命令并不显示减去该文件后的大小。直到该运行的应用关闭了这个打开的文件,df返回的值才显示出减去了该文件后的文件系统的使用情况。
列出一个目录占用的空间
1.
du或du -s或du -k
du -S | sort -n 可以迅速发现那个目录是最大的。
2.
用df可以看到已安装的文件系统的空间大小及剩余空间大小。
3.
quota -v查看用户的磁盘空间信息,如果你用quota限制了用户空间大小的话。
The details of Python memory management depend on the implementation. The standard C implementation of Python uses reference counting to detect inaccessible objects, and another mechanism to collect reference cycles, periodically executing a cycle detection algorithm which looks for inaccessible cycles and deletes the objects involved. The gc module provides functions to perform a garbage collection, obtain debugging statistics, and tune the collector’s parameters.
Jython relies on the Java runtime so the JVM’s garbage collector is used. This difference can cause some subtle porting problems if your Python code depends on the behavior of the reference counting implementation.
Sometimes objects get stuck in tracebacks temporarily and hence are not deallocated when you might expect. Clear the tracebacks with:
import sys
sys.exc_clear()
sys.exc_traceback = sys.last_traceback = None
Tracebacks are used for reporting errors, implementing debuggers and related things. They contain a portion of the program state extracted during the handling of an exception (usually the most recent exception).
In the absence of circularities and tracebacks, Python programs need not explicitly manage memory.
Why doesn’t Python use a more traditional garbage collection scheme? For one thing, this is not a C standard feature and hence it’s not portable. (Yes, we know about the Boehm GC library. It has bits of assembler code for most common platforms, not for all of them, and although it is mostly transparent, it isn’t completely transparent; patches are required to get Python to work with it.)
Traditional GC also becomes a problem when Python is embedded into other applications. While in a standalone Python it’s fine to replace the standard malloc() and free() with versions provided by the GC library, an application embedding Python may want to have its own substitute for malloc() and free(), and may not want Python’s. Right now, Python works with anything that implements malloc() and free() properly.
In Jython, the following code (which is fine in CPython) will probably run out of file descriptors long before it runs out of memory:
for file in <very long list of files>:
f = open(file)
c = f.read(1)
Using the current reference counting and destructor scheme, each new assignment to f closes the previous file. Using GC, this is not guaranteed. If you want to write code that will work with any Python implementation, you should explicitly close the file; this will work regardless of GC:
for file in <very long list of files>:
f = open(file)
c = f.read(1)
f.close()
在 Python 中,为了解决内存泄漏问题,采用了对象引用计数,并基于引用计数实现自动垃圾回收。
因为 Python 有了自动垃圾回收功能,不少初学者就认为自己从此过上了好日子,不必再受内存泄漏的骚扰了。但如果查看一下 Python 文档对 __del__() 函数的描述,就知道好日子里也是有阴云的。下面摘抄一点文档内容:
Some common situations that may prevent the reference count of an object from going to zero include: circular references between objects (e.g., a doubly-linked list or a tree data structure with parent and child pointers); a reference to the object on the stack frame of a function that caught an exception (the traceback stored in sys.exc_traceback keeps the stack frame alive); or a reference to the object on the stack frame that raised an unhandled exception in interactive mode (the traceback stored in sys.last_traceback keeps the stack frame alive).
可见,有 __del__() 函数的对象间的循环引用是导致内存泄漏的主凶。特别说明:对没有 __del__() 函数的 Python 对象间的循环引用,是可以被自动垃圾回收掉的。
有 __del__() 函数的对象间的循环引用是导致内存泄漏的主凶。特别说明:对没有 __del__() 函数的 Python 对象间的循环引用,是可以被自动垃圾回收掉的。所以,没什么事,千万不要轻易启用__del__操作。
如何知道一个对象是否内存泄漏了呢?
方法一、当你认为一个对象应该被销毁时(即引用计数为 0),可以通过 sys.getrefcount(obj) 来获取对象的引用计数,并根据返回值是否为 0 来判断是否内存泄漏。如果返回的引用计数不为 0,说明在此刻对象 obj 是不能被垃圾回收器回收掉的。
方法二、也可以通过 Python 扩展模块 gc 来查看不能回收的对象的详细信息。
首先,来看一段正常的测试代码:
#--------------- code begin --------------
# -*- coding: utf-8 -*-
import gc
import sys
class
CGcLeak(object):
def __init__(self):
self._text = '#'*10
def __del__(self):
pass
def make_circle_ref():
_gcleak =
CGcLeak()
# _gcleak._self = _gcleak # test_code_1
print '_gcleak ref count0:%d' % sys.getrefcount(_gcleak)
del _gcleak
try:
print '_gcleak ref count1:%d' % sys.getrefcount(_gcleak)
except UnboundLocalError:
print '_gcleak is invalid!'
def test_gcleak():
# Enable automatic garbage collection.
gc.enable()
# Set the garbage collection debugging flags.
gc.set_debug(gc.DEBUG_COLLECTABLE | gc.DEBUG_UNCOLLECTABLE | \
gc.DEBUG_INSTANCES | gc.DEBUG_OBJECTS)
print 'begin leak test...'
make_circle_ref()
print 'begin collect...'
_unreachable = gc.collect()
print 'unreachable object num:%d' % _unreachable
print 'garbage object num:%d' % len(gc.garbage)
if __name__ == '__main__':
test_gcleak()
#--------------- code end ----------------
在 test_gcleak() 中,设置垃圾回收器调试标志后,再用 collect() 进行垃圾回收,最后打印出该次垃圾回收发现的不可达的垃圾对象数和整个解释器中的垃圾对象数。
gc.garbage 是一个 list 对象,列表项是垃圾收集器发现的不可达(即是垃圾对象)、但又不能释放(即不能回收)的对象。文档描述为:A list of objects which the collector found to be unreachable but could not be freed (uncollectable objects).
通常,gc.garbage 中的对象是引用环中的对象。因为 Python 不知道按照什么样的安全次序来调用环中对象的 __del__() 函数,导致对象始终存活在 gc.garbage 中,造成内存泄漏。如果知道一个安全的次序,那么就打破引用环,再执行 del gc.garbage[:] ,以清空垃圾对象列表。
上段代码输出为(#后字符串为笔者所加注释):
#-----------------------------------------
begin leak test...
# 变量 _gcleak 的引用计数为 2.
_gcleak ref count0:2
# _gcleak 变为不可达(unreachable)的非法变量.
_gcleak is invalid!
# 开始垃圾回收
begin collect...
# 本次垃圾回收发现的不可达的垃圾对象数为 0.
unreachable object num:0
# 整个解释器中的垃圾对象数为 0.
garbage object num:0
#-----------------------------------------
可见 _gcleak 对象的引用计数是正确的,也没有任何对象发生内存泄漏。
如果不注释掉 make_circle_ref() 中的 test_code_1 语句:
_gcleak._self = _gcleak
也就是让 _gcleak 形成一个自己对自己的循环引用。再运行上述代码,输出结果就变成:
#-----------------------------------------
begin leak test...
_gcleak ref count0:3
_gcleak is invalid!
begin collect...
# 发现可以回收的垃圾对象: 地址为 012AA090,类型为
CGcLeak.
gc: uncollectable <
CGcLeak 012AA090>
gc: uncollectable <dict 012AC1E0>
unreachable object num:2
#!! 不能回收的垃圾对象数为 1,导致内存泄漏!
garbage object num:1
#-----------------------------------------
可见 <
CGcLeak 012AA090> 对象发生了内存泄漏!!而多出的 dict 垃圾就是泄漏的 _gcleak 对象的字典,打印出字典信息为:
{'_self': <__main__.
CGcLeak object at 0x012AA090>, '_text': '##########'}
除了对自己的循环引用,多个对象间的循环引用也会导致内存泄漏。简单举例如下:
#--------------- code begin --------------
class CGcLeakA(object):
def __init__(self):
self._text = '#'*10
def __del__(self):
pass
class CGcLeakB(object):
def __init__(self):
self._text = '*'*10
def __del__(self):
pass
def make_circle_ref():
_a = CGcLeakA()
_b = CGcLeakB()
_a._b = _b # test_code_2
_b._a = _a # test_code_3
print 'ref count0:a=%d b=%d' % \
(sys.getrefcount(_a), sys.getrefcount(_b))
# _b._a = None # test_code_4
del _a
del _b
try:
print 'ref count1:a=%d' % sys.getrefcount(_a)
except UnboundLocalError:
print '_a is invalid!'
try:
print 'ref count2:b=%d' % sys.getrefcount(_b)
except UnboundLocalError:
print '_b is invalid!'
#--------------- code end ----------------
这次测试后输出结果为:
#-----------------------------------------
begin leak test...
ref count0:a=3 b=3
_a is invalid!
_b is invalid!
begin collect...
gc: uncollectable <CGcLeakA 012AA110>
gc: uncollectable <CGcLeakB 012AA0B0>
gc: uncollectable <dict 012AC1E0>
gc: uncollectable <dict 012AC0C0>
unreachable object num:4
garbage object num:2
#-----------------------------------------
可见 _a,_b 对象都发生了内存泄漏。因为二者是循环引用,垃圾回收器不知道该如何回收,也就是不知道该首先调用那个对象的 __del__() 函数。
采用以下任一方法,打破环状引用,就可以避免内存泄漏:
[1] 注释掉 make_circle_ref() 中的 test_code_2 语句;
[2] 注释掉 make_circle_ref() 中的 test_code_3 语句;
[3] 取消对 make_circle_ref() 中的 test_code_4 语句的注释。
相应输出结果变为:
#-----------------------------------------
begin leak test...
ref count0:a=2 b=3 # 注:此处输出结果视情况变化.
_a is invalid!
_b is invalid!
begin collect...
unreachable object num:0
garbage object num:0
#-----------------------------------------
结论:Python 的 gc 有比较强的功能,比如设置 gc.set_debug(gc.DEBUG_LEAK) 就可以进行循环引用导致的内存泄露的检查。如果在开发时进行内存泄露检查;在发布时能够确保不会内存泄露,那么就可以延长 Python 的垃圾回收时间间隔、甚至主动关闭垃圾回收机制,从而提高运行效率。
1.小块空间的内存池
在Python中,许多时候申请的内存都是小块的内存,这些小块内存在申请后,很快又会
被释放,由于这些内存的申请并不是为了创建对象,所以并没有对象一级的内存池机制。这就
意味着Python在运行期间会大量地执行malloc和free的操作,频繁地在用户态和核心态之间
进行切换,这将严重影响Python的执行效率。为了加速Python的执行效率,Python引入了一
个内存池机制,用于管理对小块内存的申请和释放。这也就是之前提到的Pymalloc机制.
2.在Python2.5中,Python内部默认的小块内存与大块内存的分界点定在256个字节,这个
分界点由前面我们看到的名为SMALL_REQUEST_THRESHOLD的符号控制。也就是说,当申
请的内存小于256字节时,PyObject_Malloc会在内存池中申请内存;当申请的内存大于256
字节时,PyObject_Malloc的行为将蜕化为malloc的行为。当然,通过修改Python源代码,我
们可以改变这个默认值,从而改变Python的默认内存管理行为。
3.在一个对象的引用计数减为0时,与该对象对应的析构函数就会被调用,但是要特别注意的是,调用析构函数并不意味着最终一定会调用free释放内存空间,如果真是这样的话,那频繁地申请、释放内存空间会使
Python的执行效率大打折扣(更何况
Python已经多年背负了人们对其执行效率的不满)。一般来说,
Python中大量采用了内存对象池的技术,使用这种技术可以避免频繁地申请和释放内存空间。因此在析构时,通常都是将对象占用的空间归还到内存池中。
"这个问题就是:
Python的arena从来不释放pool。这个问题为什么会引起类似于内存泄漏的现象呢。考虑这样一种情形,申请10*1024*1024个16字节的小内存,这就意味着必须使用160M的内存,由于
Python没有默认将前面提到的限制内存池的WITH_MEMORY_LIMITS编译符号打开,所以
Python会完全使用arena来满足你的需求,这都没有问题,关键的问题在于过了一段时间,你将所有这些16字节的内存都释放了,这些内存都回到arena的控制中,似乎没有问题。但是问题恰恰就在这时出现了。因为arena始终不会释放它维护的pool集合,所以这160M的内存始终被
Python占用,如果以后程序运行中再也不需要160M如此巨大的内存,
这点内存岂不是就浪费了?"
python内存管理规则:
del的时候,把list的元素释放掉,把管理元素的大对象回收到py对象缓冲池里.
mport time
def test():
for i in range ( 1000000 * 10 ):
del i
if ( __name__ == "__main__" ):
test()
while ( True ):
time.sleep( 1 )
观察mem:内存维持不变!
从这点可以猜测:python不是立即释放资源的.
个人测试代码:
-----------------------------------------------test0.py-------------------------------------
import time
def test():
for i in range ( 1000000 * 10 ):
del i
def test_2():
#i = range ( 1000000 * 10 )
#del i
pass
def test_3():
#i = "*" * ( 1000000 * 10 )
#del i
pass
if ( __name__ == "__main__" ):
for i in range( 10 ):
test()
test_2()
test_3()
time.sleep( 1 )
while ( True ):
time.sleep( 1 )
-----------------------------------------------------test0.py--------------------------------------
运行 python test0.py
"while ( True ):
time.sleep( 1 )
"
保证python不退出.
发现python的内存占用率为60%.
如何解决这个问题呢?看下面的:
-----------------------------------------------test1.py-------------------------------------
#coding=utf-8
import time
max_number = 1000000 * 10
def test_0():
for i in range ( max_number ):
del i
def test_1():
for i in range( 1000 ):
for i in range ( max_number / 1000 ):
del i
if ( __name__ == "__main__" ):
#test_0()#内存使用率占40%
test_1()#内存使用率占0.2%
print "---------------------"
while ( True ):
time.sleep( 1 )
-----------------------------------------------test1.py-------------------------------------
我想问题:问题也许解决了.
这就要看你的实际需求是什么了.
例如:
我做过一个爬虫程序,如果不断往这个线程里面传递url,那么这个线程不到一会就挂了.我的改进方法:就是控制这线程能够接受的url队列长度.以及其他的优化.
其实这个不是循环导致的内存被python持有,而是range( n )让python分配了很多的内存.退出test(),python回收内存,但是python并不释放了,而是让pool持有内存空间.
enum
Cairo::FontSlant
Enumerator:
| FONT_SLANT_NORMAL |
|
| FONT_SLANT_ITALIC |
|
| FONT_SLANT_OBLIQUE |
|
enum
Cairo::FontWeight
Enumerator:
| FONT_WEIGHT_NORMAL |
|
| FONT_WEIGHT_BOLD |
0
also:
cr.select_font_face("Droid Sans Bold") works! Strange!
本文假定读者使用Windows操作系统+JDK 1.4,其他平台和JDK版本应该也是八九不离十。
为了编译和运行SWT程序,我们有两种选择:1- 使用Eclipse SDK;2- 下载单独的SWT二进制文件和源文件。
随Eclipse SDK,我们可以在它的plugins目录下找到SWT的二进制文件,通常的目录名称是:org.eclipse.swt.win32_xxxx,后缀是版本号,在这个目录下有os和ws两个子目录,内容分别是SWT的JNI库和swt.jar。
如果不是使用Eclipse来开发,或者需要SWT的源文件,那么需要下载单独的SWT二进制和源文件包,在下面的地址可以找到:
http://mirror.pacific.net.au/eclipse/eclipse/downloads/drops/R-3.0.1-200409161125/swt-3.0.1-win32.zip
这个zip文件解包以后包含JNI库(一些DLL)和swt.jar,以及swtsrc.zip,这个swtsrc就是我们SWT的源文件了,包括C和Java的源代码。
为了运行SWT程序,我们需要首先编译我们SWT的代码,这个时候需要告诉编译器swt.jar的位置;编译成功以后,我们除了指明classpath包含swt.jar之外,需要在命令行告诉java.exe另一个参数,那就是java.library.path,看上去大概是这个样子:
java -cp %SWT_HOME%\swt.jar SimplestSWT -Djava.library.path=%SWT_HOME%
如果你使用的是Eclipse SDK 3.1M5a或者更新的版本,你可以直接右键.java文件选择Run As -> SWT Application,则不用在命令行写那么长的参数了。
比较有意思的是,我们可以在eclipse.org的SWT下载页面看到目前SWT支持的平台:
Windows 98/ME/2000/XP
Windows CE (ARM PocketPC)
Windows CE (ARM PocketPC, J2ME profile)
Linux (x86/Motif)
Linux (x86/GTK 2)
Linux (AMD 64/GTK 2)
Solaris 8 (SPARC/Motif)
QNX (x86/Photon)
AIX (PPC/Motif)
HP-UX (HP9000/Motif)
Mac OSX (Mac/Carbon)
呵呵,支持的平台虽然有限,不过还是蛮多了。
本文来自CSDN博客,转载请标明出处:http://blog.csdn.net/tiney/archive/2008/09/12/2916785.aspx
16位机器,c++,sizeof(int)=2byte长度
32位机器,c++,sizeof(int)=4byte长度
在C/C++中,当我们想知道一个对象或者一个原始数据类型所占用的内存大小时,只需简单调用
sizeof操作符即可,但是,在
java中是没有相应的操作符或者方法来直接完成相应功能的。
sizeof 在C/C++得到大量的运用,是程序员必不可少的工具之一,那么为什么
java却不提供呢?要回答这个问题,我们可以从另外一个角度来看,那就是为什么C/C++中要使用
sizeof。C中要使用
sizeof主要是因为C程序员要自己管理堆内存的分配和释放,在使用malloc来获取堆内存时,我们必须知道要创建的对象的具体大小,才能根据对象的具体大小从堆中分配相应大小的动态内存,而获取对象大小这个工作就是通过
sizeof来完成的。到了C++,我们可以使用操作符new来动态分配内存,这时,对于
sizeof的依赖也没有在C时代时那么严重了。在C++中保留
sizeof,主要是为了跟C保持兼容。说到这里,我们也可以明白为什么
java中为什么没有
sizeof了:
java中的内存管理任务直接交给了JVM,这比C++更为彻底。同时,
java是一个全新设计的完全面向对象语言,不存在C++向下兼容的问题,因此,
java中不存在类似
sizeof的操作符。(存在即合理,不存在也有它的道理:))。
但是,有些时候事情并不没有想象中那么简单。当我们用
Java编写应用程序时,虽然很多时候我们都不需要了解内存的使用情况,因为JVM已经帮我们照顾好这些珍贵的资源,但是,某些时候,譬如我们要编写一个性能监测工具或者在调试时我们需要知道某个对象所占用的内存大小的。怎么办呢?是不是很怀念我们的
sizeof呢。
不用担心,所谓天无绝人之路。如果我们使用的JDK的版本是5.0或以上,那么,我们可以使用新提供的Instrument包。通过这个包提供的接口和类,我们可以很容易获取一个对象实际占用的内存大小。Instrument的具体描述可以参看JDK文档,【1】提供了一个很好的例子。
但是,上述方法只能获取对象的占用内存的大小,对于int ,long等原始类型是没有办法得知其内存大小的。有的人可能会问,这些原始类型在
java的specification中定义好的吗?我们都知道,int用4个字节,long占用8个字节。对,
java规范是对原是类型的大小作出了定义,但是这仅仅是对该类型逻辑上所需的字节作出了规定,具体到每个JVM实现中用到的实际内存大小是没有限制的,我们完全可以实现一个JVM使用8个字节来保存一个int(不知道现在64位CPU机子上是不是使用8个字节(64位)来保存一个int,我这里没有机器可以进行试验)。因此,要知道一个原始类型到底占用多少内存,我们还需另外想办法。【2】【3】【4】【5】提供了相关的信息,有兴趣的朋友可以参考一下。这里,贴出各个基本类型所占用内存的实际大小,看跟你想象中是否一致。(from 【5】Sun JRE 1.4.2 Client Hotspot JVM on Windows)
| Type |
Size (bytes) |
| java.lang.Object |
8 |
| java.lang.Float |
16 |
| java.lang.Double |
16 |
| java.lang.Integer |
16 |
| java.lang.Long |
16 |
| java.math.BigInteger |
56 (*)
|
| java.lang.BigDecimal |
72 (*)
|
java.lang.String
|
2*(Length) + 38 ± 2
|
empty java.util.Vector
|
80
|
object reference
|
4
|
float array
|
4*(Length) + 14 ± 2
|