 2007年10月16日
http://ubuntu.dormforce.net/使用说明
打开Software Manager,点击Edit⇒Software Sources
在Download from中选择Other
选择China⇒mirrors.ustc.edu.cn
点击Choose Server
a wonderful Eclipse plugin:
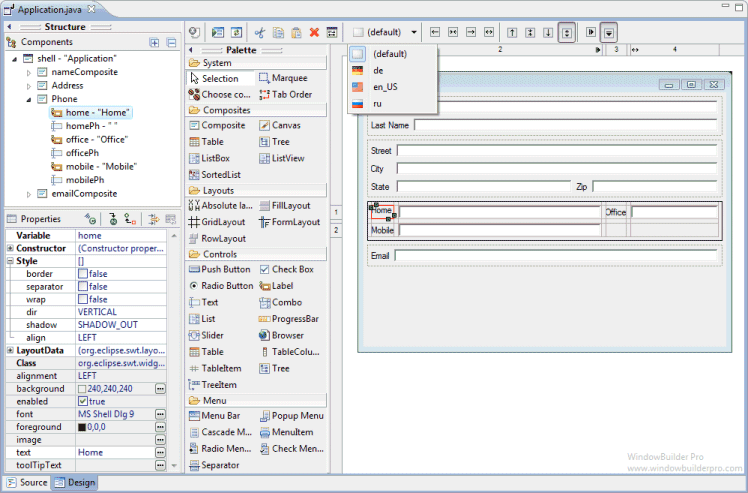
WindowBuilder, which can be used to develope Swing/SWT UI:
WindowBuilder is built as a plug-in to Eclipse and the various Eclipse-based IDEs (RAD, RSA, MyEclipse, JBuilder, etc.). The plug-in builds an abstract syntax tree (AST) to navigate the source code and uses GEF to display and manage the visual presentation.
Develop Java graphical user interfaces in minutes for Swing, SWT, RCP and XWT with WindowBuilder Pro's WYSIWYG, drag-and-drop interface. Use wizards, editors and intelligent layout assist to automatically generate clean Java code, with the visual design and source always in sync.
The project website: http://www.eclipse.org/windowbuilder/
To install the plugin in Eclipse: http://www.eclipse.org/windowbuilder/download.php

Example:
abc 1000 3452 2463 2343 2176 7654 3452 8765 5643 3452
abc 1000 3452 2463 2343 2176 7654 3452 8765 5643 3452
tas 3420 3562 2123 1343 2176 7654 3252 8765 5643 3452
aer 1000 3452 2463 2343 2176 7654 3452 8765 5643 3452
tas 3420 3562 2123 1343 2176 7654 3252 8765 5643 3452
UNIX:display the no of occurance and the record
> sort f1.txt|uniq -c
2 abc 1000 3452 2463 2343 2176 7654 3452 8765 5643 3452
1 aer 1000 3452 2463 2343 2176 7654 3452 8765 5643 3452
2 tas 3420 3562 2123 1343 2176 7654 3252 8765 5643 3452
display only the duplicate records
> sort f1.txt|uniq -dabc 1000 3452 2463 2343 2176 7654 3452 8765 5643 3452
tas 3420 3562 2123 1343 2176 7654 3252 8765 5643 3452
display distinct records
> sort f1.txt|uniqabc 1000 3452 2463 2343 2176 7654 3452 8765 5643 3452
aer 1000 3452 2463 2343 2176 7654 3452 8765 5643 3452
tas 3420 3562 2123 1343 2176 7654 3252 8765 5643 3452
Reference:
Shell: How To Remove Duplicate Text Lines
Windows:
Notepad++ can sort by line, and remove the duplicate lines at the same time.
- Open the menu under: TextFX-->TextFX Tools
Make sure "sort outputs only unique..." is checked
select a block of text (ctrl-a to select the entire document).
click "sort lines case sensitive" or "sort lines case insensitive"
1.安装JAVA环境
sudo apt-get install sun-java5-jre
2.下载tomcat: http://tomcat.apache.org/
3.解压tomcat
$sudo tar zxvf apache-tomcat-7.0.26.tar.gz -C /opt
$sudo mv /opt/apache-tomcat-7.0.26.tar.gz /opt/tomcat
4.启动tomcat
$sudo /opt/tomcat/bin/startup.sh
如果能看到下列提示,就表明启动成功了!
>Using CATALINA_BASE: /opt/tomcat
>Using CATALINA_HOME: /opt/tomcat
>Using CATALINA_TMPDIR: /opt/tomcat/temp
>Using JRE_HOME: /usr/lib/j2sdk1.5-sun
打开Firefox,在地址栏中输入http://localhost:8080,如果出来Tomcat的缺省界面,说明测试通过!
5.停止Tomcat服务
$sudo /opt/tomcat/bin/shutdown.sh
1.下载安装 RubyInstaller: http://rubyforge.org/frs/?group_id=167&release_id=46588
2. 检查 RubyGems 版本,须高于 1.3.6
gem -v
3.如果版本不是最新,可以通过下面的命令更新至最新版本:
gem update --system
gem uninstall rubygems-update
4.安装 Rails:
gem install rails
1.按照github上的指南配置(
http://help.github.com/win-set-up-git/)基础的git环境。
2.在github上创建一个Repository。
3.在Eclipse中通过“Eclipse Marketplaces”,在Market Places里安装egit。
4.在Eclipse中生public key, 并添加到GitHub Repository中。
Eclipse中通过:performance -> SSH2 -> Key Management -> Gernerate RSA Key 生成 SSH 的 public key。
在GitHub中通过:edit your profile -> ssh key -> Add SSH Key 添加SSH Key, 把上面生成的 public key 拷贝到这里,保存。
5.Eclipse里File菜单,Import,即可从git导入刚添加到git的项目了。
6.修改,并提交。在项目上点右键–>team–>commit。commit是commit到本机的git库,而push才是同步到github。
1.下载最新版 Eclipse:
官方下载:http://www.eclipse.org/downloads/
2.解压下载的压缩包:
$sudo tar xvfz eclipse-SDK-3.1.2-linux-gtk.tar.gz -C /opt
这个时候,就可以在 /opt 文件夹中看到出现了一个eclipse的文件夹,双击其中的eclipse文件就可以运行eclipse了。
3.在菜单设置Eclipse选项: $gedit ~/.local/share/applications/eclipse-user.desktop
插入一下内容:
[Desktop Entry]
Comment=Java IDE
Name=Eclipse
Exec=/opt/eclipse/eclipse
Encoding=UTF-8
Terminal=false
Type=Application
Categories=Application;Development;
Icon=/opt/eclipse/icon.xpm
方法1: 用SET PASSWORD命令
mysql -u root
mysql> SET PASSWORD FOR 'root'@'localhost' = PASSWORD('newpass');
方法2:用mysqladmin
mysqladmin -u root password "newpass"
如果root已经设置过密码,采用如下方法
mysqladmin -u root password oldpass "newpass"
方法3: 用UPDATE直接编辑user表
mysql -u root
mysql> use mysql;
mysql> UPDATE user SET Password = PASSWORD('newpass') WHERE user = 'root';
mysql> FLUSH PRIVILEGES;
方法4: 在丢失root密码的时候,可以这样
mysqld_safe --skip-grant-tables&
mysql -u root mysql
mysql> UPDATE user SET password=PASSWORD("new password") WHERE user='root';
mysql> FLUSH PRIVILEGES;
---------------------------------------
经测试,方法三修改成功,其他三种方法没有测试。
一.问题环境:
Eclipse3.4 + Tomcat6.0.20
二.问题现象:
在Eclipse下启动Tomcat6时,控制台会有下面警告信息
警告: [SetPropertiesRule]{Server/Service/Engine/Host/Context} Setting property 'source' to 'org.eclipse.jst.jee.server:...' did not find a matching property.
三.详细解决办法:
1.打开服务器视图:窗口 > 显示视图 > 服务器 > 服务器
2.双击服务器列表中的Tomcat,打开“服务器概述”窗口
3.选中"Publish module contexts to separate XML files"选项。
小提示:如果Tomcat处于启动状态,请先停止,否则,在保存服务器设置时,提示不能保存。
Here is a simple way to generate a analyze report by using FindBugs plugins in RSA:
- Using FindBugs to scan the code and save the result as XML file
- the XML report is in a bad format for reading, we can use XSL file to make it easy and clear to read:
<?xml version="1.0" encoding="UTF-8"?>
<?xml-stylesheet type="text/xsl" href="summary.xsl"?>
- Use Internet Explore to open the XML report, now we get a report:
Note: FindBugs provided following xsl files for different format: 1、default.xsl;
2、fancy.xsl;
3、fancy-hist.xsl;
4、plain.xsl;
5、summary.xsl;
摘要: GZIP
1. Compressing a File in the GZIP Format
2. Uncompressing a File in the GZIP Format
ZIP
1. Creating a ZIP File
2. Listing the Contents of a ZIP File
3. Retrieving a Compressed File from a ZIP File
阅读全文
摘要: 使用 JSEclipse,JavaScript 程序员现在有了自己的 Eclipse 插件,该插件将提供许多重要功能来辅助开发 JavaScript 应用程序。像 Eclipse 多年来为 Java™ 语言和其他语言提供了易用性一样,JSEclipse 为 JavaScript 开发人员提供了同样的优点。
阅读全文
分享一个不错的编写properties文件的Eclipse插件(plugin),有了它我们在编辑一些简体中文、繁体中文等
Unicode文本时,就不必再使用native2ascii编码了。您可以通过Eclipse中的软件升级(Software
Update)安装此插件,步骤如下:
1、展开Eclipse的Help菜单,将鼠标移到Software Update子项,在出现的子菜单中点击Find and Install;
2、在Install/Update对话框中选择Search for new features to install,点击Next;
3、在Install对话框中点击New Remote Site;
4、在New Update Site对话框的Name填入“PropEdit”或其它任意非空字符串,在URL中填入http://propedit.sourceforge.jp/eclipse/updates/;
5、在Site to include to search列表中,除上一步加入的site外的其它选项去掉,点击Finsih;
6、在弹出的Updates对话框中的Select the features to install列表中将所有结尾为“3.1.x”的选项去掉(适用于Eclipse 3.2版本的朋友);
7、点击Finish关闭对话框;
8、在下载后,同意安装,再按提示重启Eclipse,在工具条看到形似vi的按钮表示安装成功,插件可用。此时,Eclpise中所有properties文件的文件名前有绿色的P的图标作为标识。
摘要: 在Eclipse中遇到The type XXX cannot be resolved. It is indirectly referenced from required .class files错误.....,查找的解决办法如下:
阅读全文