Play是个Rails风格的Java Web框架,需要了解背景请看:
- Play Framework介绍1--主要概念
- Play Framework介绍2—Helloworld
如何调试请看此处。以下进入正题^_^
Server启动过程主要涉及三个地方:
- play.Play类:代表Play本身业务模型。
- play.server.Server类:负责服务器启动。
- play.classloading包:负责.java文件读取、编译和加载。
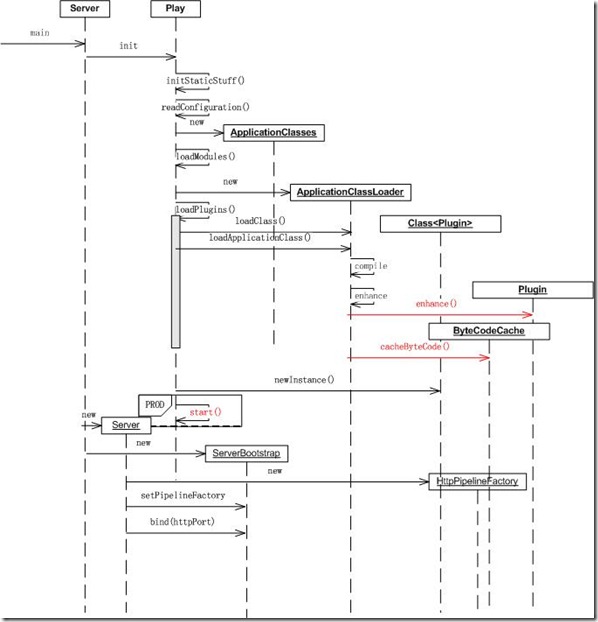
总体流程:

Server.main为入口方法:
public static void main(String[] args) throws Exception {

…

Play.init(root, System.getProperty("play.id", ""));

if (System.getProperty("precompile") == null) {

new Server();

} else {

Logger.info("Done.");

}

}
做两件事:
- Play.init
- 然后创建Server对象。
Play.init
public static void init(File root, String id) {


…


readConfiguration();


Play.classes = new ApplicationClasses();


…


// Build basic java source path

        VirtualFile appRoot = VirtualFile.open(applicationPath);

roots.add(appRoot);

javaPath = new ArrayList<VirtualFile>(2);

javaPath.add(appRoot.child("app"));

javaPath.add(appRoot.child("conf"));


// Build basic templates path

        templatesPath = new ArrayList<VirtualFile>(2);

templatesPath.add(appRoot.child("app/views"));


// Main route file

        routes = appRoot.child("conf/routes");


…


// Load modules

        loadModules();


…


// Enable a first classloader

        classloader = new ApplicationClassloader();


// Plugins

        loadPlugins();


// Done !

        if (mode == Mode.PROD ||preCompile() ) {

start();

}


…

}
主要做:
- 加载配置
- new ApplicationClasses();加载app、views和conf路径到VirtualFile中,VirtualFile是Play内部的统一文件访问接口,方便后续读取文件
- 加载route
- 加载Module,Play的应用扩展组件。
- 加载Plugin,Play框架自身的扩展组件。
- 工作在产品模式则启动Play.
关键步骤为new ApplicationClasses(),执行computeCodeHashe(),后者触发目录扫描,搜索.java文件。相关过程简化代码如下:
public ApplicationClassloader() {

super(ApplicationClassloader.class.getClassLoader());

// Clean the existing classes

        for (ApplicationClass applicationClass : Play.classes.all()) {

applicationClass.uncompile();

}

pathHash = computePathHash();

…

}
int computePathHash() {

StringBuffer buf = new StringBuffer();

for (VirtualFile virtualFile : Play.javaPath) {

scan(buf, virtualFile);

}

return buf.toString().hashCode();

}
  void scan(StringBuffer buf, VirtualFile current) {

if (!current.isDirectory()) {

if (current.getName().endsWith(".java")) {

Matcher matcher = Pattern.compile("\\s+class\\s([a-zA-Z0-9_]+)\\s+").matcher(current.contentAsString());

buf.append(current.getName());

buf.append("(");

while (matcher.find()) {

buf.append(matcher.group(1));

buf.append(",");

}

buf.append(")");

}

} else if (!current.getName().startsWith(".")) {

for (VirtualFile virtualFile : current.list()) {

scan(buf, virtualFile);

}

}

}
Start流程

简化代码如下:
public static synchronized void start() {

try {

...

// Reload configuration

            readConfiguration();


...


// Try to load all classes

            Play.classloader.getAllClasses();


// Routes

            Router.detectChanges(ctxPath);


// Cache

            Cache.init();


// Plugins

            for (PlayPlugin plugin : plugins) {

try {

plugin.onApplicationStart();

} catch(Exception e) {

if(Play.mode.isProd()) {

Logger.error(e, "Can't start in PROD mode with errors");

}

if(e instanceof RuntimeException) {

throw (RuntimeException)e;

}

throw new UnexpectedException(e);

}

}


...


// Plugins

            for (PlayPlugin plugin : plugins) {

plugin.afterApplicationStart();

}


} catch (PlayException e) {

started = false;

throw e;

} catch (Exception e) {

started = false;

throw new UnexpectedException(e);

}

}
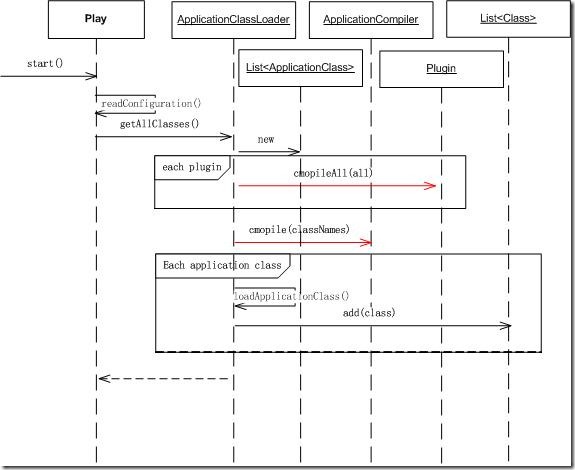
关键步骤为执行Play.classloader.getAllClasses()加载app目录中的类型。简化代码如下:
public List<Class> getAllClasses() {

if (allClasses == null) {

allClasses = new ArrayList<Class>();


if (Play.usePrecompiled) {

...

} else {

List<ApplicationClass> all = new ArrayList<ApplicationClass>();


// Let's plugins play

                for (PlayPlugin plugin : Play.plugins) {

plugin.compileAll(all);

}


for (VirtualFile virtualFile : Play.javaPath) {

all.addAll(getAllClasses(virtualFile));

}

List<String> classNames = new ArrayList<String>();

for (int i = 0; i < all.size(); i++) {

if (all.get(i) != null && !all.get(i).compiled) {

classNames.add(all.get(i).name);

}

}


Play.classes.compiler.compile(classNames.toArray(new String[classNames.size()]));


for (ApplicationClass applicationClass : Play.classes.all()) {

Class clazz = loadApplicationClass(applicationClass.name);

if (clazz != null) {

allClasses.add(clazz);

}

}

...

}

}

return allClasses;

}
主要步骤:
- plugin.compileAll,给所有plugin一次机会进行自定义编译。
- Play.classes.compiler.compile(classNames.toArray(new String[classNames.size()]));编译所有.java文件。编译后的.class存储在ApplicationClass中。内部使用了eclipse的JDT编译器。
- loadApplicationClass,取出ApplicationClass中的.class加入List中返回。
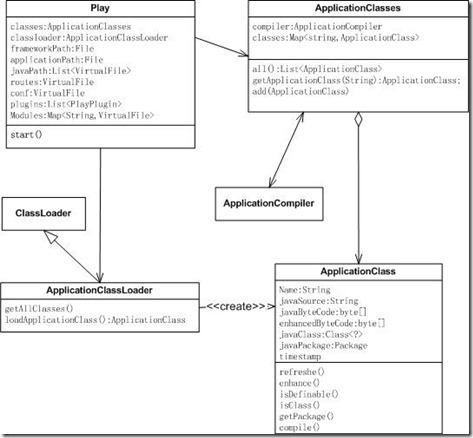
到此完成.java的加载。相关对象关系如下图:

接着new Server()启动HTTP服务,监听请求
简化代码如下:
public Server() {

...

if (httpPort == -1 && httpsPort == -1) {

httpPort = 9000;

}

...

InetAddress address = null;

try {

if (p.getProperty("http.address") != null) {

address = InetAddress.getByName(p.getProperty("http.address"));

} else if (System.getProperties().containsKey("http.address")) {

address = InetAddress.getByName(System.getProperty("http.address"));

}


} catch (Exception e) {

Logger.error(e, "Could not understand http.address");

System.exit(-1);

}


ServerBootstrap bootstrap = new ServerBootstrap(new NioServerSocketChannelFactory(

Executors.newCachedThreadPool(), Executors.newCachedThreadPool())

);

try {

if (httpPort != -1) {

bootstrap.setPipelineFactory(new HttpServerPipelineFactory());

bootstrap.bind(new InetSocketAddress(address, httpPort));

bootstrap.setOption("child.tcpNoDelay", true);


if (Play.mode == Mode.DEV) {

if (address == null) {

Logger.info("Listening for HTTP on port %s (Waiting a first request to start) ...", httpPort);

} else {

Logger.info("Listening for HTTP at %2$s:%1$s (Waiting a first request to start) ...", httpPort, address);

}

} else {

if (address == null) {

Logger.info("Listening for HTTP on port %s ...", httpPort);

} else {

Logger.info("Listening for HTTP at %2$s:%1$s  ...", httpPort, address);

}

}


}


} catch (ChannelException e) {

Logger.error("Could not bind on port " + httpPort, e);

System.exit(-1);

}

...

}
主要步骤:
- 设置端口,地址
- new ServerBootstrap,创建jboss netty服务器。Play1.1.1使用了netty作为底层通讯服务器。
- new HttpServerPipelineFactory(),设置netty所需的请求处理管道工厂。它负责当请求到达时提供处理者。
- bootstrap.bind(new InetSocketAddress(address, httpPort),绑定地址,端口。
到此万事具备,只等东风了…