Posted on 2012-06-04 17:36
IceWee 阅读(33030)
评论(22) 编辑 收藏 所属分类:
Java 、
Tomcat

SSL——Secure Sockets Layer双向认证(个人理解):
客户端认证:
客户端通过浏览器访问某一网站时,如果该网站为HTTPS网站,浏览器会自动检测系统中是否存在该网站的信任证书,如果没有信任证书,浏览器一般会拒绝访问,IE会有一个继续访问的链接,但地址栏是红色,给予用户警示作用,即客户端验证服务端并不是强制性的,可以没有服务端的信任证书,当然是否继续访问完全取决于用户自己。如何去除地址栏的红色警告呢?后续会介绍导入服务端证书到浏览器的方法。
服务端认证:
服务端需要获取到客户端通过浏览器发送过来的认证证书,该证书在服务端的证书库中已存在,仅仅是个匹配过程,匹配成功即通过认证,可继续访问网站资源,反之则无法显示网页,后续有截图。
基本逻辑:
1、生成服务端密钥库并导出证书;
2、生成客户端密钥库并导出证书;
3、根据服务端密钥库生成客户端信任的证书;
4、将客户端证书导入服务端密钥库;
5、将服务端证书导入浏览器。
构建演示系统
演示环境:
JDK:1.6.0_32
Tomcat:apache-tomcat-7.0.27
开发工具:MyEclipse 10
浏览器:Internet Explorer 9
一、生成密钥库和证书
可参考以下密钥生成脚本,根据实际情况做必要的修改,其中需要注意的是:服务端的密钥库参数“CN”必须与服务端的IP地址相同,否则会报错,客户端的任意。
key.script
 1、生成服务器证书库
keytool -validity 365 -genkey -v -alias server -keyalg RSA -keystore E:\ssl\server.keystore -dname "CN=127.0.0.1,OU=icesoft,O=icesoft,L=Haidian,ST=Beijing,c=cn" -storepass 123456 -keypass 123456
2、生成客户端证书库
keytool -validity 365 -genkeypair -v -alias client -keyalg RSA -storetype PKCS12 -keystore E:\ssl\client.p12 -dname "CN=client,OU=icesoft,O=icesoft,L=Haidian,ST=Beijing,c=cn" -storepass 123456 -keypass 123456
3、从客户端证书库中导出客户端证书
keytool -export -v -alias client -keystore E:\ssl\client.p12 -storetype PKCS12 -storepass 123456 -rfc -file E:\ssl\client.cer
4、从服务器证书库中导出服务器证书
keytool -export -v -alias server -keystore E:\ssl\server.keystore -storepass 123456 -rfc -file E:\ssl\server.cer
5、生成客户端信任证书库(由服务端证书生成的证书库)
keytool -import -v -alias server -file E:\ssl\server.cer -keystore E:\ssl\client.truststore -storepass 123456
6、将客户端证书导入到服务器证书库(使得服务器信任客户端证书)
keytool -import -v -alias client -file E:\ssl\client.cer -keystore E:\ssl\server.keystore -storepass 123456
7、查看证书库中的全部证书
keytool -list -keystore E:\ssl\server.keystore -storepass 123456二、Tomat配置
使用文本编辑器编辑${catalina.base}/conf/server.xml
找到Connector port="8443"的标签,取消注释,并修改成如下:
<Connector port="8443" protocol="org.apache.coyote.http11.Http11NioProtocol" SSLEnabled="true"
maxThreads="150" scheme="https" secure="true"
clientAuth="true" sslProtocol="TLS"
keystoreFile="${catalina.base}/key/server.keystore" keystorePass="123456"
truststoreFile="${catalina.base}/key/server.keystore" truststorePass="123456"/> 备注:
keystoreFile:指定服务器密钥库,可以配置成绝对路径,如“D:/key/server.keystore”,本例中是在Tomcat目录中创建了一个名称为key的文件夹,仅供参考。
keystorePass:密钥库生成时的密码
truststoreFile:受信任密钥库,和密钥库相同即可
truststorePass:受信任密钥库密码
三、建立演示项目
项目结构图:
项目名称:SSL(随意)
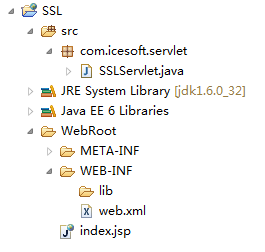
SSLServlet.java
package com.icesoft.servlet;
import java.io.IOException;
import java.io.PrintWriter;
import java.security.cert.X509Certificate;
import javax.servlet.ServletException;
import javax.servlet.http.HttpServlet;
import javax.servlet.http.HttpServletRequest;
import javax.servlet.http.HttpServletResponse;

 /** *//**
 * <p>
* <p>
* SSL Servlet
* </p>
*
* @author IceWee
* @date 2012-6-4
* @version 1.0
 */
*/
public class SSLServlet extends HttpServlet  {
{
private static final long serialVersionUID = 1601507150278487538L;
private static final String ATTR_CER = "javax.servlet.request.X509Certificate";
private static final String CONTENT_TYPE = "text/plain;charset=UTF-8";
private static final String DEFAULT_ENCODING = "UTF-8";
private static final String SCHEME_HTTPS = "https";
public void doGet(HttpServletRequest request, HttpServletResponse response)

 throws ServletException, IOException {
response.setContentType(CONTENT_TYPE);
response.setCharacterEncoding(DEFAULT_ENCODING);
PrintWriter out = response.getWriter();
X509Certificate[] certs = (X509Certificate[]) request.getAttribute(ATTR_CER);
if (certs != null) {
int count = certs.length;
out.println("共检测到[" + count + "]个客户端证书");
for (int i = 0; i < count; i++) {
out.println("客户端证书 [" + (++i) + "]: ");
out.println("校验结果:" + verifyCertificate(certs[--i]));
out.println("证书详细:\r" + certs[i].toString());
 }
}
} else {
if (SCHEME_HTTPS.equalsIgnoreCase(request.getScheme())) {
out.println("这是一个HTTPS请求,但是没有可用的客户端证书");
} else {
out.println("这不是一个HTTPS请求,因此无法获得客户端证书列表 ");
}
}
out.close();
}
public void doPost(HttpServletRequest request, HttpServletResponse response)
throws ServletException, IOException {
doGet(request, response);
}
/** *//**
* <p>
* 校验证书是否过期
* </p>
*
* @param certificate
* @return
*/
private boolean verifyCertificate(X509Certificate certificate) {
boolean valid = true;
try {
certificate.checkValidity();
} catch (Exception e) {
e.printStackTrace();
valid = false;
}
return valid;
}
}
web.xml
说明:该演示项目强制使用了SSL,即普通的HTTP请求也会强制重定向为HTTPS请求,配置在最下面,可以去除,这样HTTP和HTTPS都可以访问。
<?xml version="1.0" encoding="UTF-8"?>
<web-app version="3.0"
xmlns="http://java.sun.com/xml/ns/javaee"
xmlns:xsi="http://www.w3.org/2001/XMLSchema-instance"
xsi:schemaLocation="http://java.sun.com/xml/ns/javaee
http://java.sun.com/xml/ns/javaee/web-app_3_0.xsd">
<display-name>Secure Sockets Layer</display-name>
<servlet>
<servlet-name>SSLServlet</servlet-name>
<servlet-class>com.icesoft.servlet.SSLServlet</servlet-class>
</servlet>
<servlet-mapping>
<servlet-name>SSLServlet</servlet-name>
<url-pattern>/sslServlet</url-pattern>
</servlet-mapping>
<welcome-file-list>
<welcome-file>index.jsp</welcome-file>
</welcome-file-list>
<!-- 强制SSL配置,即普通的请求也会重定向为SSL请求 -->
<security-constraint>
<web-resource-collection>
<web-resource-name>SSL</web-resource-name>
<url-pattern>/*</url-pattern><!-- 全站使用SSL -->
</web-resource-collection>
<user-data-constraint>
<description>SSL required</description>
<!-- CONFIDENTIAL: 要保证服务器和客户端之间传输的数据不能够被修改,且不能被第三方查看到 -->
<!-- INTEGRAL: 要保证服务器和client之间传输的数据不能够被修改 -->
<!-- NONE: 指示容器必须能够在任一的连接上提供数据。(即用HTTP或HTTPS,由客户端来决定)-->
<transport-guarantee>CONFIDENTIAL</transport-guarantee>
</user-data-constraint>
</security-constraint>
</web-app> index.jsp
<%@ page language="java" pageEncoding="UTF-8"%>
<!DOCTYPE HTML PUBLIC "-//W3C//DTD HTML 4.01 Transitional//EN">
<html>
<head>
<title>客户端证书上传</title>
<meta http-equiv="pragma" content="no-cache">
<meta http-equiv="cache-control" content="no-cache">
<meta http-equiv="expires" content="0">
</head>
<body>
<form action="${pageContext.request.contextPath}/sslServlet" method="post">
<input type="submit" value="提交证书"/>
</form>
</body>
</html> 四、演示及配置
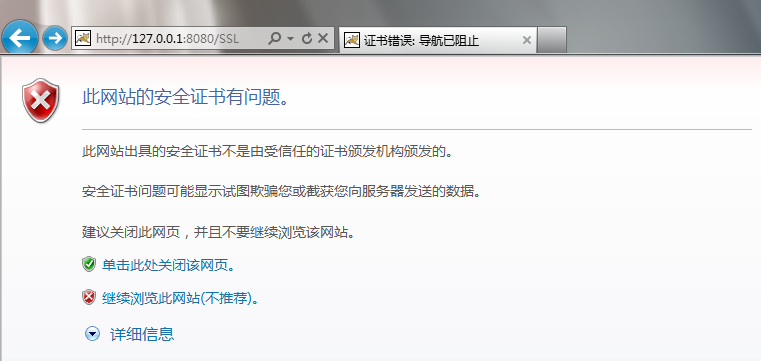
发布演示项目,通过浏览器访问:
http://127.0.0.1:8080/SSL或
https://127.0.0.1:8443/SSL,得到相同的结果,如图:


得到如上结果的原始是因为客户端没有通过服务端的安全认证,接下来将服务端给客户端颁发的证书导入到浏览器中:
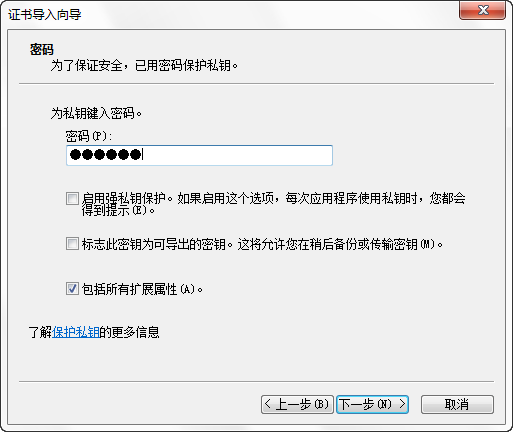
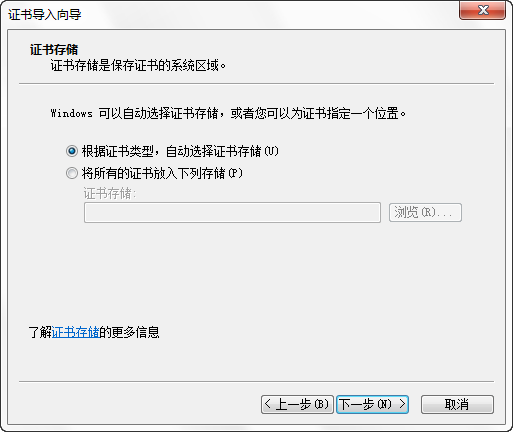
双击“client.p12”

弹出窗口,下一步

默认,下一步

输入生成密钥时的密码“123456”,下一步
下一步
完成
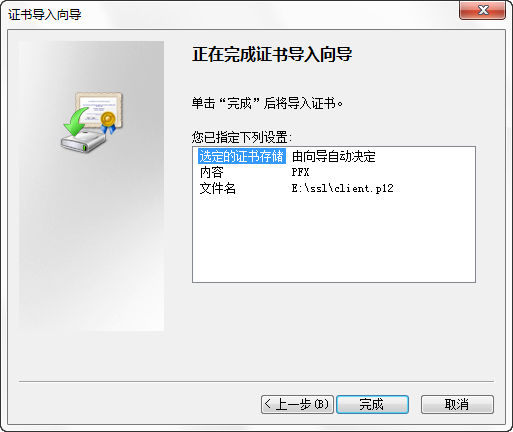
成功

再次访问
http://127.0.0.1:8080/SSL或
https://127.0.0.1:8443/SSL,弹出提示框:
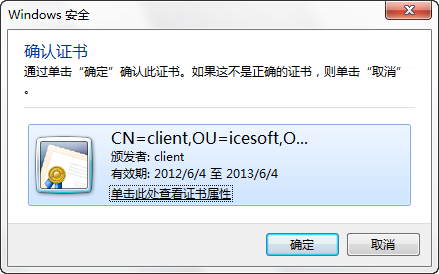
点击确定后,IE浏览器自动阻止了继续访问,并给予警告提示,原因是浏览器中未导入该网站的可信证书

点击“继续浏览此网站”,弹出提示,点击确定

哇!鲜红的地址栏,够醒目吧!你访问的网站不安全那,亲!
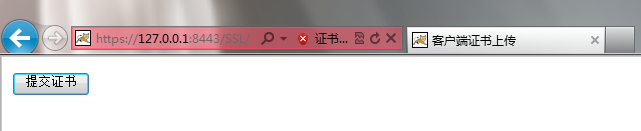
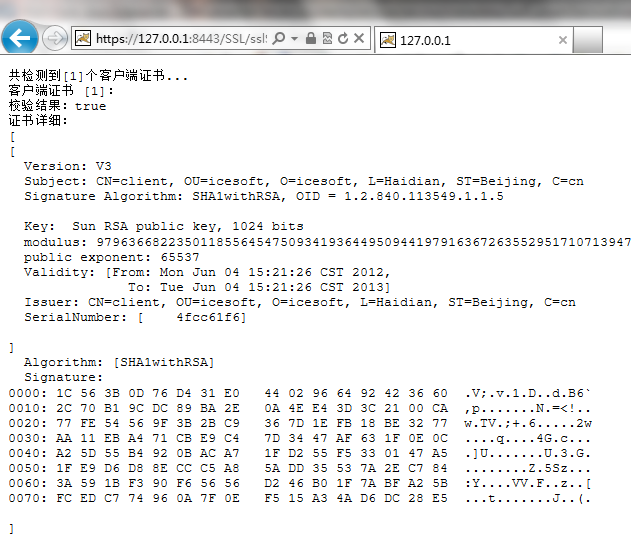
点击“提交证书”按钮,返回正确结果!
可以看出,客户端并没有服务端那么严格,只要未通过验证就甭想访问,下面将服务端生成的信任证书导入到浏览器的根证书中,这样红色的地址栏就会消失了!
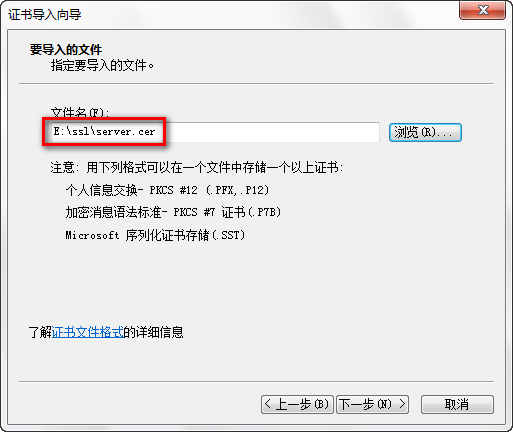
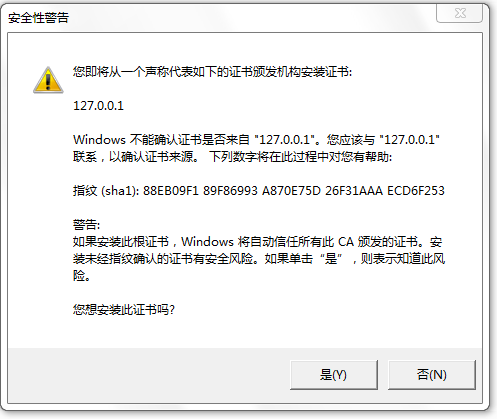
开始导入服务端信任证书,不能双击“server.cer”,需要手动导入到受信任的根证书机构中去。

浏览器Internet选项-内容-证书
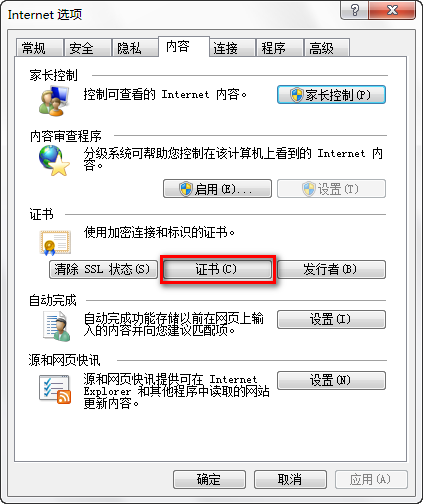
点击“受信任的根证书颁发机构”
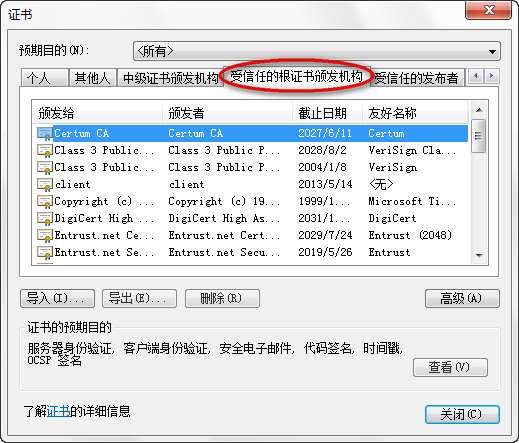
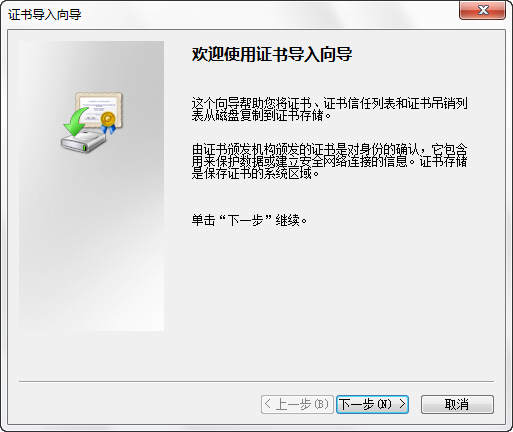
点击“导入”

下一步
手动选择“server.cer”,下一步
下一步
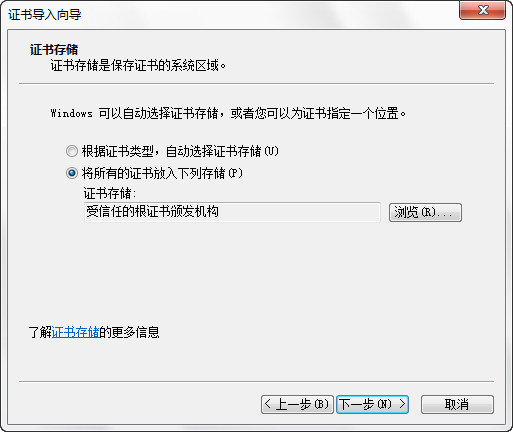
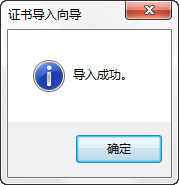
完成

点“是”
成功
可以看到我们刚刚导入的根证书

把所有浏览器窗口都关掉,再次访问网站,发现鲜红色已经逝去
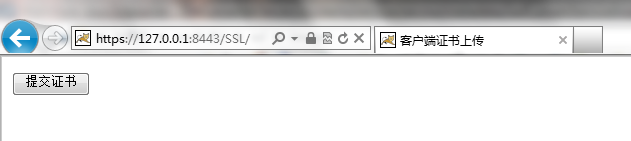
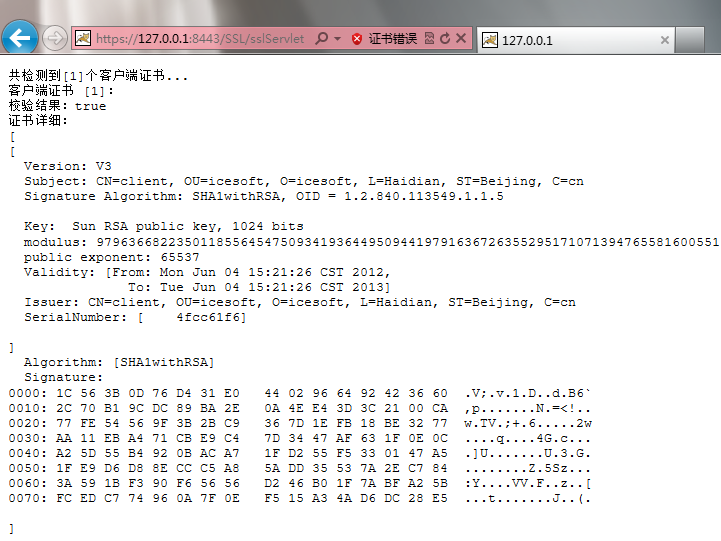
点击“提交证书”按钮,一切正常了,双向认证的DEMO结束了!
全文完!