Chapter 2. Getting Started(入门指南)
Table of Contents
- Demo setup(安装演示)
- Example projects in the workspace(工作区里的示例项目)
- Library dependencies(库依赖)
- Eclipse setup(Eclipse下的安装)
- Inspecting the database(检查数据库)
Demo setup(安装演示)
Setup is an ant script located in directory setup that helps you get up and running with Activiti quickly.
安装是一个放置在目录里的脚本。它帮助用户快速建立并运行Activiti。
To run the script, you'll need a working Java runtime and Ant installation. Also make sure that the JAVA_HOME and ANT_HOME system variables are correctly set. The way to do this depends on your operating system, but the manual of ant gives a description on how to do this. The demo setup script is tested with Ant 1.7.1.
为了运行脚本,需要一个可以工作的安装。也要确保JAVA_HOME 和 ANT_HOME系统变量设置正确。虽然具体的设置方式根据操作系统不同而相异,但是为如何完成这些设置提供了描述。演示安装脚本在下测试通过。
To configure setup for your environment, update property files build.properties and build.{your-database}.properties . Check those files for more information on configurable properties and potential values.
为了针对你的环境配置安装,请更新属性文件build.properties 和 build.{your-database}.properties。为了获取更多可配置属性和潜在的值的信息,请仔细检查这些文件。
The easiest target to get started is open a command prompt in de setup folder and type:
入门最容易的目标是在setup文件夹打开一个命令提示并键入:
ant demo.start
This target will start tomcat and if you're using h2, it will also start the h2 database. The first time when that is executed, it will also perform the installation:
这个目标将启动Tomcat。如果正在使用H2数据库,它也将启动H2数据库。若是第一次执行安装,它也将执行下列安装:
-
(*) Build the webapps. All libraries are stored in ${actviti.home}/setup/files/dependencies/libs The webapps without the libs are stored in ${actviti.home}/setup/files/webapps. Building the webapps means that webapps are combined with the necessary libraries in ${actviti.home}/setup/build/webapps
(*)构建webapps。所有的库保存在${actviti.home}/setup/files/dependencies/libs。没带库的保存在${actviti.home}/setup/files/webapps。构建意味着在组合webapp和必须的库在${actviti.home}/setup/build/webapps目录里。
-
(*) Install the H2 in ${activiti.home}/apps/h2. This only happens if you're using h2 as your database. H2 is the default database.
(*) 将H2安装至目录里。只是采用H2数据库时才发生。H2是缺省的数据库。
-
Start the H2 database. Again, this is only done if using h2 as the database. If you're using a different database it is assumed that it is already up and running.
启动H2数据库。对了,如果采用H2数据库时,才完成这一步。如果采用不同的数据库,那么假定数据库已经启动并运行了。
-
(*) Create the Activiti tables in the database
(*) 在数据库里建立Activiti库表
-
(*) Insert the demo users and groups in the Activiti identity tables (see below)
(*) 将示例用户和组插入到 Activiti identity表(见下)。
-
(*) Deploy the example processes to the Activiti Engine DB
(*) 将示例流程部署至Activiti Engine DB。
-
(*) Download Tomcat if not available in the ${downloads.dir}
(*) 如果在目录里面没有Tomcat,就下载Tomcat
-
(*) Install Tomcat in ${activiti.home}/apps/apache-tomcat-${tomcat.version}
(*) 将Tomcat安装至${activiti.home}/apps/apache-tomcat-${tomcat.version}
-
(*) Create an Activiti configuration jar
建立一个 Activiti 配置jar包
-
(*) Deploy the REST interface webapp into tomcat
(*)部署REST接口webapp值Tomcat
-
(*) Download the Activiti Modeler webapp to ${activiti.home}/webapps
(*) 将Activiti Modeler webapp下载至${activiti.home}/webapps目录。
-
(*) Deploy the Probe, Explorer and Modeler webapps into tomcat.
(*) 将Probe, Explorer and Modeler webapps部署至Tomcat。
-
Start tomcat
启动Tomcat
(*) only performed the first time when running ant demo.start
After running this target H2 and Tomcat will be running in the background. To stop those processes run ant demo.stop.
The other targets in that build script can also be called individually and they will take the configurable properties into account. Run ant -p for more details.
在运行目标H2之后,Tomcat将在后台运行。为了停止这些进程,请运行 ant demo.stop。在构建脚本里的其它目标也能够单个调用。它们将考虑考虑可配置属性。详情可以运行ant -p 得到。
These are the demo users:
这些事示例用户:
Table 1.1. The demo users(示例用户)
UserId
Password
Security roles
kermit
kermit
admin
gonzo
gonzo
manager
fozzie
fozzie
user
Now you can access following web applications:
现在,你能访问下列web 应用程序:
Table 1.2. The webapp tools(webapp工具)
Webapp Name
URL
Description
Activiti Probe
http://localhost:8080/activiti-probe
The admin management console. Use this tool to see if the configured process engine is correctly initialized, DB tables contents.
Activiti Explorer
http://localhost:8080/activiti-explorer
The process engine user console. Use this tool to view your personal and candidate task lists and to complete tasks.
Activiti Cycle
http://localhost:8080/activiti-cycle
The process cycle layer. Use this to browse repositories, execute transformations between model formats.
Activiti Modeler powered by Signavio
http://localhost:8080/activiti-modeler
The web based process designer tool. Use this tool to graphically author BPMN 2.0 compliant process definitions files.
Note that the Activiti demo setup is a way of showing the capabilities and functionality of Activiti as easy and as fast as possible. This does however, not mean that it is the only way of using Activiti. As Activiti is 'just a jar', it can be embedded in any Java environment: with swing or on a Tomcat, JBoss, WebSphere, etc. Or you could very well choose to run Activiti as a typical, standalone BPM server. If it is possible in Java, it is possible with Activiti!
注意Activiti示例安装时为了尽快,尽容易展现Activiti功能和能力的一种方式。但是这并不意味着这是采用Activiti的唯一方式。Activiti只是一个jar包,它可以嵌入到任何Java环境:Swing或者Tomcat,JBoss,WebSphere等等。或者你能选择将Activiti作为一个典型的,独立的BPM服务器。Java若在,Activiti就在!
Example projects in the workspace(工作区里的示例项目)
The distribution contains a workspace directory containing a couple of example java projects:
发行包包含一个许多java项目的工作区目录。
-
activiti-engine-examples: This set of examples show the most common usage of Activiti: BPMN process definitions and process executions are stored in a DB and the examples make use of the persistent API.
This project contains the eclipse project files, an ant build file and a maven pom file. The ant build file is independent of the maven pom. Both are there to show how you can use ant and maven respectively for building and deploying processes as part of your build.
activiti-engine-examples: 把这一系列示例展示了Activiti的通用用法:保存在DB里的BPMN流程定义和流程执行。还有持久化API使用的示例。
这个项目包含了eclipse的项目文件,一个ant构建文件和一个maven pom文件。ant 构建文件和maven pom文件相互独立。作为你的构建部分,为了构建和部署流程,两者展示了能够使用ant和maven进行构建。
-
activiti-spring-examples: These examples show how you can use the Activiti Engine in a Spring environment.
activiti-spring-examples: 这些示例展示在Spring环境下如何使用Activiti引擎。
-
activiti-groovy-examples: These examples show the library dependencies for groovy and an example process with groovy scripting.
activiti-groovy-examples: dd这些示例展示了groovy的依赖库和用groovy脚本处理的示例流程。
-
activiti-jpa-examples: These examples show library dependencies and how you can work with JPA in Activiti.
activiti-jpa-examples: 这些示例展示了JPA的依赖库,以及在Activiti里采用JPA是如何工作的。
-
activiti-cycle-examples: This is a project containing an demo example project for Activiti Cycle
activiti-cycle-examples: 这是一个包含针对Activiti Cycle的示例项目。
-
activiti-modeler-examples: This is a file based model repository to which the Activiti Modeler is configured in the demo setup.
activiti-modeler-examples:
activiti-modeler-examples: 这是一个在示例安装里配置Activiti Modeler所需的基于模型的仓库。
the section called “Eclipse setup(Eclipse下的安装)” shows how you can set up your eclipse environment to play with these example projects.
the section called “Eclipse setup(Eclipse下的安装)” 展示了如何安装eclipse环境来熟悉这些示例项目。
As part of the demo.start, the examples will be inflated. This means that all the libs and configuration files will be put in place. If you don't run the demo.start and you want to inflate the examples with libs in the appropriate place, run this command in the setup directory:
作为 demo.start的部分,将展开这些事例。 这意味着所有的库和配置文件将安置就位。如果不运行demo.start而将示例和库展开到合适的位置,运行安装目录下的这个命令:
ant inflate.examples
Once you've done that the activiti-engine-examples and activiti-spring-examples will contain libs-runtime and libs-test directories containing the runtime dependency jars and test time dependency jars respectively.
一旦完,将包含 activiti-engine-examples 成activiti-spring-examples目录。这些目录相应地包含而来运行时所依赖的jar包和测试时依赖的jar包。
Library dependencies(库依赖)
In order to prevent that the distribution file becomes too big by libraries that are included multiple times, all the libraries are grouped into a single directory somewhere in the setup/files.
吧为了防止由于库包含多次而使发布文件变得太大,所有的库被分组到setup/files下单个的目录。
The ant scripts in the setup/build.xml can inflate the examples (target inflate.examples) with the libs and they will include the appropriate libs when building the webapps.
在 setup/build.xml文件里面的ant 脚本能够展开示例 (target inflate.examples) 及其库。当构建webapp时,它们将包含合适的库。
All the libs are located in setup/files/dependencies/libs And the following files in setup/files/dependencies describe the library dependencies:
所有库放置在 setup/files/dependencies/libs ,并且在setup/files/dependencies 目录里下列文件描述了库依赖:
-
libs.engine.runtime.txt: The library runtime dependencies to run the Activiti Engine.
libs.engine.runtime.txt: 运行Activiti引擎的运行时依赖库。
-
libs.engine.runtime.test.txt: The libraries that need to be added to the ones in libs.engine.runtime.txt to run the tests
libs.engine.runtime.test.txt: 为了运行测试,需要加入到libs.engine.runtime.txt 的库
-
libs.engine.runtime.feature.groovy.txt: The libraries that need to be added to the ones in libs.engine.runtime.txt to use the groovy scripting capabilities.
libs.engine.runtime.feature.groovy.txt: 为了使用groovy脚本能力,需要加入到libs.engine.runtime.txt 的库。
-
libs.engine.runtime.txt: The libraries that need to be added to the ones in libs.engine.runtime.txt to use the JPA variable reference capabilities.
libs.engine.runtime.txt: 为了使用JPA变量引用能力,需要加入到libs.engine.runtime.txt 的库。
-
libs.spring.runtime.txt: The library runtime dependencies to run the Activiti Engine in a Spring environment. (This list includes the libs in libs.engine.runtime.txt)
libs.spring.runtime.txt: 在Spring环境下运行Activiti引擎的运行期依赖库。(这个列表包含了libs.engine.runtime.txt)
-
libs.spring.runtime.test.txt: The libraries that need to be added to the ones in libs.spring.runtime.txt to run tests in a Spring environment
libs.spring.runtime.test.txt: 在Spring环境下,为了测试,需要加入到libs.spring.runtime.txt 下的库。
-
libs.cycle.runtime.test.txt, libs.webapp.rest.txt and libs.webapp.ui.txt: The full list of libraries dependencies for the respective components cycle, the rest webapp and the UI webapps like Activiti Explorer, Activiti Probe and Activiti Cycle
libs.cycle.runtime.test.txt, libs.webapp.rest.txt和 libs.webapp.ui.txt: 相关组件cycle,rest webapp和像Activiti Explorer, Activiti Probe 和 Activiti Cycle之类的UI Webapp所需依赖库的全部列表。
Eclipse setup(Eclipse下的安装)
To run and play with the examples in your eclipse, follow these simple instructions:
为了在eclipse里运行示例,遵从这些简单的指令:
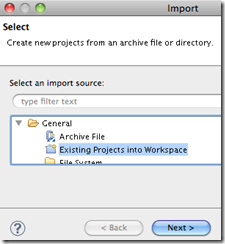
File --> Import...
File --> Import...

Select General --> Existing Projects into Workspace and click Next
选择 General --> Existing Projects into Workspace并点击Next

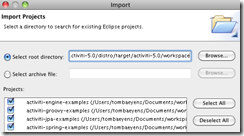
Click 'Browse...', select the directory ${activiti.home}/workspace and you'll see the example projects being automatically selected.
点击 'Browse...',选择目录 ${activiti.home}/workspace ,那么将自动选择示例项目。
Then you can click Finish in the Import dialog and you're all set.
吧然后你在输出对话框能点击按钮,所有都设置好了。
For more convenience, open the ant view (Window --> Show View --> Ant) and drag the file activiti-engine-examples/build.xml into the ant window. Now you'll be able to activate the build targets by just double clicking on them.
为了更加方便起见,打开ant视图(Window --> Show View --> Ant)并将文件拽至ant窗口。通过在它们上面双击,现在你能激活构建目标。
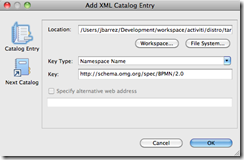
If you want BPMN 2.0 XML auto-completion and validation while typing, you can add the BPMN 2.0 XML Schema to the XML catalog. Go to Preferences --> XML --> XML Catalog --> Add, and select the XML Schema from the file system in the folder docs/xsd/BPMN20.xsd.
如果你想当输入时,BPMN 2.0 XML自动完成和校验,可以将BPMN 2.0 XML Schema 加入到XML分类里面。导航至Preferences --> XML --> XML Catalog --> Add,从文件系统里的文件夹里的docs/xsd/BPMN20.xsd选择XML Schema。

Inspecting the database(检查数据库)
To check out the database while trying out the demo setup, run the following Ant target in the setup folder:
当尝试示例安装时,为了检查数据库,运行在文件夹下的Ant目标:
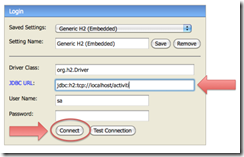
ant h2.console.start
This will boot the H2 web console. Note that the Ant target doesn't return, so a 'CTRL + C' is required to shutdown the console. Fill in the following URL in the JDBC URL field and click connect:
这将引导H2 Web控制台。注意Ant 目标并不返回,所以为了关闭控制台,需要键入'CTRL + C'。在 JDBC URL字段里填入URL,并点击“connect”:
jdbc:h2:tcp://localhost/activiti

You are now able to browse the Activiti database schema and check the content of the tables.
现在你能浏览Activiti数据库结构并检查数据库表里面的内容。
To change the database, see ???
为了改变数据库,参见 ???。